Technical Details
System Requirements
To install LOGINventory you need administrative rights on a by Microsoft supported version of Windows. In principle, no Windows Server operating system is required, but recommended for productive operation.
On the hardware side, we recommend at least four logical processors, at least 8 GB RAM, and an SSD.
LOGINventory requires an existing Microsoft Net Framework 4.8 and a Microsoft SQL Server 2012 SP4 database or higher.
Info
A preconfigured Microsoft SQL Server 2025 Express Edition is already included in the setup of LOGINventory. It can be used for productive operation up to approx. 1000 assets due to the 10 GB database limit.
Of course, you can also use existing databases that meet these minimum requirements (see Database configuration).
LOGINventory Server
Hardware
- Microsoft .Net Framework 4.8 compatible PC with 4 or more logical processors
- 4 GB RAM
- 10 GB available hard disk space (preferably SSD)
Operating System
- Windows 10 (x64)
- Windows 11
- Windows Server 2016
- Windows Server 2019
- Windows Server 2022
- Windows Server 2025
Software
- Microsoft .NET Framework 4.8
- Visual C++ Redistributable for Visual Studio 2015-2022 x64
- Microsoft PowerShell 4.0 or later
Infrastructure
Database
The database can be located on the same machine as the LOGINventory installation, or on a different machine.
- Minimum: Microsoft SQL Server 2012 SP4 or later (all editions)
- Recommended: Microsoft SQL Server 2016 or later (all editions)
- LOGINventory Database (included): Microsoft SQL Server Express Edition 2025
Tip
With a Microsoft SQL Server 2016 or newer, significant performance improvements can be expected when calculating the topology. This is especially relevant for larger databases.
PC with Portable Version
For machines running the portable LMC, the same requirements apply as for the machine running the LOGINventory installation. In addition, ports 1433 (TCP) and 1434 (UDP) on the LOGINventory machine must be open for the remote machine.
Device Accessing the Web Viewer
The Web Viewer can be accessed with any modern web browser.
Warning
If you have chosen "Windows Authentication" instead of "SQL Server Authentication" in the Database Connection Configuration, the user with which the Web Viewer or the portable version is to be accessed must be explicitly authorized in the SQL Server. This is one of the reasons why we recommend using "SQL Server Authentication".
Prerequisites for Agentless Acquisition
Due to the agentless mode of operation, only network devices that have implemented one of the following remotely queryable interfaces can be captured:
- Windows RPC (WMI, Remote Registry)
- SNMP v1, v2c or v3
- SSH
Devices where this is not the case - e.g. Fritz!boxes, non-manageable switches, Windows Home Editions, televisions etc. - cannot be captured in this way.
Microsoft Exchange:
- Exchange 2010, 2013, 2016, 2019, SE (all editions)
Windows Devices:
- Windows Server 2003 / 2008 / 2012 / 2016 / 2019 / 2022 / 2025 (all editions)
- Windows XP / Vista / Windows 7 / Windows 8.x / Windows 10 / Windows 11 (all editions except "Home")
Tip
You can use the Offline Agent to gather information from devices with Windows "Home" Edition.
Network Devices:
- All with SNMP v1, v2c, v3
- Linux/Unix derivatives and MacOS with SSH and Perl 5.8 or later
- VMware vCenter or ESXi v5.x or later
- XenServer 4.x or later
CPUs:
- x86 or x64 Intel architecture for local data acquisition via LOGINfo
- Any for remote data acquisition (IP scan)
Windows Devices
Remote Scan
The remote scan of Windows computers is configured and executed in LOGINventory via a definition of type Asset Inventory.
Attention
Since there are no "ReadOnly-Admins" in Windows, you always have to use an account with local administrator rights on the respective computers. This is the case, for example, with a domain admin.
Info
An account that only has WMI rights is not sufficient, because LOGINventory uses additional sources to collect a complete picture of the entire software, hardware and configuration.
The necessary APIs are not available in Windows Home Editions, in all other Windows Editions at least the service "Server" or "File and Printer Sharing" must be started and of course no firewall must hinder communication.
Info
How to configure the firewall properly is described in detail here.
In same domain - or with Trust
The scan within the same domain or other domains with trust status (Trust) additionally requires full access to Administrative Shares (C$, Admin$, ...). Alternatively, the "Remote Registry" service must be running. Attention: This service is "Disabled" by default from Windows 10 on.
In another domain - without Trust
In principle, the scan only works across non-trusted domain boundaries if there is full access to administrative shares (C$, Admin$, ...).
In Workgroup
Attention
If you are experiencing errors 1312 or 1326 although everything might seem to be configured correctly, make sure to check the account you are using for the service LOGINventory9-InventoryService. The used account needs to have administrative rights on the LOGINventory machine (with password). Do not use Local Service or Local System!
For workgroup computers - or when capturing using the local account of the remote computer (also in domains):
- UAC-Remote must be disabled, i.e. in the registry:
HKLM\SOFTWARE\Microsoft\Windows\CurrentVersion\Policies\System, LocalAccountTokenFilterPolicy (DWORD)must be set to 1.- In addition, the following policy must be set (e.g. locally via GPEDIT.EXE), which is always set like this for domain members: Computer Configuration / Windows Settings / Security Settings / Local Policies / Security Options / Network Access: Sharing and Security Model for Local Accounts = Classic
- These two policy changes will only become effective after a policy refresh (reboot &
gpupdate /force(or after two hours))
- The password of the remote administrator must not be empty.
Ports and Protocols Used for Remote Scan
TCP/IP (IPv4 or IPv6) and is used for acquisition:
- ICMP Echo Request (Ping)
- Client for Microsoft Networks
- TCP Port 139 (NetBIOS Session Services)
- UDP Ports 137 and 138 (NetBIOS Name Server, NetBIOS Datagram)
- TCP Ports 135 and 445 (RPC, WMI)
- Dynamic Ports:
- Windows Server 2008, Windows Vista and higher: TCP Ports 49152-65535
- Windows 2000, Windows XP, and Windows Server 2003: TCP Ports 1025-5000
- UDP Port 161 (SNMP)
- TCP/UDP Port 22 (SSH)
- TCP/UDP Port 443 (VMware vSphere)
The Windows Firewall configuration is explicitly described below.
Recommended as access test:
C:\> NET USE * \\\RemotePc-or-IP\Admin$ /USER:Domain\AdminAccount AdminPassword
And:
C:\> WMIC /NODE:RemotePc-or-IP /USER:Domain\AdminAccount /PASSWORD:AdminPassword CPU
Logon Script
No further prerequisites need to be fulfilled on the respective computer when executing the logon or startup script. The executing account must only have the right to store the .inv file created during the entry in the "data directory" of the LOGINventory computer, i.e. have write access to the share and in the file system.
We recommend: Authenticated Users (= Domain User + Domain Computers) with write permissions ("Change")
Example for a logon script call
START /B \\loginventory-server\LI9DATA\LOGINFO.EXE
Windows Offline Agent
With the Offline Agent the inventory data can be delivered via http/https to a web server as well as to a file share. Also here the used account must have write permissions on the share and in the file system of the "data directory".
To install the Offline Agent on a Windows computer, the .NET Framework 3.5 must be available.
Exchange Organization
The definition type "Microsoft Exchange Inventory" is used in the Remote Scanner to inventory a complete Exchange organization. The account used requires membership in the role "View-Only Organization Management" or "Organization Management" in the Exchange organization. As the source, you only need to select one Exchange Server from the suggested list, the one with the highest version, but no Edge role. At the same time, the account on the Exchange Server computer - as always with Windows - must have local administrator rights.
VMware vSphere, ESXi
For VMware ESXi and vCenter there is the definition type "VMware vSphere Inventory" in LOGINventory.
The used account only needs "read only" rights.
Typically, when you capture ESXi or vCenter, the Job Monitor will display a "Warning: Invalid SSL Certificate" message if you are using SelfSigned certificates automatically created by VMware and have not yet used a trusted certificate authority. This warning does not affect the inventory.
XenServer
An account with administrator rights on the XenServer is also required here.
XenApp Server
To access the XenApp data on a corresponding Windows server, the account used in the "XenApp Inventory" method must have administrator rights on both Windows and XenApp. In addition, the Citrix XenApp PowerShell SDK must be installed on the XenApp computer (supplied in the ISO with the XenApp setup).
Unix, Linux, macOS
When capturing Linux-based systems, a distinction must be made as to whether this is to be carried out remotely, i.e. via an SSH connection, or locally, i.e. by executing a script or by the Linux / macOS offline agent.
In both cases, a Perl installation and the Perl module Exporter are required. (In the case of a remote scan, it may also be possible to capture data without Perl installed, but a lot of important information is missing, so Perl should be installed).
In both cases, the following modules / commands are recommended:
- Die
Perl-ModuleJSON,Parse::EDID(for monitors on Linux),Net::IP(for network adapters on macOS),XML::LibXML,XML::LibXSLT,XML::Simple(for reading SWID tags). dscl(last user name on macOS (for Domain Users))smartctl(improved drive information on Linux)lshw(video adapter on Linux)qm(VmGuests on Linux)
As a general rule, a higher privileged account provides better information, so users with sudo or wheel rights should be used for the capture if possible.
The following commands are also required for the remote scan:
chmod cp gzip mkdir mv rm rmdir tar
The authentication of the user for SSH is done alternatively by user name and password or by user name and key file as well as passphrase. On some systems the password authentication must be enabled separately, the authentication via key file with passphrase is in principle always possible. The key file must be in OpenSSH format because SSH.NET is used. PPK keys from PuTTY can be converted to this format.
macOS
To enable remote scanning of a device with macOS, SSH must be enabled. To do this, choose Apple > System Preferences from the Mac menu and click Sharing. Then enable "Remote Login" for the account you want to use for remote scanning.
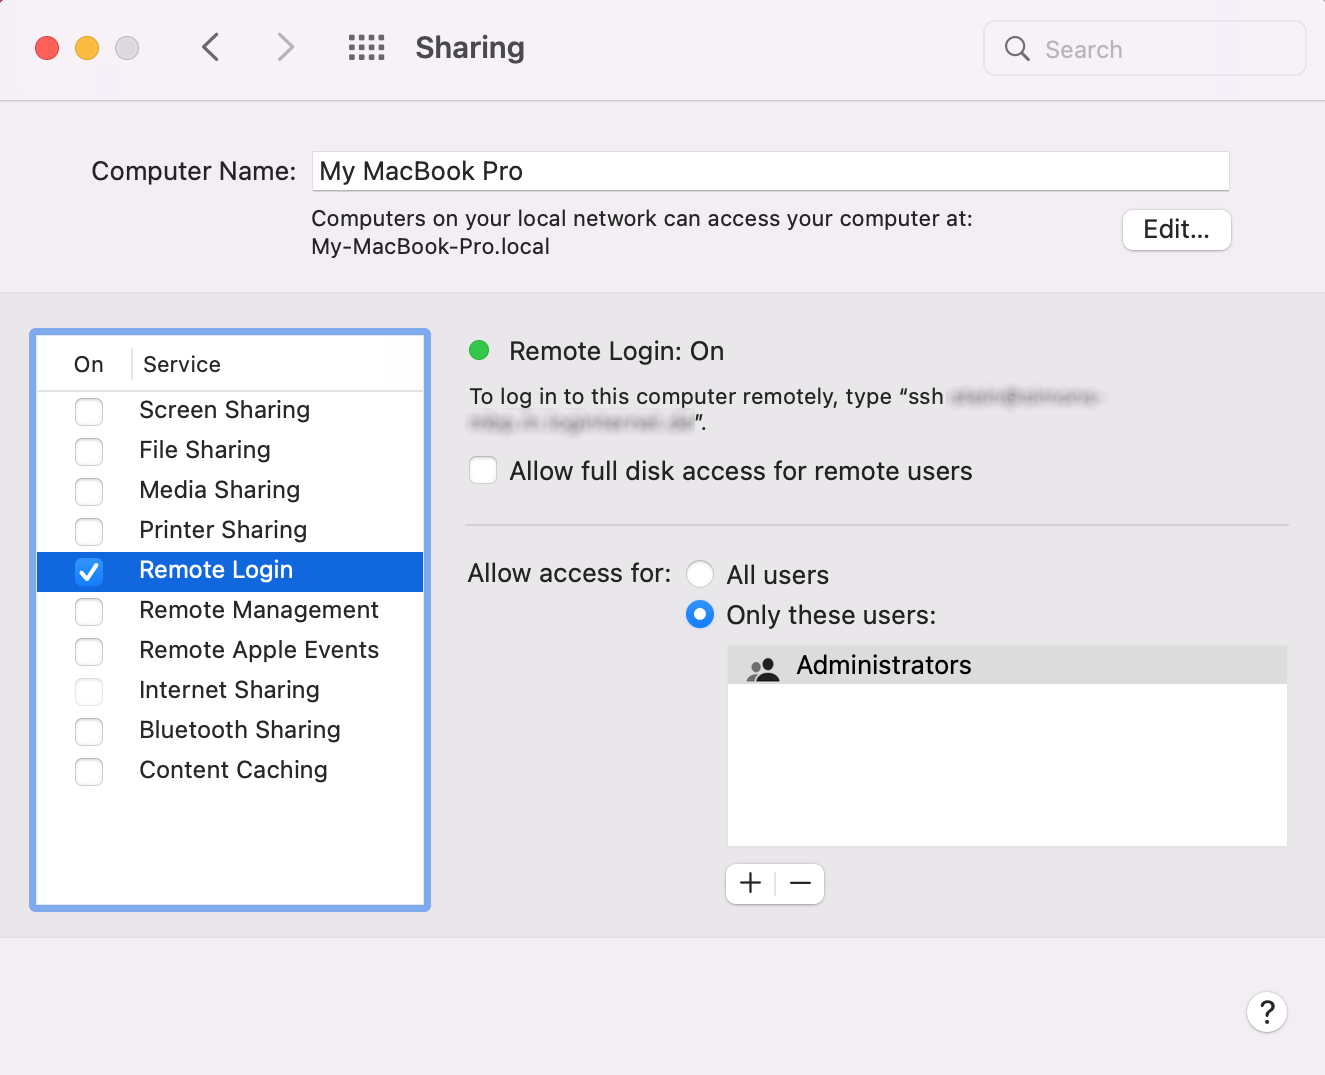
If the user is granted the User may manage this computer right, detailed information on connected monitors and accounts available on the device can be determined.
In addition, at least macOS 10.15 (Catalina) must be installed. Older macOS / OS X versions are not supported.
The registration of macOS devices can also be carried out with domain users / domain administrators. To do this, proceed as follows:
- Set up a “network account server”
- Create user in the domain
- Log in locally on the macOS device with the domain user (a “mobile account” must be created)
- If necessary, grant the user the Remote login right. The user may already have this right due to group membership.
Tip
As an alternative to Remote Scan, the macOS Offline Agent can also be used.
SuSe Linux
The following actions must be performed to enable SSH:
- NetServices:
sshd enable - Firewall / Service / Share SSH daemon
For the password authentication the entry
must be changed in
the file /etc/ssh/sshd_config:
PasswordAuthentication no -> yes
After a change a restart of the system or a restart of the daemon is necessary.
Ubuntu Linux
The activation of the SSH daemon must be done explicitly as follows:
sudo apt-get install openssh-server
Password authentication is activated by default here.
Red Hat Linux, CentOS
The SSH daemon and password authentication are activated by default.
Oracle Solaris
The SSH daemon and password authentication are already activated by default. To use the user ID "root", however, the configuration of the SSH daemon must be adapted:
- In the file
/etc/ssh/sshd_configthe entry forPermitRootLoginmust be set toyes. - In the file
/etc/default/loginthe entry forCONSOLEmust be commented out:#CONSOLE=/dev/console. - In the file
/etc/user_attrthe entry;type=rolemust be removed from the 'root' entry. This can be done with the following command:rolemod -K type=normal root. - Now you have to restart the SSH daemon:
svcadm restart svc:/network/ssh:default.
Troubleshooting Scanning Unix, MacOS and Linux
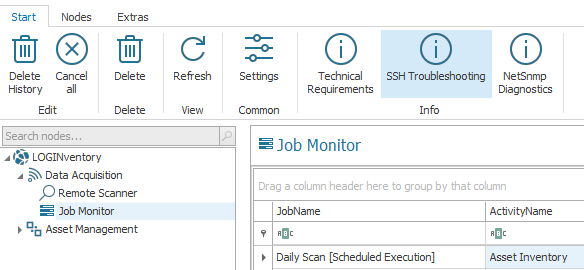
If the acquisition of these devices is not successful and the reasons are unknown, a dialog box can be used to search for errors. This window can be opened by selecting the Custom action "SSH Test" in the Failed Inventory
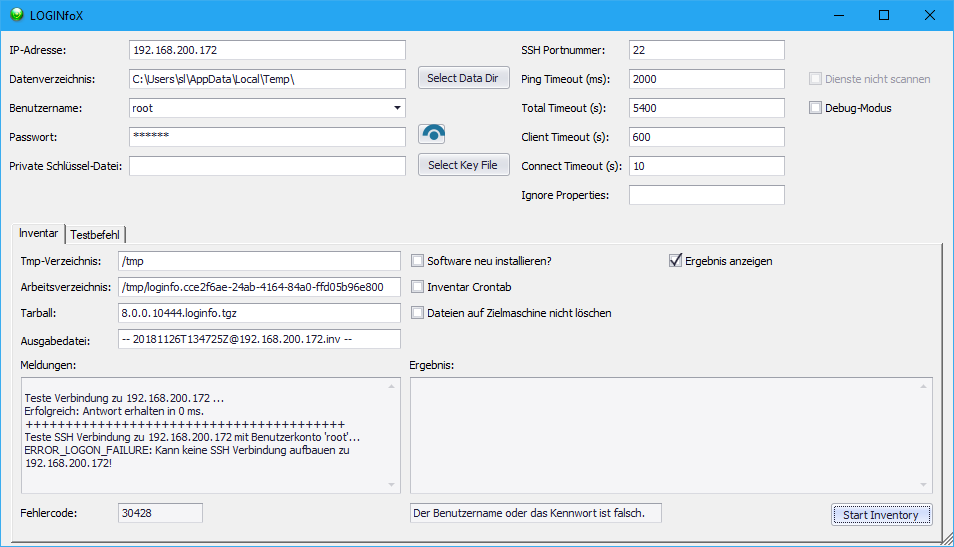
node for a failed asset or by selecting "SSH Troubleshooting" in the Job Monitor. The window can also be opened directly with the command %ProgramFiles%\LOGIN\LOGINventory9\LOGINfoX.exe /w.
In the dialog that opens, different user names, passwords, key files, ports, timeouts, etc. can be tested. The messages show directly to what extent the inventory is successful with these values and parameters. If the inventory was successful, the result code 20300 is output.
Printers, Routers, Switches
These devices are usually captured via Asset Inventory using SNMP v1, v2c or v3. The SNMP v1/v2c API is standard in Windows and works without further configuration steps. Most printers have a SNMP v1/v2c ReadOnly community string "public" preset, which can be used to easily read the configuration.
This is usually not the case with routers and switches and must then be configured manually. We recommend using different community strings to select specific device types when capturing data. The default view (should be the OID 1) and the IP of the permitted management station(s), i.e. the LOGINventory computer (0.0.0.0 = all computers) may also have to be adapted.
If SNMP v3 is to be used, a NetSNMP Credentials user account can be used.
Info
For a device to be captured by LOGINventory via SNMP, the device must support snmpwalk. Supporting snmpget commands alone is not sufficient. During acquisition LOGINventory reads values according to the standard MIB-2; at least expected are values at "MIB-2.system" (OID: 1.3.6.1.1). Private Enterprise MIBs are not used in principle. However, additional OIDs can be read by modifying the LOGINfo.script file.
Reading out Cloud Services
To read out certain online data from Microsoft (Azure) or Amazon (AWS), it is necessary to use a special authentication procedure ("Modern Authentication") instead of username and password. For this, an app registration must be created in the corresponding portal and the generated credentials must be stored in the Remote Scanner.
| Defintion Type | Modern Authentication | User Name + Password |
|---|---|---|
| Exchange Online Acquisition | ||
| Azure AD and Microsoft 365 Subscriptions | ||
| Azure Virtual Machines | ||
| AWS Virtual Machines |
Tip
Where possible, we recommend reading out the data using an app registration. If this is not desired / possible, see the notes here for acquisition without an app registration.
Configuring an App Registration with Microsoft Azure
1. Create a new App Registration
- Log in to portal.azure.com and select Microsoft Entra ID (formerly: Azure Active Directory).
- Navigate to the App registrations menu and create a New registration.
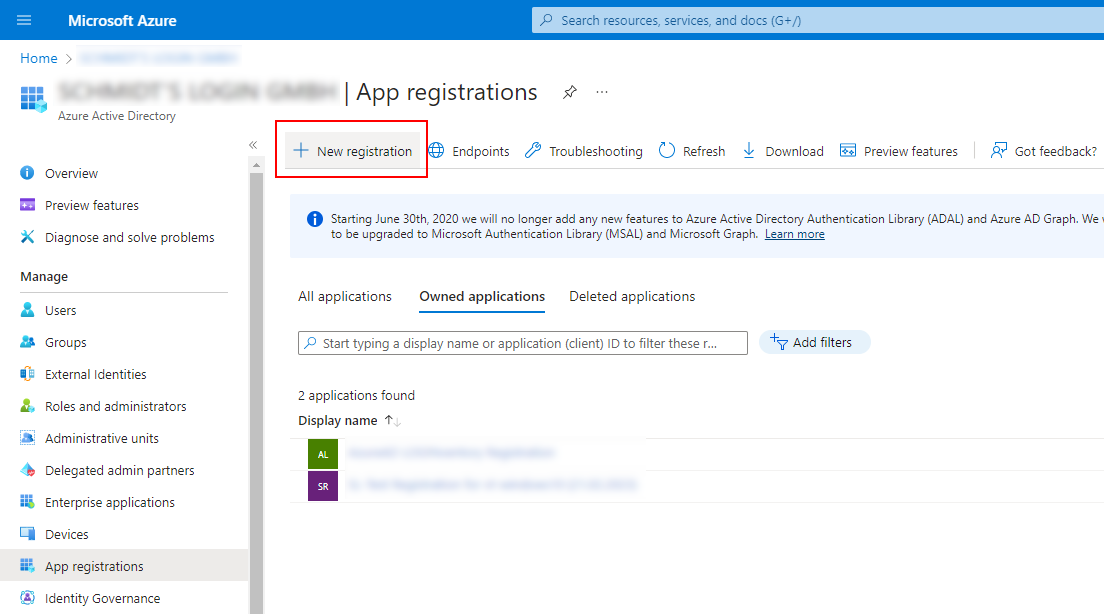
- Assign a descriptive name (e.g., "LOGINventory").
2. Create a Client Secret
- Go to the Certificates & secrets menu of the app you just created and select New client secret
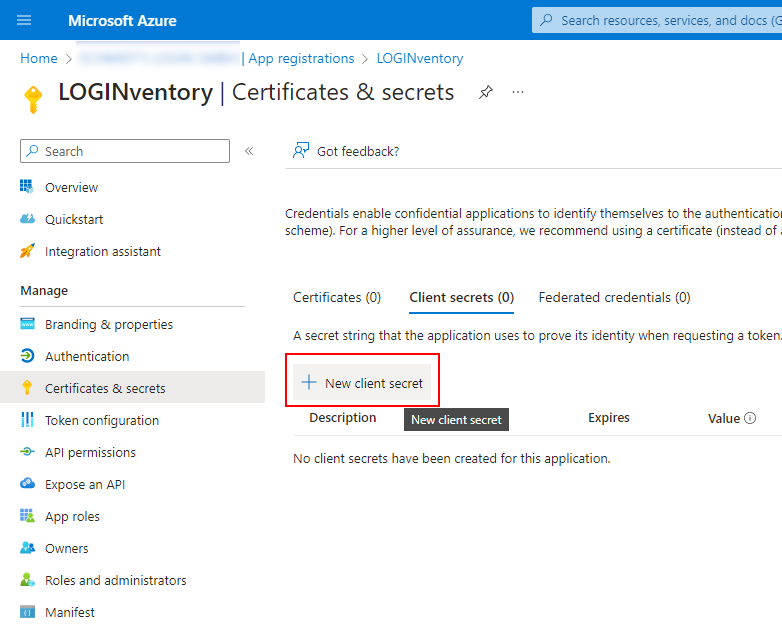
- Enter a description for your key, select if or when it expires, and select Add.
Tip
Although it is more secure to let the key expire, keep in mind that if you do, you will need to generate a new key at some point in the future.
- Copy the generated key, which can now be seen in the Value field on this page.
The Secret ID is NOT required and does not need to be copied.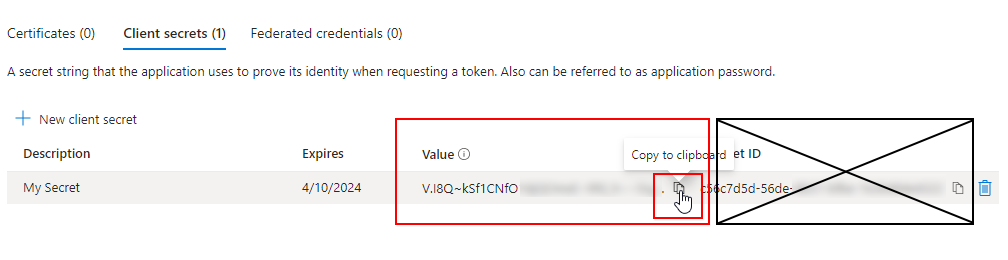
Warning
The value of the Client Secret cannot be viewed except immediately after it is generated. Make sure you save this value after creation before leaving the page.
Info
If you prefer to use a Certificate instead of a Client Secret, this is also possible, but requires more configuration: In addition to the creation of a certificate, it must also be taken into account that the account under which the Inventory Service runs must also be able to access the certificate.
3. Customize App Registration Permissions
If the mailboxes of an online Exchange server are also to be read with the app registration or if data on the last login is also to be read for Azure users, a further assignment of permissions is necessary! If this is not to be done with the app registration, this step can be skipped and you can continue directly with step 4.
Admin consent is required to adjust the authorizations.
Exchange Online Acquisition
The following steps are based on these instructions from Microsoft: https://learn.microsoft.com/en-us/powershell/exchange/app-only-auth-powershell-v2?view=exchange-ps#step-2-assign-api-permissions-to-the-application
- Go to the Manifest option of the newly created app registration.
- Locate the section that starts with
requiredResourceAccess(around line 50).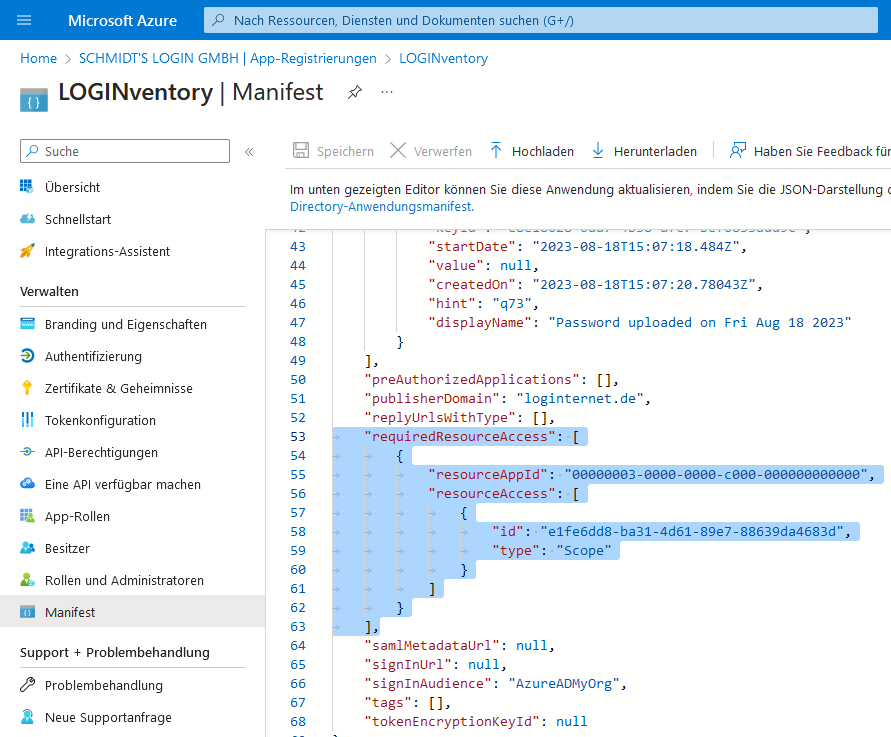
- Replace the existing section with the following lines and then save the change:
"requiredResourceAccess": [
   {
      "resourceAppId": "00000002-0000-0ff1-ce00-000000000000",
      "resourceAccess": [
         {
            "id": "dc50a0fb-09a3-484d-be87-e023b12c6440",
            "type": "Role"
         }
      ]
   }
],
Date of the Last Login
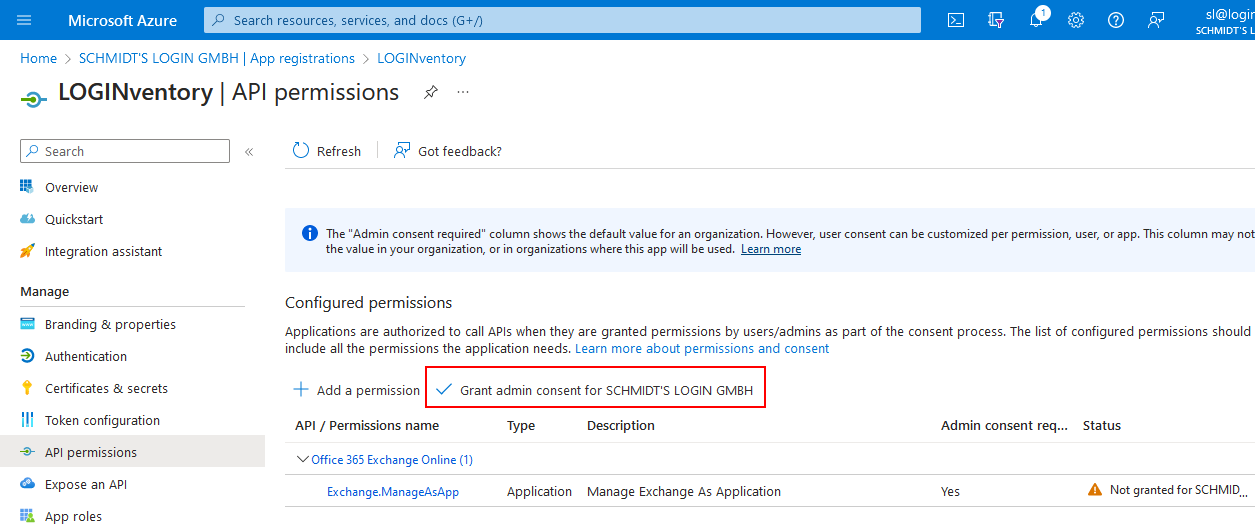
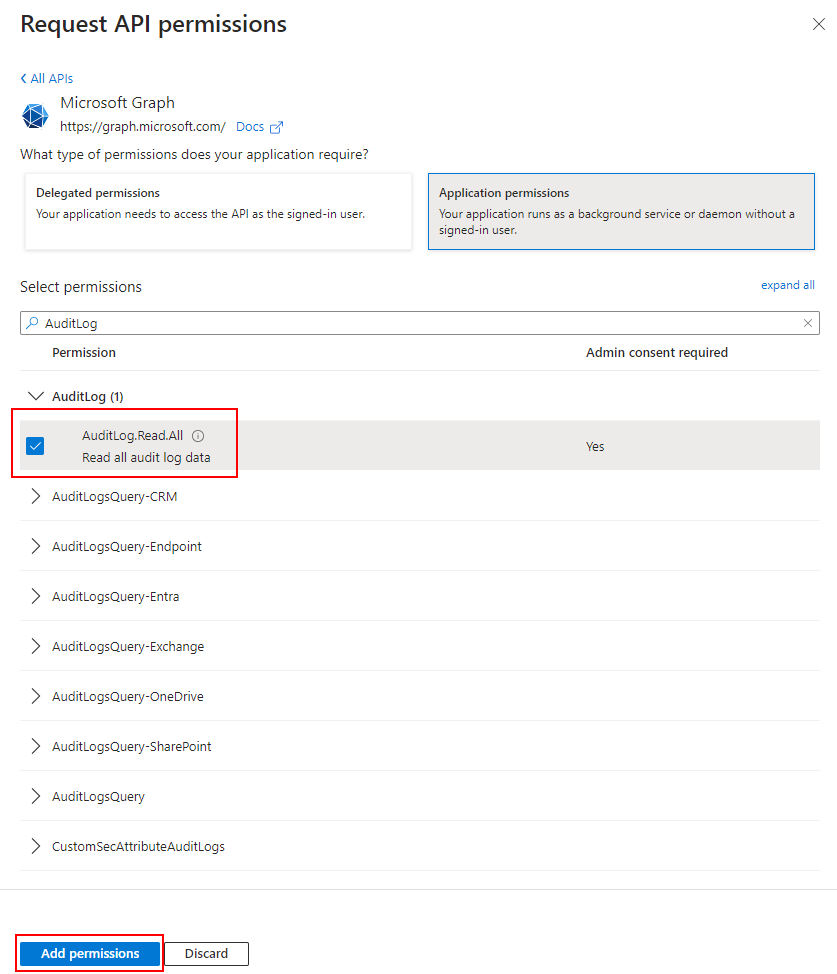
- Go to the API permissions option of the newly created app registration.
- Add a new permission using the plus sign.
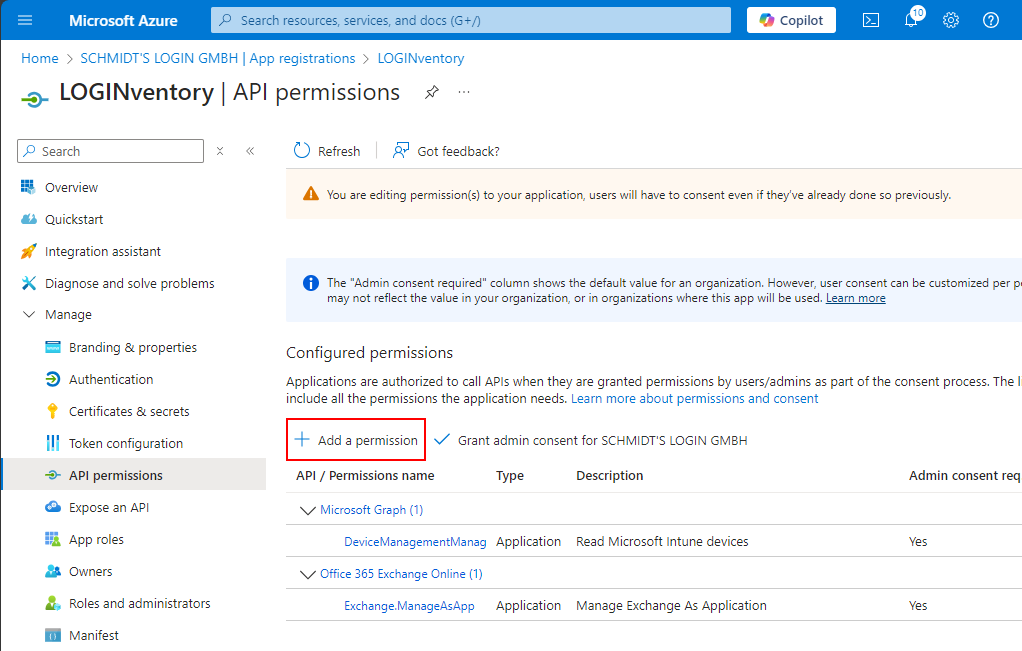
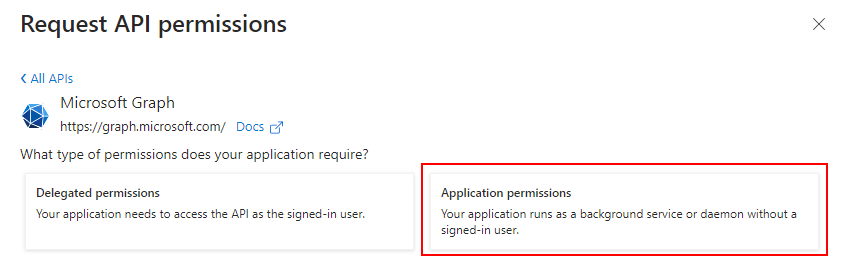
- Select "Microsoft Graph" and then "Application permissions"
- Type "AuditLog" into the search window.
- Select "AuditLog.Read.All".
- Confirm the selection by clicking the Add permissions button.
- Select Grant admin consent for ....
Info
If this step is not carried out correctly / is forgotten, the recording of users, groups & computers from Entra ID still works, but does not provide the date of the last login of the user. A warning message is then displayed in the Job Monitor: 
Sending Emails
The following steps only need to be performed if tasks are to send emails via an online Exchange server. Please refer to the notes in the settings.
- Go to the API permissions option of the newly created app registration.
- Add a new permission using the plus sign (Add a permission).
- Select "Microsoft Graph" and then "Application permissions".
- Type "Mail" into the search window.
- Select "Mail.Send".
- Confirm the selection by clicking the Add permissions button.
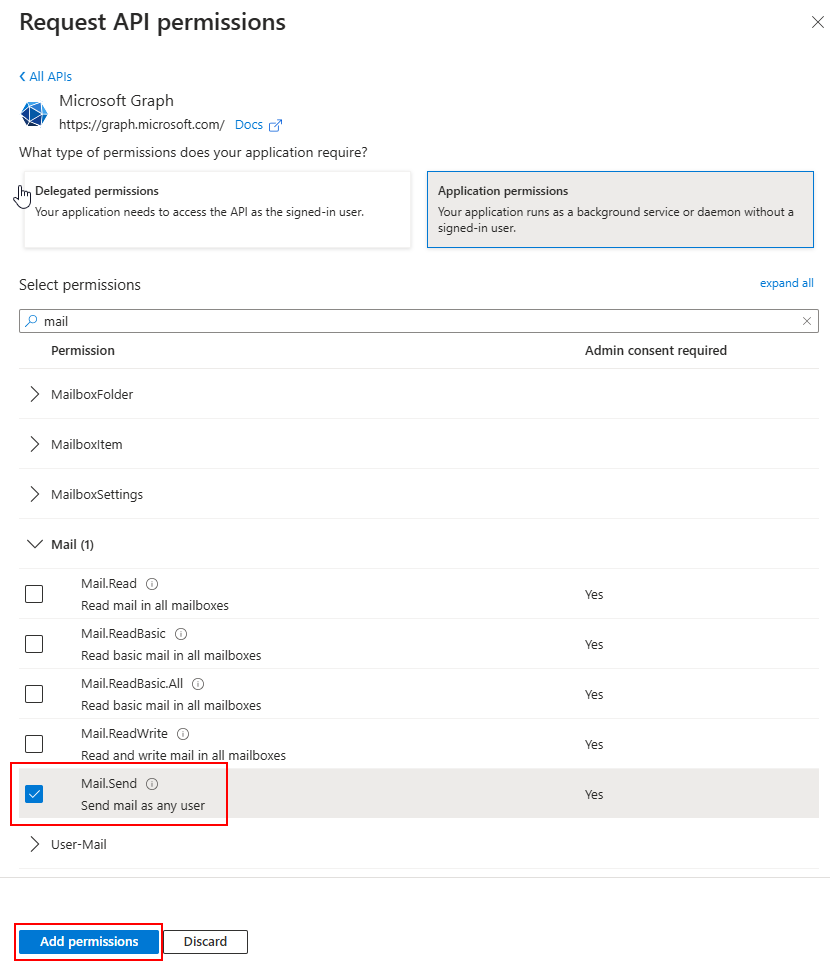
- Select Grant admin consent for ....
4. Assign Roles
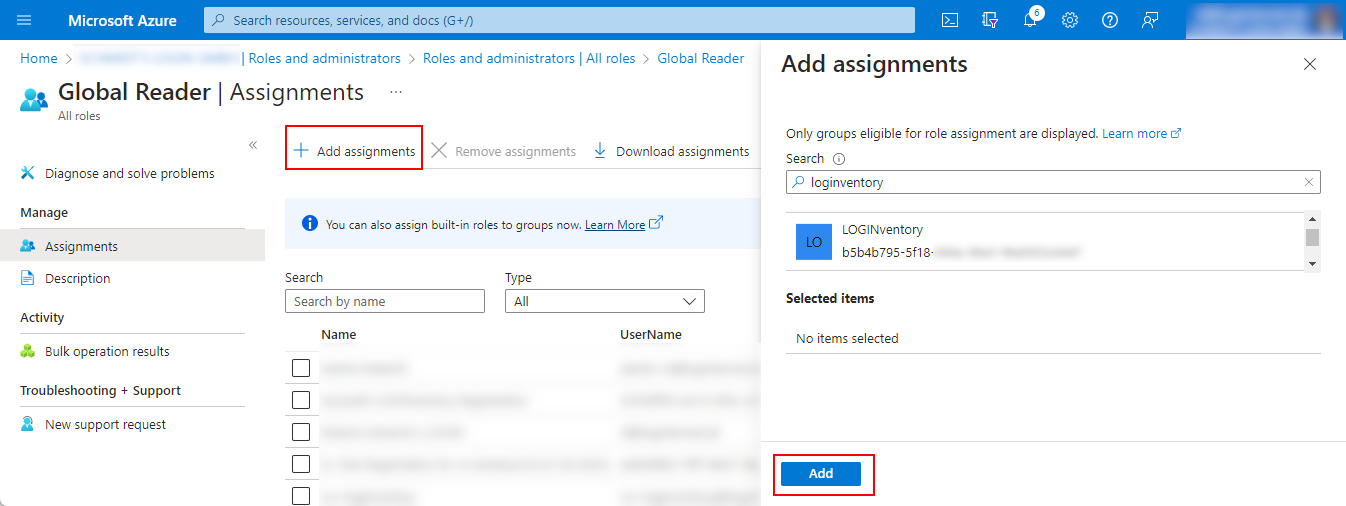
- In the Microsoft Entra ID configuration, navigate to Roles and administrators and search for the Global Reader role and select it.
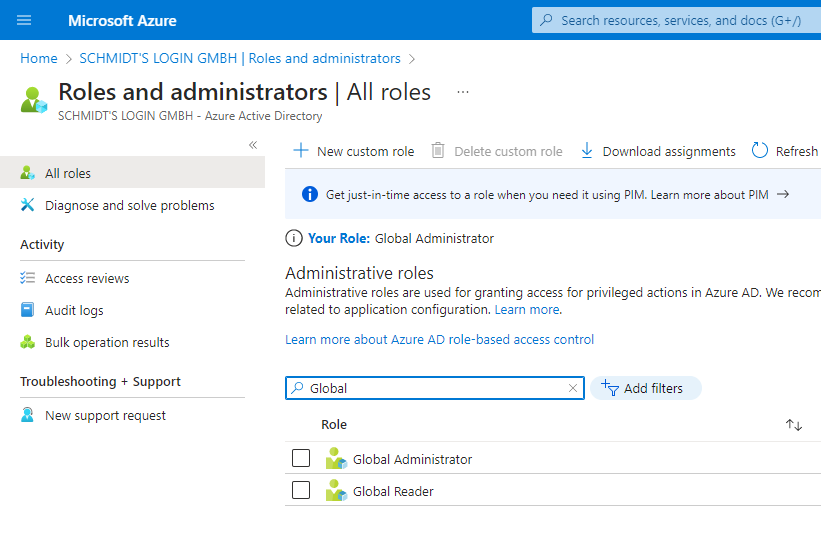
- Select Add assignments and search for the name of the app registration you created earlier (for example, "LOGINventory") and select it.
Info
This gave the app read access to all data. Theoretically, a more granular permission setting would also be possible, but the API permissions Users.Read.All, Groups.Read.All and Device.Read.All alone are not sufficient, for example, to read the multi-factor authentication information during AzureAD acquisition.
Therefore, we recommend this setting, which requires the least configuration effort.
5. Authorization to Access the Subscription
Info
This step needs to be performed only if you want to use this App Registration to read information about virtual machines in Azure. If you only want to read data from Azure AD and Microsoft 365 Subscriptions, this step is not necessary.
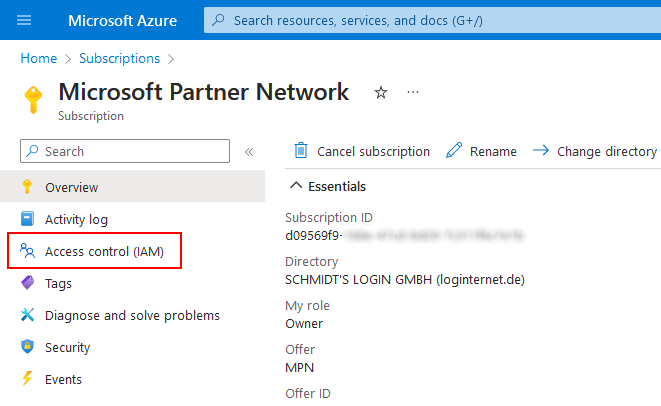
- At portal.azure.com, select Subscriptions.
- In the list of subscriptions, select the one to which the virtual machines (VMs) in Azure are assigned.
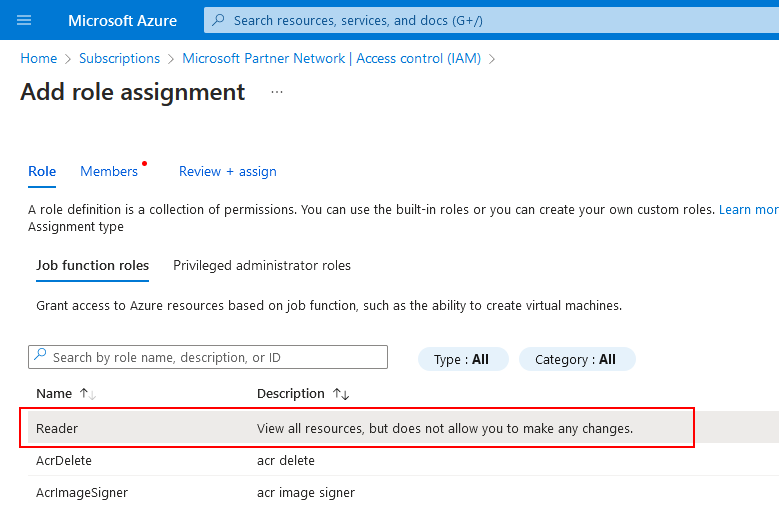
- Select Access control (IAM).
- Select Add role assignment from the drop-down menu at Add.
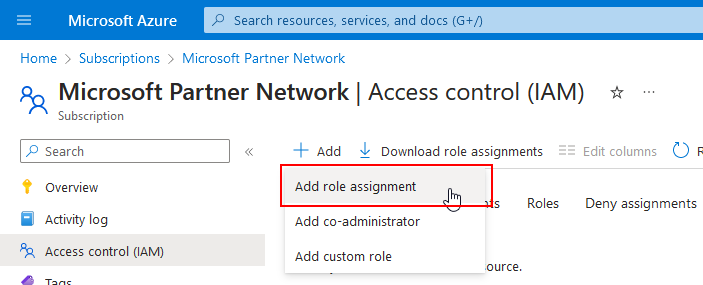
- On the Role page, click in the row named Reader. The red dot next to Role will disappear and you can switch to the Members page.
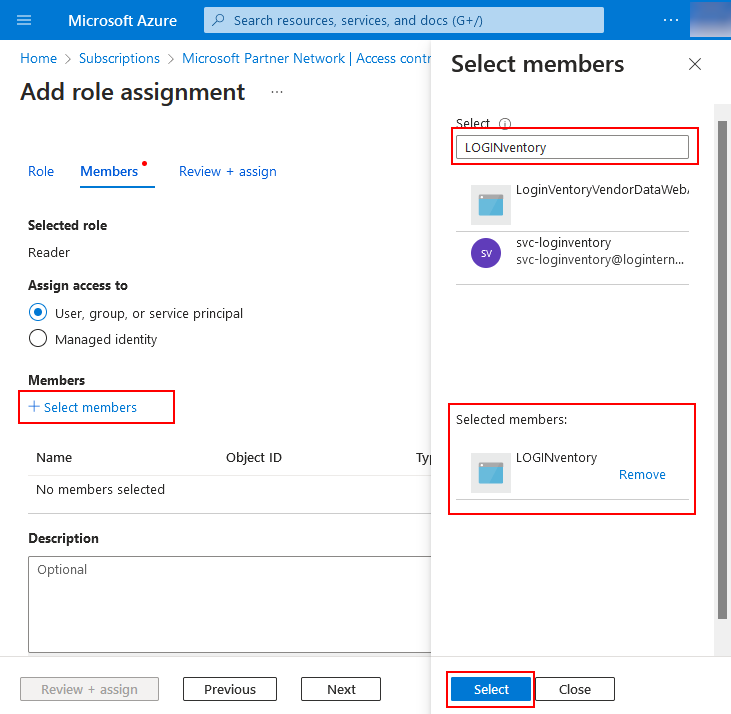
- On the Members page, choose Select members and find the name of the app registration you created earlier (e.g. "LOGINventory") and select it.
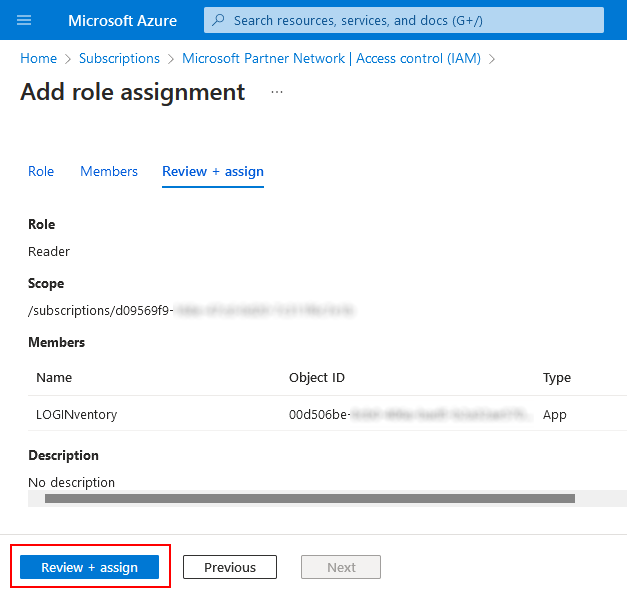
- On the Review and Assign page, confirm the assignment of this app registration to the Reader role.
6. Store the Credentials in the Remote Scanner
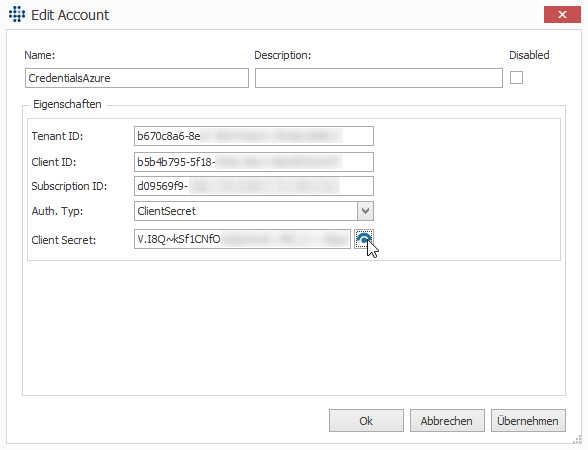
- In the Remote Scanner, create a new account of type Azure Credentials and select Auth. Type "ClientSecret".
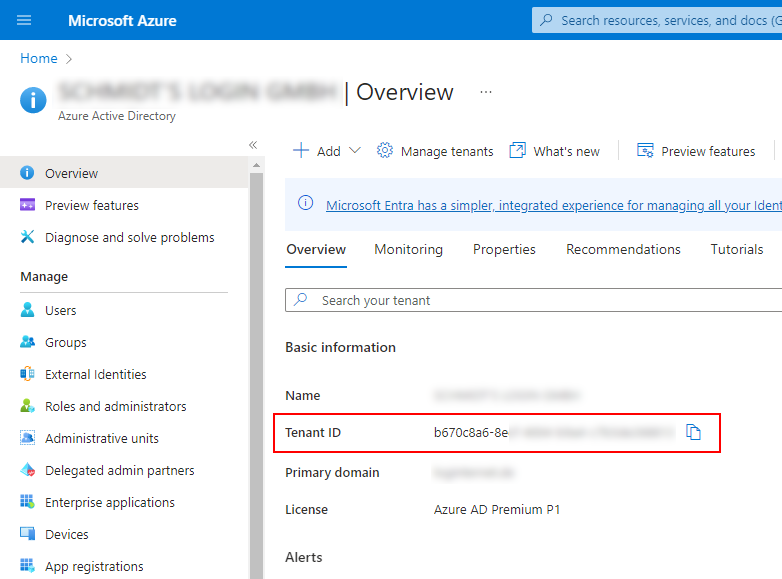
- For Tenant ID you have to enter the tenant ID of your Azure Active Directory (Microsoft Entra ID). You can retrieve this here, for example:
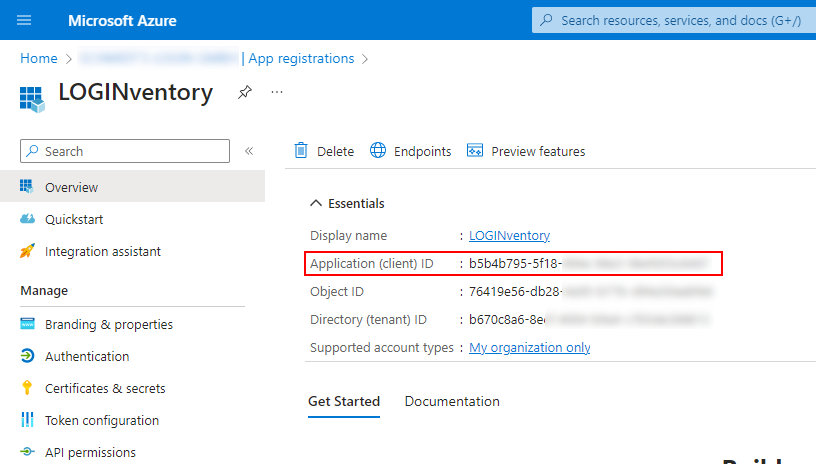
- For Client ID, the "Application (client) ID" of the previously created app registration must be entered. You can find this on the overview page of the previously created app registration:
- At Subscription ID, only something has to be entered if you want to retrieve information about virtual machines in Azure, see step 5.
The Subscription ID can be found at portal.azure.com at Subscriptions.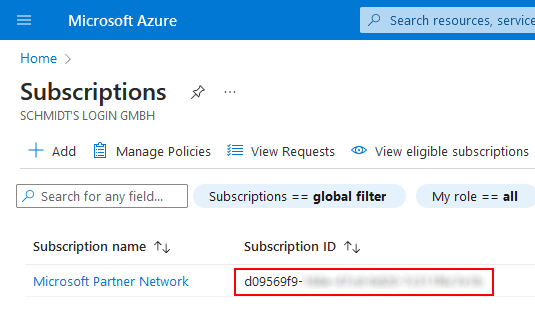
- For Client Secret, enter the "Value" of the secret you created and copied in step 2.
Reminder: You do not need the Client Secret ID, but the value!
The finished configuration looks then e.g. like this:
Now this account can be assigned to the corresponding definition and the scan can be started. The progress of the scan can be monitored in the Job Monitor.
Reading out Microsoft Online Services without App Registration
If authentication during readout is to take place using user name & password, this is only possible if multi-factor authentication (MFA) has been decativated for the user used OR the IP address of the LOGINventory computer comes from a "Trusted Location".
Attention
If you use multi-factor (2FA) / multifactor (MFA) authentication for access, then you need to add an exception regarding trusted IP address for which multi-factor authentication is not required. This is possible via this link: https://account.activedirectory.windowsazure.com/usermanagement/mfasettings.aspx
However, a "Named Location" must have been created beforehand. This is possible via this link (if not already done): https://portal.azure.com/#blade/Microsoft_AAD_IAM/SecurityMenuBlade/NamedLocations
For Exchange Online acquisition, a user can be added to the "View-Only Organization Management" role here if the account used does not have sufficient rights.
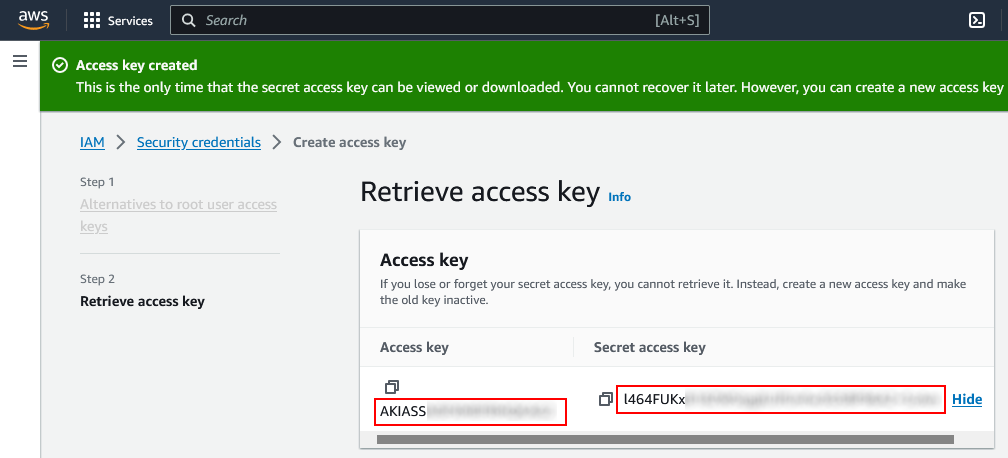
Configuring an Access Key with AWS
To read virtual machine information on AWS, it is necessary to create an access key on AWS as described in this guide: https://docs.aws.amazon.com/de_de/IAM/latest/UserGuide/id_credentials_access-keys.html
Specifically, this means that a new Access Key must be created at https://us-east-1.console.aws.amazon.com/iamv2/home#/security_credentials.

If an access key is created here, the Secret Access Key must now be copied and stored in the Remote Scanner at an account of type AWS Credentials together with the Access Key.
Warning
The value of the Secret Access Key cannot be viewed except immediately after creation. Make sure you save this value after creation before leaving the page.
Differences between the Acquisition Methods
Depending on whether the acquisition of a Windows device is carried out with a privileged user (local administrator) or unprivileged user, or remotely or locally, different data is sometimes available. However, the data is identical to about 99 %.
| Remote | Local | |
|---|---|---|
| Rights of scanning / executing user | always privileged | only privileged if executing user is local administrator |
| Additionally collected data | in the user profile
|
Only in the exceptional case when the remote-scanned user is the same as the currently logged on user of the device to be scanned, the connected network drives are also included in the remote scan.
The unprivileged scan differs from the privileged scan by missing access to certain information:
- Docking station information
- Encryption status of partitions (bitlocker)
- Entries from the security event log (this includes user logons)
- Hard disk data on SMART values and whether it is an SSD
- TrustedPlatformModule values
Furthermore, there is the following information that an unprivileged user can obtain only partially (e.g., the values available in the user context):
- Scheduled tasks
- SQL Server databases
Important
If the acquisition does not run exclusively in one context (e.g. agentless scan only), but is run sometimes with privileged, sometimes with unprivileged rights, there would be many changes in the change history. To prevent this behavior, the information that is only partially available to unprivileged users is not captured by default. This behavior can be changed by using the command line parameter //ForceAllPossibleData 1 so that the information that is not complete is also collected in the unprivileged context.
Thus, this parameter should be used only when collecting exclusively in the unprivileged context (e.g. exclusively running LOGINfo.exe in the logon script).
The command line parameter //ScanSqlServerDatabases 1 ensures that the (incomplete) information about SQL Server databases is also captured by the asset inventory (or executing LOGINfo.exe). The complete information is available by running an SQL Server inventory.
For information that is only available in the user context, a cleanup function is also necessary due to this behavior. With the cleanup of obsolete data, context-related information that has not been recorded for longer than X days is deleted.
Example
In a network, Windows devices are scanned both by the remote scanner and by running LOGINfo.exe in the logon script. User A logs on to his device, whereupon the unprivileged acquisition in the logon script is executed and, among other things, the list of software packages installed in the context of this user is determined. During the next month, only user B logs on to this device, whereupon the data on the software installed in the context for user A is no longer determined. If the threshold for the cleanup of obsolete data was set to 30 days in the settings, the data on the software installed in the context for User A will therefore be removed after 31 days. This could have been prevented if another acquisition had been made in the context of User A in the meantime.
Info
The Offline Agent creates two Scheduled Tasks: One in the user context, one in the system context. This ensures that the data is captured at least once in a privileged manner, thus achieving a complete image of the computer.
Conclusion
In summary, it can be said that the agentless scan basically captures all data except for the connected network drives, whereas when LOGINfo.exe is executed locally (e.g. in the logon script), certain particularly sensitive information is not available. However, the combination of both collection methods merges the collected data.
Special Considerations for Hypervisor Acquisition
There are a few special features to be aware of when capturing hypervisors (e.g. VMware ESXi, Hyper-V, XenServer).
Reading Out Information
In general, the virtual machines can be captured both directly (e.g., through the asset inventory of the corresponding IP range), and by querying the hypervisor.
Info
There is no special definition type in Remote Scanner for capturing Hyper-V machines. Hyper-V machines are automatically included in Asset Inventory.
Attention
Through the hypervisor inventory, hosts and VMs are created as assets, but the scan only collects the data that the host has about its VMs. This means that virtual machines captured solely through hypervisor inventory will have incomplete information (e.g., no information about installed software, hardware, etc.). Therefore, all virtual machines should additionally always be captured via a definition of type Asset Inventory (e.g. by scanning the relevant IP range with the VMs). Incompletely captured devices can be recognized by the Stub entry at LastInventory.Method.
If only the hypervisor is scanned, then only the host as well as all machines running at the time of the scan are created as an asset (these then have the value Stub at LastInventory.Method). This behavior can be toggled by using the command line parameter /StoppedVMs (see Switches), which results in stopped VMs also being created as assets.
Nevertheless, all information about the virtual machines (whether stopped or not) can of course be viewed in each case when double-clicking on the hypervisor under "VM Guests".
Do not Scan Certain VMs
With the help of command line parameters it can be set that certain VMs are not captured. For this purpose, the command line argument //IgnoreVMs "[Name:<NAME>][OperatingSystem:<OPERATINGSYSTEM>]" can be used in the "General" tab. Instead of <name> and <OPERATINGSYSTEM> name filters can be used using the wildcard character *.
Examples
To stop capturing VMs as stub whose operating system name contains "Linux", the following argument can be used: //IgnoreVMs "[OperatingSystem:*Linux*]"
To stop capturing VMs whose name starts with "VT", the following argument can be used: //IgnoreVMs "[Name: VT*]
To stop capturing VMs as stubs whose operating system name contains "Linux" or "Mac", the following argument can be used: //IgnoreVMs "[OperatingSystem: *Linux*,*Mac*]"
To stop capturing VMs as stub whose operating system name contains "Linux" or "Windows", or whose name starts with "A", the following argument can be used: //IgnoreVMs "[Name:A*][OperatingSystem:*Linux*,*Windows*]" 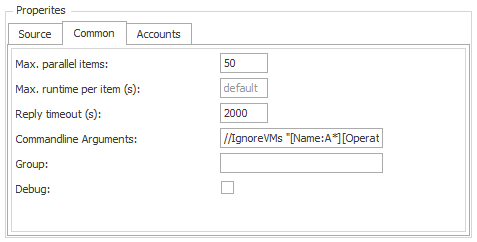 This parameter applies to both capturing VMs on VMware (definition type: VMware vSphere Inventory, on XenServers (definition type: XenServer Inventory), and on Hyper-V (definition type: Asset Inventory).
Setting Custom Properties
If the hypervisor hosts are to be assigned a Custom Property directly during acquisition (analogous to Asset Inventory), then this is only possible by adding a corresponding command-line argument. The syntax here is ///Custom.property "value".
example
So the argument ///Custom.Floor "3rd" creates a property "Floor" with the value "3rd" for all captured hypervisor hosts.
If a property is to be assigned to the virtual machines on the hypervisor hosts, this is done analogously with the command line argument ///Vm.Custom.Property value and is only applied if the VMs are scanned exclusively by capturing the host. If the VMs are scanned directly, ///Custom.Property must be used.
Installed Services
During the installation of LOGINventory different services are installed, which offer different functionalities.
| Service name | Description |
|---|---|
| LOGINventory9 Inventory Service | This service starts the agentless acquisition of the devices. Among other things, it ensures that the inventory is carried out even if LOGINventory is not started. |
| LOGINventory9 Data Service | This service monitors the data directory and processes all .inv files stored there. This service must therefore run so that all newly recorded devices are also entered into the database and are thus available for evaluations. If several clients have been created, this service also monitors the different data directories and enters the data into the correct database. |
| LOGINventory9 Automation Service | This service performs all tasks and notifications, ensuring that emails are sent and exports and reports are stored in pre-defined locations. |
| SQL Server (LOGINVENTORY) | This service provides the SQL Server instance for LOGINventory. |
If several clients are created, additional instances of the LOGINventory9 Inventory Service and LOGINventory9 Automation Service services are also created, each of which applies to one client. They manage the recording and execution of the tasks accordingly.
Troubleshooting non-starting services
If the services Inventory Service and/or Automation Service cannot be started, this is probably because the used accounts under which the services run do not have database access.
In this case, make sure that the accounts have database access by opening the "services.msc"! For example, database access is not given by default if the database is on a different machine and no SQL Server authentication is used, but Windows authentication is!
In the LOGINventory Event Viewer, you will find detailed error messages that provide information about the cause if the start is unsuccessful.
System Tasks
To perform various calculations / optimizations, the following system tasks are created automatically:
| Name | Description | Time |
|---|---|---|
| DataCleanup | Automatic data cleanup, if the corresponding check mark was set in the Settings | 01:00 a.m. |
| RebuildSharedFolder | Automatic recalculation of effective access rights to shared folders for individual users | 03:00 a.m. |
| ReorganizeIndices | Generate indices in the database to improve performance | 04:00 a.m. |
| UpdateVendorWarranty | Automatic update of Warranty Data | random time between 5 and 7 a.m. |
Additionally, there is a special task (not a system task): The Calculation of the license status of the products in the license management. The associated task is located on the License Management node and can be edited so that the calculation can be performed at a different time than the default setting of 02:00 a.m..
Windows Firewall Configuration
Attention
Basic prerequisite for the acquisition of remote Windows computers: The service "Server" ("LanmanServer") must be running and access to administrative shares (e.g. IPC$, Admin$, C$) must be given.
Used Ports
ICMP Echo Request (Ping)
UDP Ports 137 and 138 (NetBIOS Name Server, NetBIOS Datagram)
TCP Port 139 (NetBIOS Session Services)
TCP Ports 135 and 445 (RPC, WMI)
Dynamic Ports:
- Windows Server 2008, Windows Vista and higher: TCP Ports 49152-65535
- Windows 2000, Windows XP and Windows Server 2003: TCP Ports 1025-5000
Info
If you use the Windows Firewall you can enable Windows Management Instrumentation (WMI) in the firewall settings, then all required ports will be opened automatically.
Recommended as Access Test :
C:\> NET USE * \\RemotePc-or-IP\Admin$ /USER:Domain\AdminAccount AdminPassword
And:
C:\> WMIC /NODE:RemotePc-or-IP /USER:Domain\AdminAccount /PASSWORD:AdminPassword CPU
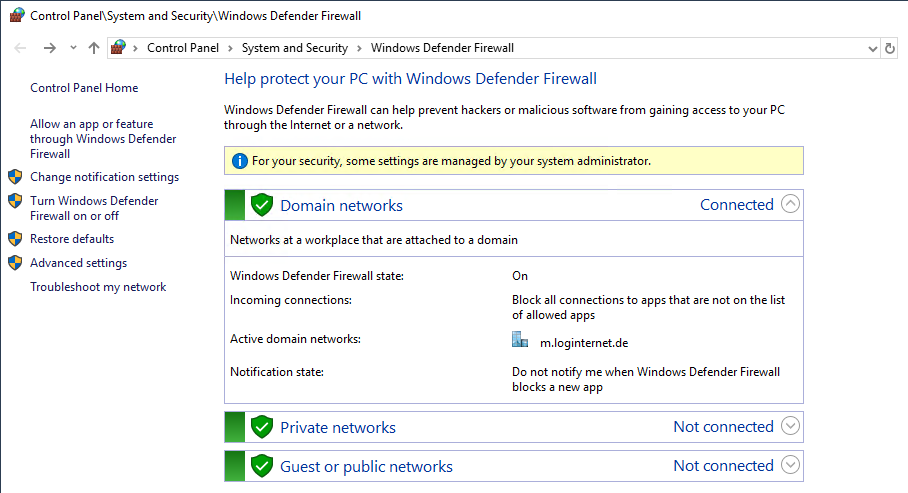
If there are problems with the acquisition, we recommend to switch off the firewall temporarily in the active profile on a computer to be scanned and then run the scan again. You can disable the Windows Firewall from the Control Panel.
If the problem with the capture is then solved, the firewall should be configured accordingly for all computers.
Simplest Solution
Group policies can be used to deactivate the firewall in the domain network for all computers.
Recommended Solution
On all computers to be scanned, corresponding rules can be defined (manually or via group policies) that allow the connections required for the scan from the LOGINventory server (or for the entire server subnet).
This rule can be stored by opening the Advanced firewall settings:
- Define New Incoming Rule
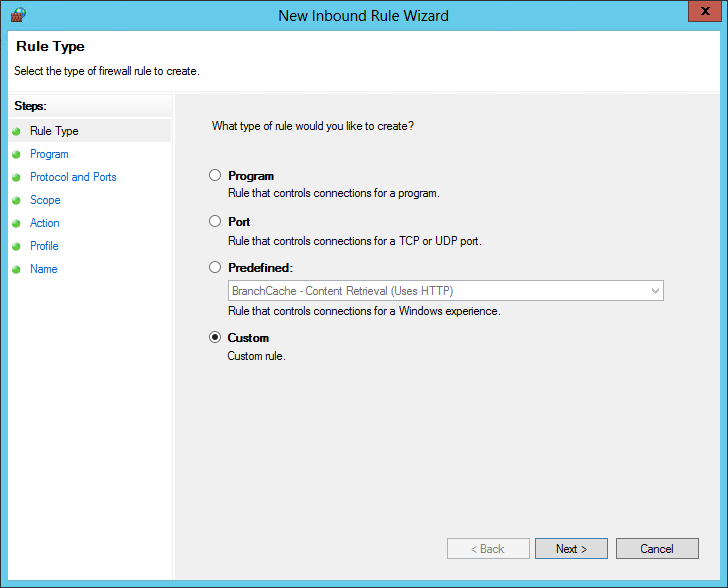
- Select Custom; Next
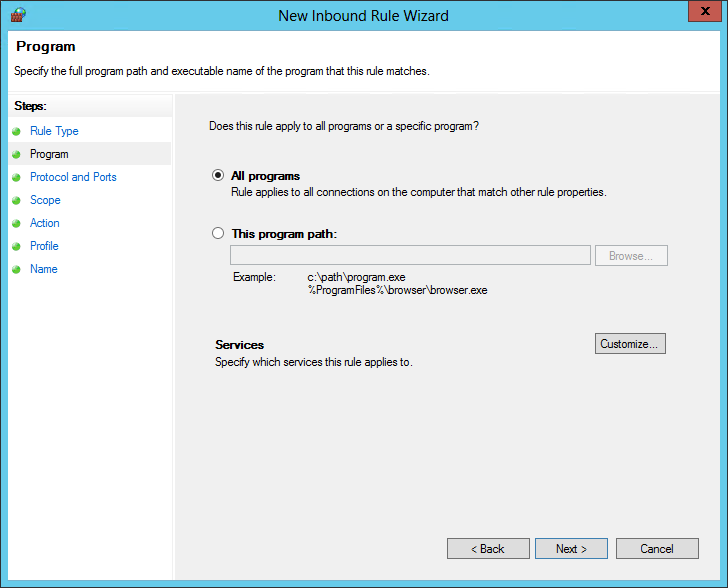
- Select All programs; Next

- Protocol type: Select Any; Next
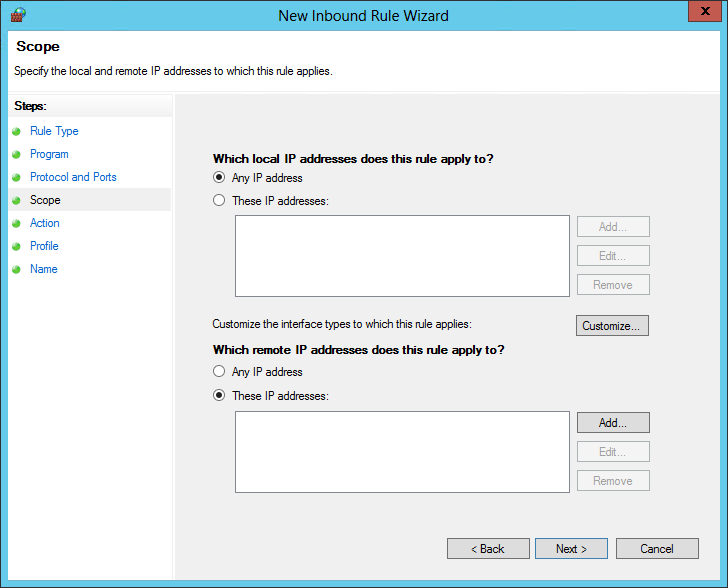
- For which local IP addresses does this rule apply? Any IP address (default)
- For which remote IP addresses does this rule apply? These IP addresses: here you enter the address (or subnet) of the LOGINventory computer, e.g.: 192.168.169.170 or 192.168.169
- Select Allow connection.
- In the next step check the Domain profile box
- Finally, a name must be specified for the rule, e.g: allow LOGINventory
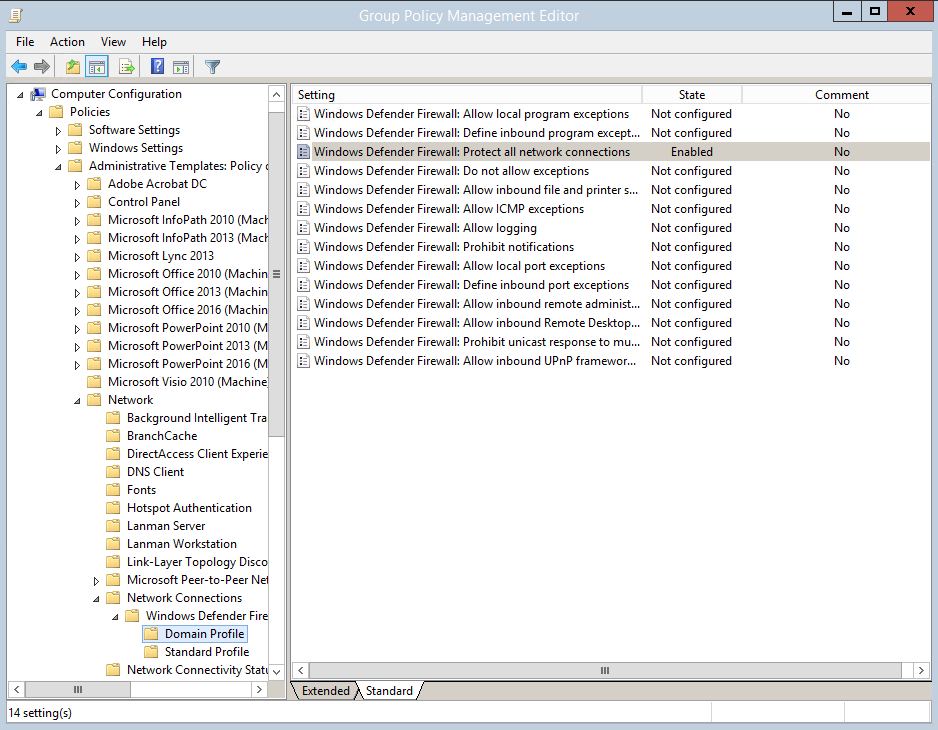
Of course, you can also define this as a group policy in the domain. To do this, you must first have a domain controller, for example:
- Open Group Policy Management
- Navigate to the desired OU
- Create and link a Group Policy object here (name e.g. "Firewall") and then edit it:
- Navigate to Computer Configuration / Policies / Windows Settings / Security Settings / Windows Firewall / Windows Firewall / Incoming Rules and select New Rule.
The further procedure then corresponds to the procedure described at the beginning of this chapter.
Fallback Method
As a fallback method, if administrative shares are not available, data can also be collected via the remote registry. The service "RemoteRegistry" must be set to Automatic or Manual for the Start type.
This can also be done centrally via group policies under Computer Configuration -> Windows Settings -> Security Settings -> System Services.
Info
This method requires a functioning trust between the computer to be scanned and the LOGINventory computer.
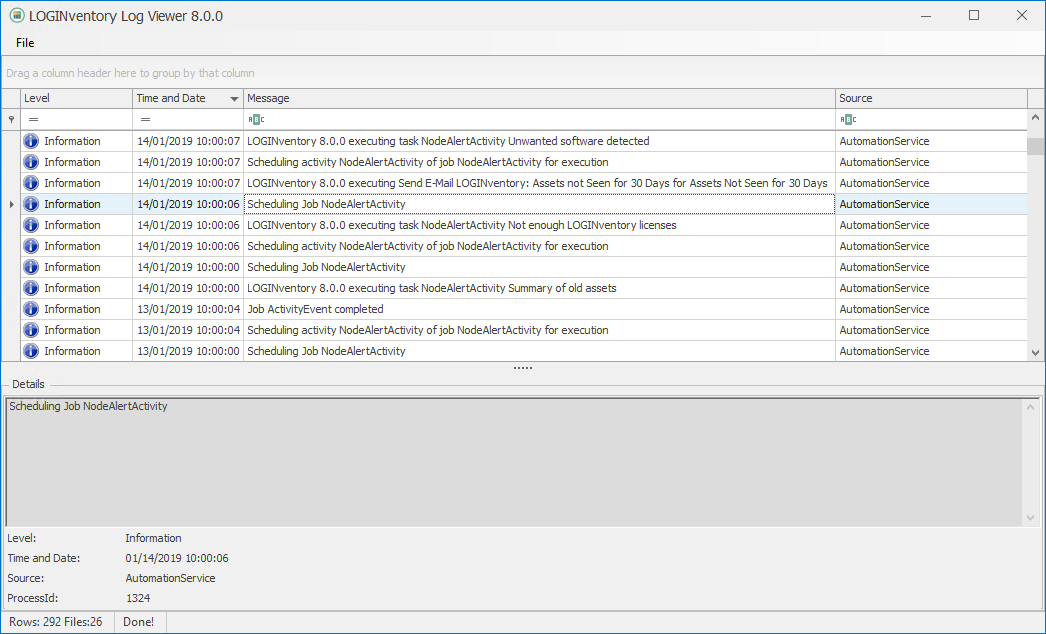
Log Files and Event Viewer
The individual modules of LOGINventory9 write log information into the directory %ProgramData%\Login\LOGINventory\9.0. The LOGINventory Event Viewer can be started via the LOGINventory Data Service icon in the task bar and via the LOGINventory ribbon menu under Extras.

The Event Viewer contains information about the program flow of LOGINventory and can provide valuable conclusions about error sources.
Class Hierarchy "HardwareAsset"
In LOGINventory, both automatically scannable devices (=Entity Device) (PCs, servers, virtual machines, printers, switches, smartphones, etc.) and non-scannable devices (=Entity PeripheralDevice) (docking stations, keyboards, webcams, headsets, monitors, mice, etc.) & Entity Item (tables, chairs, cars, keys, key cards, etc. ) can be managed.
All three asset types are derived from the abstract class HardwareAsset in the data model.

The HardwareAsset includes properties such as Name, Info, WarrantyStart, SerialNumber or InventoryNumber, i.e. properties that are available for Device, PeripheralDevice, and Item.
Example
To get an evaluation of which inventory number was assigned to which equipment (no matter whether Device or PeripheralDevice or Item), a query to the entity HardwareAsset is necessary.
Structure of .inv Files
The recorded data of an asset is saved in .inv files and then entered into the stored database. A .inv file is basically an encrypted .xml file. These files can also be created by yourself to write data in LOGINventory with an external tool, for example. You can create a .xml file and rename it to .inv, e.g. test.inv. When this file is moved to the Data Directory, it is automatically added to the database and a new asset is created in LOGINventory.
A .inv file can look like the following as an example.
<?xml version="1.0" encoding="utf-8"?>

<Inventory xmlns="http://www.loginventory.com/schemas/LOGINventory/data"

    Version="9.0"

    Agent="Notepad" Account="Domain\user"

    Timestamp="2018-11-09T13:47:23Z" Duration="1000" >

<Device xmlns="http://www.loginventory.com/schemas/LOGINventory/data/9.0/LogInfo">

    <NAME>MyAsset8</NAME>

    <ARCHIVED></ARCHIVED>

    <DeviceInfo>

        <SERIALNUMBER>CZ3233TEYP</SERIALNUMBER>
        <ASSETTAG>Asset-CZ3233TEYP</ASSETTAG>

    </DeviceInfo>

    <NETWORK ADAPTER>

        <INTERFACEINDEX>1</INTERFACEINDEX>

        <NAME>NIC8</NAME>

        <IP>192.68.200.8</IP>

        <MAC>A0:05:CA:33:A8:AD</MAC>

    </NETWORK ADAPTER>

    <OperatingSystem>

        <NAME>Unknown OS</NAME>

        <Version>6.3</Version>

    </OperatingSystem>

</Device>

</Inventory>
Identification of Assets by Fingerprint
Asset identification is based on a fingerprint, which is used to identify whether the asset is an existing asset or a previously undetected (= new) asset. This fingerprint is composed of a number of device properties (if available):
Name, LastInventory.Mac, SystemUUID, SerialNumber, AssetTag, DnsHostName, Contact, Description, Location, MachineSid, Operatingsystem.DistinguishedName, MobileDevice.IMEI, MobileDevice.ID
Almost all of the above criteria are not used individually as a unique identification feature of an asset, but in combination. Under certain circumstances, however, it may be desirable to bypass or modify the fingerprint procedure.
Special Case: Pre-Staging
If devices are created manually in LOGINventory (e.g. using the asset editor or via csv import) before they are scanned for the first time by an automatic inventory, there are some special aspects to consider when fingerprinting:
For example, it is likely that when the asset is first created (pre-staging), the final host name with which the device will later be recorded for the first time is not yet known. However, if the serial number of the device is known, this can be used for the assignment during the first automatic acquisition (no creation of duplicates).
In this case, the following special rule applies to the fingerprint: If an asset does not have a value in the LastInventory.Result field (all automatic acquisition methods write a value here - i.e. the device was created manually), the serial number is used as a unique identification criterion. This makes it possible to store documents, properties etc. for an asset before it has been scanned for the first time and still ensure that the information is “matched” during the first acquisition. From the second acquisition (LastInventory.Result not empty), the normal fingerprint applies again.
This behavior can also be switched off, see Ignoring Identification Rules.
Bypassing the Fingerprint Procedure
Info
Bypassing the fingerprint method may be desired if, based on the information collected during acquisition, it is not recognized that two scans represent the same device or if the collected information from two devices is so similar that they are mistaken to be the same asset.
Bypass via CustomID
The fingerprinting procedure can be bypassed by using the CustomID. This value can either be read from the following registry value HKLM\Software\LOGIN\LOGINfo\CustomID or is set via the LOGINfo.script file, e.g..: CustomID=%$DeviceInfo.SerialNumber%.
The mentioned registry value is not available on devices by default, but can - if desired - be placed on the devices e.g. via software distribution. However, we always recommend testing the adjustments "on a small scale" beforehand to be aware of the possible effects.
Note
If the CustomID is set or changed for an asset that already exists in LOGINventory, this will inversely create another asset.
Ignoring Identification Rules
Certain rules can be deactivated. To do this, the name of the rule must be used with a parameter when registering the device.
By using the IgnoreFingerPrintRules <NameOfTheRule> parameter, you can set this rule to be ignored.
The parameter should - like the CustomID - be used with caution as follows:
- Asset Inventory (using the Remote Scanner): Command line parameter
/IgnoreFingerPrintRules <NameOfTheRule> - Running LOGINfo.exe: Command line parameter
/IgnoreFingerPrintRules <NameOfTheRule> - VMware Inventory (using the Remote Scanner): Command line parameter
/IgnoreFingerPrintRules <NameOfTheRule> - General disabling for all Windows, Linux and Hyper-V scans: Adding the entry
!SET IgnoreFingerPrintRules=<NameOfTheRule>in the LOGINfo.script file
Note: This does not affect VMware inventory
Name
Name of the rule: NameOnly
Especially in cases where there are multiple devices (whether physical or virtual machines) in an infrastructure that have the same name, it may be desirable not to use the name as a fallback matching criterion and also deactivate all other rules that contain the name.
Info
The fingerprint uses as a fallback a match in the "name" field. This is e.g. required to be able to import custom properties from a .csv file that only contains the name of an asset as identifier.
Example
In a non-domain environment, two different ESXi hosts (Host1 and Host2) each have a VM named WindowsVirtual. Although the two VMs differ in the DNS extension, LOGINventory permanently shows that the devices overwrite each other. This is visible in the change history of the asset: IP address, MAC address and other values change with each scan.
If now the command line argument /IgnoreFingerPrintRules NameOnly is added to both the VMware inventory (scan of the host and the guest's info known to the host) and the asset inventory (scan of the VM's software, configuration, etc.) with the IP range in which the virtual machines are located, mutual overwriting no longer occurs during scans.
Serial Number
Name of the rule: SerialNumberOnly
The identification of assets based solely on the serial number only takes place in the case of pre-staging, see above.
This rule can be deactivated if an asset was created during pre-staging and only the serial number is known AND it is expected that an asset with exactly this serial number will be automatically recorded during an upcoming scan, although it is not the same object as was previously created manually. This means that two different assets (with the same serial number) should exist in LOGINventory.
Reading Docking Station Information
When scanning Windows PCs, it is possible under certain conditions to read out information on connected docking stations, including model name, serial number and firmware version. A specific driver must be installed on the Windows PC, the docking station must support readout in accordance with the manufacturer's specifications, the Windows PC must come from the same manufacturer as the connected docking station, and the scan must be performed with administrative privileges.
Example
For example, it is only possible to read information about HP docking stations if the appropriate HP driver is installed on the HP notebook and an HP docking station is connected.
The following manufacturers are supported:
| Manufacturer | Required Driver | Notes |
|---|---|---|
| Dell | Dell Command | Monitor or Dell System Inventory Agent | One of the two drivers is required. If the Dell System Inventory Agent is to be used, the complicated Dell instructions must actually be followed in order to install the correct version number of the driver. |
| HP | HP Accessory WMI Provider | only newer models supported |
| Lenovo | Lenovo Dock Manager | Serial number can only be determined for certain (newer) models see instructions, chapter 4 |
| Microsoft | Surface Dock WMI Provider | Depending on the exact Microsoft Surface model and the docking station, the appropriate driver must be installed |
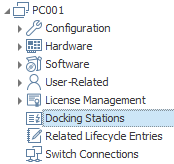
If docking station information was successfully read out when the PC was captured, this information will be visible after double-clicking on the asset:
If the capture is not successful although the conditions appear to be met, check whether the data can be accessed with an administrative powershell as described by the manufacturer. If you test the capture on the local PC, make sure that the LOGINfo.exe is executed as administrator!
Reading Failed Logon Attempts
Both successful and failed logins/login attempts are determined in the UserLogons entity. For Windows devices, you can see see who has logged on to this device and when. This data always comes from the Windows Event Log.
Important
In order for failed logon attempts to be read out by LOGINventory, logging must first be activated in the event log of the Windows computer. This monitoring policy is not activated by default, even for domain members. Group policies, for example, must be used to ensure that failed logon attempts are logged and that entries for ID 4625 can therefore be found in the event log. These are then read out by LOGINventory.
If failed logon attempts are not to be read although event log entries are available, the switch //NoFailedLogons 1 can be used when logging.
File Search
The file search allows you to scan the file system on Windows devices for specific files. The results are displayed for the devices in LOGINventory or in corresponding queries, enabling you to evaluate which devices have (or do not have) certain files.
Configuring the File Search
Depending on the acquisition method, different options are available to configure the file search:
The Remote Scan, acquisition via LOGINfo.exe, and the Windows Offline Agent all respect the entries made in the LOGINfo.script file. In this script file, you can configure where and which files to search for using specific commands. Use !FindFiles <PATH> to search in the specified path and !FindFilesRec <PATH> for a recursive search, including all subfolders.
Tip
If you edit the LOGINfo.script file on the LOGINventory server and want the Offline Agents to adopt these changes (e.g., to perform the file search locally on the client), you need to use the "Create loginfo_script.zip for self-update" button in the Offline Agent configuration dialog (see Reason 3 in Updating the Offline Agent). This ensures that during the next self-update (max. once per day), the Offline Agents fetch the updated LOGINfo.script file from the server and perform the file search locally according to the changes.
You can use the wildcard character * in the file name to search for all .exe files in a folder, for example: !FindFiles C:\Program Files\ExampleApp\*.exe.
Only in the Remote Scanner, for definitions of type Asset Inventory, the file search can also be configured via the user interface (not just in the LOGINfo.script file) in the "File Search" tab.
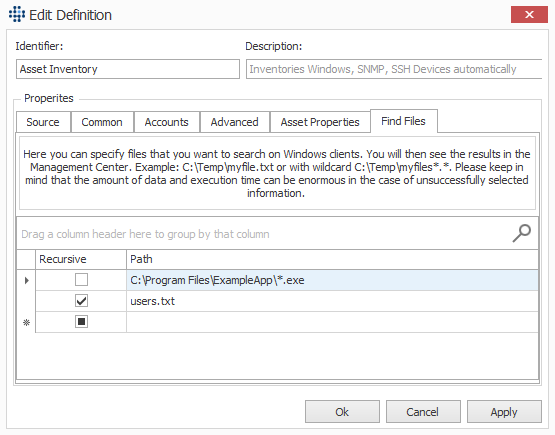
A checkbox is available to enable the file search recursively (including all subfolders). The behavior is otherwise identical to the control via the LOGINfo.script file.
File Search Results
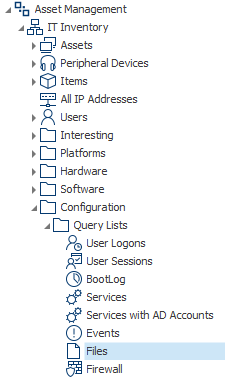
The results of the file search for an individual device can be viewed by double-clicking on the device and then selecting "Configuration" - "Files."

To evaluate across devices which files are present on which devices, navigate to "Configuration" - "Query Lists" - "Files" in the tree structure or create a corresponding query for the "FileInfo" entity.
Examples of File Search
Suppose the following example folder structure is to be searched:
C:\
├─ Program Files\
│  └─ ExampleApp\
│     ├─ ExampleApp.exe
│     ├─ ExampleAppHelper.exe
│     └─ readme.txt
│
├─ ProgramData\
│  └─ ExampleApp\
│     ├─ config.txt
│     └─ users.txt
│
├─ Users\
│  └─ Max\
│     ├─ Desktop\
│     │  ├─ ExampleApp.lnk
│     │  └─ Notes.txt
│     ├─ Documents\
│     │  └─ Guide.txt
│     └─ Downloads\
│        └─ ExampleAppSetup.exe
│
└─ Windows\
   └─ System32\
      └─ drivers.txt
| Entry in LOGINfo.script | File Search Result | Comment |
|---|---|---|
!FindFiles C:\Program Files\ExampleApp\ExampleApp.exe |
C:\Program Files\ExampleApp\ExampleApp.exe |
Quotation marks around the path are optional |
!FindFiles C:\Program Files\ExampleApp\*.exe |
C:\Program Files\ExampleApp\ExampleApp.exe and C:\Program Files\ExampleApp\ExampleAppHelper.exe |
Searches for all .exe files in the specified path |
!FindFiles C:\*.exe |
No matches | No .exe files are directly in C:\ |
!FindFiles C:\Program Files\ExampleApp\*.* |
C:\Program Files\ExampleApp\ExampleApp.exe, C:\Program Files\ExampleApp\ExampleAppHelper.exe, and C:\Program Files\ExampleApp\readme.txt |
Lists all files in the specified path |
!FindFiles C:\Program*\ExampleApp\*.txt |
No matches | Wildcards in the path are not allowed—use recursive search instead |
!FindFilesRec C:\ProgramFiles\*.exe |
C:\Program Files\ExampleApp\ExampleApp.exe and C:\Program Files\ExampleApp\ExampleAppHelper.exe |
Searches for all .exe files in the specified path and all subfolders |
!FindFilesRec C:\*.exe |
C:\Program Files\ExampleApp\ExampleApp.exe, C:\Program Files\ExampleApp\ExampleAppHelper.exe, and C:\Users\Max\Downloads\ExampleAppSetup.exe |
Recursive search in all subfolders of C:\ |
!FindFilesRec users.txt |
C:\ProgramData\ExampleApp\users.txt |
Recursive search for a file with this exact name on all drives |
!FindFilesRec *.* |
All files on drive C: | Not recommended due to high time consumption and potentially large result set |
Info
If you want to search for files in user directories (e.g., "C:\Users\Max\Documents" and "C:\Users\Erika\Documents"), using %username% will not yield the desired result, as the variable cannot be resolved. Instead, it is better to perform a recursive file search by specifying, for example, !FindFilesRec C:\Users\ExampleAppSetup.exe.
Additionally, ensure that the account under which the acquisition is performed has the necessary permissions to list files in the respective user folder.
Backup / Restore
In general, we always recommend to install LOGINventory on a Windows Server operating system and to use the normal daily data backup here as well. In exceptional cases, however, the installation can also be performed on a desktop operating system; however, no data backup mechanism is normally available for these. For such exceptional cases, where no backup procedure is available at all, we provide two batch files: Backup-LIV.bat and Restore-LIV.bat. These files are located in the subfolder "Resources" in the LOGINventory installation directory. With the help of these files, a simple data backup of the LOGINventory database, configuration and scan definitions can be performed if the following requirements are met:
- The supplied local database is used in the instance "LOGINventory".
- The name of the database is LOGINventory9.
- The executing user is a local administrator.
The Backup-LIV.bat
file will then do the following:
- Query the directory to which you want to back up;
- The central configuration files
LOGINventory.Configandscan.dbare copied to the above directory; - The "LOGINventory9" database from the "LOGINVENTORY" instance is saved in the above directory.
The Restore-LIV.bat
file then executes the following:
- Query the directory in which the backed up data is stored;
- The central configuration files
LOGINventory.Configandscan.dbare copied back from the above directory; - The "LOGINventory9" database from the "LOGINVENTORY" instance is restored from the above directory.
Advanced Acquisition via Command Line
When using Remote Scanner, depending on the Definition Type, the GUI will call a corresponding .exe file that performs the actual acquisition, resulting in an .inv file that contains the collected information. These .exe files can also be called directly from the command line or within a script, if the correct parameters are used.
Tip
Acquisition via command line can be interesting e.g. when scanning customer networks where nothing is to be installed or when taking inventory of a "foreign" domain, i.e. without trust and DNS integration - e.g. by service providers who want to do this via VPN dial-in or by using a laptop on site. In this case it offers some advantages compared to the use via remote scanner GUI.
The .exe files relevant for the acquisition are located in the LOGINventory program directory (by default 'C:\Program Files\LOGIN\LOGINventory9').
| Scan Definition | Program | Relevant Parameter |
|---|---|---|
| Asset Inventory | LOGINfo.exe, LOGINfoX.exe | - |
| Active Directory Accounts and Groups | LOGINfoAD.exe | - |
| MS Exchange Inventory | LOGINfoMX.exe | - |
| VMware vSphere Inventory | LOGINfoESX.exe - | |
| XenApp Inventory | LOGINfoMX.exe | /XenApp |
| XenServer Inventory | LOGINfoESX.exe | /XenServer |
| SQL Server Inventory | LOGINfoESX.exe | /SqlServer |
| Microsoft 365 Subscriptions | LOGINfoMX.exe | /AzureAD |
Info
The inventory of Azure AD is not performed by an extra exe, but integrated in the Remote Scanner. Therefore, the Azure AD inventory cannot be started via command line.
The following syntax applies to the specification of further parameters:
Via !, the device to be recorded is always specified by means of FQDN or IP - it must be ensured that no "conflicting credentials" occur. In the path [DataDir] specified afterwards, the resulting .inv file is stored, the acquisition is carried out with the user specified in /USER and the parameters specified additionally afterwards also influence the acquisition.
Example
For example, the acquisition of a XenServer named "XenServ01" is started with the following command and the resulting .inv file is stored in the directory "C:\Temp":LOGINfoESX.exe !XenServ01 C:\Temp /XenServer.
LOGINfo.exe
The use of the LOGINfo.exe is already described in detail here. The other available switches are also explained there.
LOGINfoAD.exe
For the stand-alone execution of the AD acquisition, additional files must be copied from the program directory into the directory with the LOGINfoAD.exe:
- EntityFramework.dll
- Essential.Diagnostics.Core.dll
- Essential.Diagnostics.RollingFileTraceListener.dll
- Login.Quiry.dll
- Login.Tasks.dll
- Login.Ventory.Common.dll
- Login.Ventory.Data.dll
- LoginfoAD.exe
- LoginfoAD.exe.config
By calling LOGINfoAD.exe, the lookup is executed on the domain to which the current user is logged on and the resulting .inv files are written to the same directory. In principle, LOGINfoAD can only be executed on a computer that is a domain member of the domain to be captured, or can use a position of trust for this purpose.
Thus, the domain "my.domain.com" can be captured with the following command:
Alternatively, a domain controller can be specified directly after the !.
| Parameter | Explanation |
|---|---|
/ignoregroups group1;group2 |
This argument can be used to exclude user groups from the AD from being recorded. This may be desirable, for example, if you only want to capture part of your entire organization. |
/membershipsmanaged |
If the /membershipsmanaged parameter is specified, the .GetAuthorizationGroups() method is used to determine the group memberships instead of performing a direct recursive group resolution. |
/recursivegroups |
Recursive resolution of group memberships in security groups. |
/recursivegroupsext |
Recursive resolution of group memberships even outside the own scope / the specified OU. |
LOGINfoESX.exe
| Parameter | Explanation |
|---|---|
/AllowVmNameSpaces |
Does not truncate virtual machine names after the first space, but allows spaces to be in the virtual machine name. Caution: If this switch is used and the virtual machine is explicitly scanned (no spaces allowed in the name), it may result in duplicates in the assets list. |
/DontIgnoreInvalidCertificate |
If no valid SSL certificate is found, by default the acquisition is still performed. This can be prevented with this parameter. |
/Port |
VMware & XenServer acquisition: Use a different port for acquisition (Default: 443) |
/SqlServer |
Start SQL Server inventory |
/StoppedVMs |
Stopped VMs are also created as Asset (Stub). Applies only to ESX host discovery. |
/XenServer |
Start XenServer inventory |
/IgnoreFingerPrintRules NameOnly |
See explanation here |
//ReadSQLServices 1 |
Enumerierung aller Windows Services, die "SQL Server..." im Namen tragen, um damit die Liste der SQL-Instanzen zu gewinnen (diese werden standardmäßig aus der Registry gelesen) |
//NOVIRTUALSWITCH 1 |
For hosts, no virtual switch and the corresponding MAC address table is recorded |
///Custom.Property "Value" |
Creates a new "property" with the value "Value". Applies only to ESX host discovery. |
///Vm.Custom.Property "Value" |
Creates a new "property" with the value "Value". Applies only to virtual machines being discovered on ESX hosts. |
LOGINfoMX.exe
| Parameter | Explanation |
|---|---|
/MaxLastSync |
Exchange acquisition: By default, mobile devices that have synchronized via EAS within the last 90 days are captured. This period can be adjusted with this parameter (e.g. to 30 days: /MaxLastSync 30) |
/NoEas |
Exchange acquisition: No scanning of devices connected via EAS (smartphones etc.) |
/NoSendAs |
Exchange acquisition: No reading of the "SendAs" authorizations. Reading this type of authorization is very slow and thus has a strong influence on the duration of the entire acquisition. |
/EasOnly |
Exchange acquisition: Only scanning of devices connected via EAS (no mailboxes etc.) |
/NoMailbox |
Exchange acquisition: No mailbox information read out |
/ServerFilter |
Exchange acquisition: Using wildcards only certain Exchange servers can be selected for acquisition |
/Test |
does not carry out a scan, but only checks whether an acquisition would be possible (return code 20429) |
/TestCmd |
can be used to test CMD commands, e.g. /testcmd "echo Test1" |
/TestPowerShell |
PowerShell commands can be tested, e.g. /testpowershell "write-output test2" |
/NoRpc |
hereby the PowerShell session for acquisition is not executed on the specified Exchange Server, but locally |
///Custom.Property "Value" |
Creates a new "property" with the value "Value". Applies to Exchange Servers and mobile devices (EAS) |
All test parameters can also be combined several times to test different command combinations during acquisition. This can be useful for identifying errors or problems.
Example test command:
LOGINfoMX.exe !exchange2019 C:\Temp /user domain\admin password /test /testmd "echo hello" /testpowershell "write-output hello2" /norpc
LOGINfoX.exe
| Parameter | Explanation |
|---|---|
/cmd "COMMAND" |
In order to run a "COMMAND" on the target machine |
/keyfile |
Keyfile access |
/sshport "PORT" |
Value "PORT" is used as SSH Port (Default:22) |
/tmpdir "DIR" |
Directory on the target machine where the scripts are being copied to (Default: „/tmp“) |
/workdir "DIR" |
Working directory on the target machine (Default: „/tmp/loginfo“) |
/w |
Show LOGINfoX dialog to test the connection |
Activating the Beta Mode
Selected new features are initially only available in beta mode. To activate the beta mode of your LOGINventory installation, please proceed as follows.
- Navigate via Windows Explorer to the directory where LOGINventory has been installed, e.g.
C:\Program Files\LOGIN\LOGINventory9. - Navigate to the subfolder
Manufacturer. - Execute the file
SetBetaMode_On.regby double click and confirm in the next dialog that the process should be continued. - Start LOGINventory again
Info
To deactivate the beta mode, execute the file SetBetaMode_Off.reg and then start LOGINventory again.
Info
The beta mode setting is computer specific. If you use e.g. the portable version, the registry key must be added on the computer on which you work with LOGINventory (not on the server installation).