Hand Out and Return of Devices
Overview
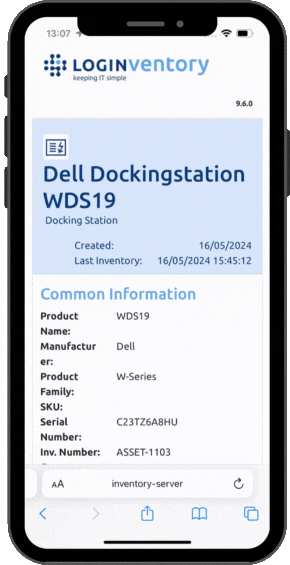
LOGINventory offers the possibility to automatically generate an individual label including QR code for all assets - no matter if scanned automatically or created manually. If the QR code is scanned by a smartphone or tablet with a camera, a website opens on the device that displays the details of the asset.
Here, the hand out of the asset to a specific user or the return of the asset can be documented. The receipt of the asset is documented on the smartphone with a digital signature, whereupon a corresponding entry is created in LOGINventory that is linked to both the asset and the user. In this way, the hand out or return of all IT assets (e.g. laptops, monitors, docking stations, webcams, headsets, keyboards, mice, USB sticks) can be documented in a paperless manner and it can be seen at any time which user received / returned which devices and when.
Prerequisites & Preparation
Asset Present in LOGINventory
If an asset is to be transferred that already exists in LOGINventory, this requirement is already met.
If, on the other hand, an asset is to be transferred that has not yet been scanned / created in LOGINventory, there are various possibilities:
If it is a scannable asset (e.g. PC, switch), scan this asset, e.g. using the Remote Scanner or by running LOGINfo.exe (e.g. also via USB stick). If the asset is still in the incoming supply, or in a box that is not to be unpacked yet, but you already know some details of the asset (e.g. model, serial number, etc.), you can use the Asset Editor to create the asset already.
Info
If the device was then connected to the network at some later point and automatically scanned, the information (manually stored and automatically read out) is combined if LOGINventory can clearly recognize that it is the same device. This is done e.g. by assigning the same name as determined by the scan.
If it is a peripheral device, use the Asset Editor or convert an entry from the list of connected monitors or USB devices to a peripheral device.

Inventory Number Assigned
Make sure that an inventory number has been assigned to the asset: This should be done automatically if the check mark has been set in the dialog for managing inventory numbers so that new assets automatically receive an inventory number. If the asset has not yet been assigned an inventory number, you can also set a number in this dialog.
Danger
You should think carefully about which name pattern to use for your inventory numbers. The numbers are printed on the labels (depending on the selection) and are always located in the link hidden behind the QR code! Changing the number afterwards should be avoided in any case, otherwise the corresponding labels will have to be reprinted!
Web Viewer Published
In order to integrate a link to the LOGINventory Web Viewer in the labels to be printed, the Web Viewer must have been published first.
Danger
In the Web Viewer publishing dialog, take note of the second page which recommends the use of CNAMEs / aliases and a non version specific URL. If LOGINventory should ever be installed on another PC or you upgrade to a new version, all labels would have to be reprinted if the host name of the LOGINventory computer is used in the URL instead of a CNAME / alias or the version is used in the URL. This should be avoided in any case!
Optional: Customizing the Website
Through the settings of the Corporate Style, you can store your own company logo and company colors. If the corresponding checkbox is checked in the settings, these settings will also be applied to the website.
Using the Authorization Concept
To ensure that not every user can later scan the QR codes to view the details of a device or create lifecycle entries, we strongly recommend using the authorization concept. Adjust the settings so that, for example, only members from the IT department are administrators and "normal" employees in your company either have no access or only guest access.
Warning
If you do not assign roles, any domain user can scan the QR codes and create fictional handover / return entries!
Only users with the Power User or Administrator roles can access the web viewer via the QR code, unless the checkbox in the user roles settings has been checked to allow Guests and Users to have read-only access to the page.
Optional: Disable Automatic Update of the Owner
If a user is selected via the website called up by the QR code to whom a device is to be transferred, the Custom property Owner (main user), among other things, is changed as a result. This creates a link between the user and the device.
However, LOGINventory also offers the possibility to automatically update the Owner for devices where a last logged in user can be determined (e.g. scan of Windows clients, Windows servers, Linux clients, MacOS devices), if the Owner has not changed during X consecutive scans.
So if it is planned that the handover of such scannable devices via smartphone is also digitally documented, the automatic updating of the owner should be deactivated.
If, on the other hand, only the handover of non-scannable devices (USB sticks, docking stations, monitors, headsets, etc.) is to be digitally documented using a smartphone and the main user for scannable devices is still to be determined automatically, the option for automatic updating can remain activated.
Optional: Add tags & Terms of Use
A list of tags can be stored in the settings, which is available when creating lifecycle entries. These are suitable, for example, for documenting that devices have been handed over “incl. charging cable” or “incl. laptop bag”, which means that this information does not have to be typed manually into the comment field and the handover process can be completed more quickly.
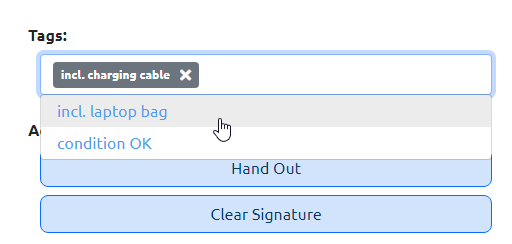
You can also set here that users can add their own tags when creating lifecycle entries that are not yet contained in the Tag list.
Furthermore, the settings can also be used to store your own terms of use in PDF format, which must be accepted by the end user when a device is issued.
Web Server Reachable from Smartphone
In order for the web page of the device to be displayed by scanning a QR code with a smartphone / tablet, the LOGINventory computer must be accessible with the web viewer from the end device. This is possible either by the smartphone being in a WLAN from which the internal LOGINventory computer can be reached. Alternatively, the web viewer can also be made accessible via a public address, e.g. using a port forwarder or reverse proxy. These settings must be implemented by the responsible administrator.
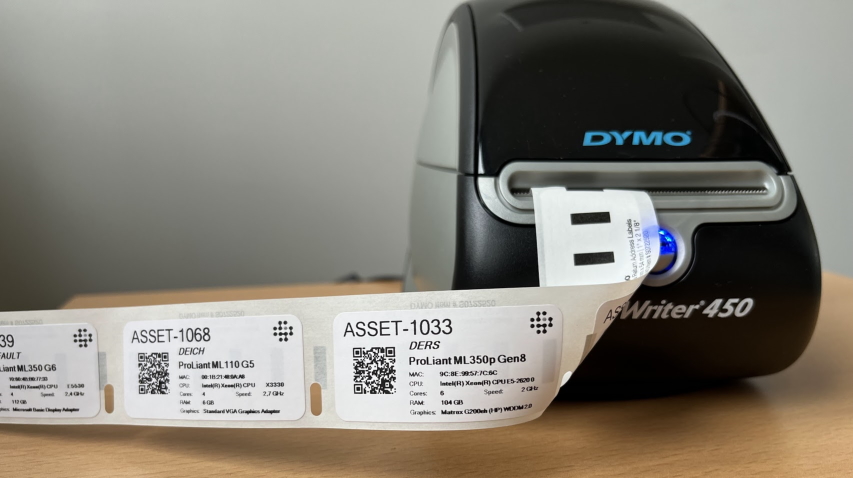
Label Printer and Labels Available
For printing the labels, you should have a label printer that is capable of printing the smallest possible labels so that you can also apply labels to small peripheral devices such as USB sticks or headsets.
Tip
We recommend using the Dymo LabelWriter 450 or a similar model, as we performed the tests with this printer. The reports we supplied fit the formats 13 mm x 25 mm and 25 mm x 54 mm. Labels in this size can be purchased from Amazon, for example.
However, it is also possible to print appropriate labels with a printer from any other manufacturer. Other formats are also possible, because all labels are based on reports that can be freely customized and thus the dimensions can also be modified.
Printing Labels
If the label printer is not accessible as a network printer but only connected to a client PC via USB, it is recommended to use the portable version on this client PC to print the labels.
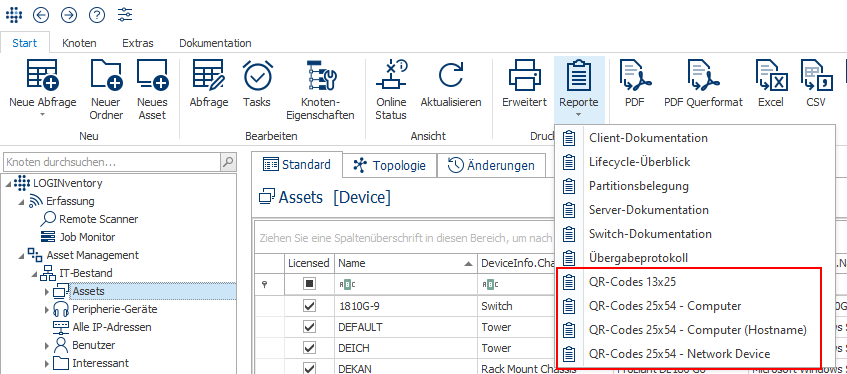
To create a label for a device, navigate to a HardwareAsset, Device or PeripheralDevice entity query, e.g. the Assets node or the Peripheral Devices query.
Select one or more result rows in the Data View, and then select one of the reports in the ribbon menu whose name starts with "QR Codes".
Info
An overview of all included reports can be found here.
Tip
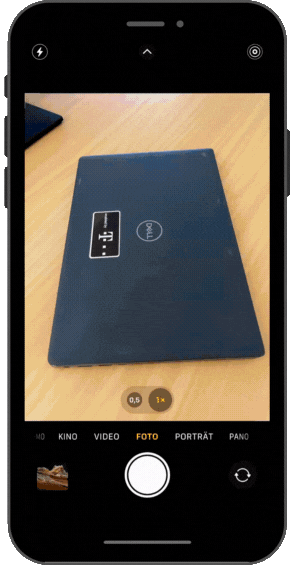
You can already test before printing whether the link on the QR code works as expected by scanning the QR code from the screen with your smartphone. 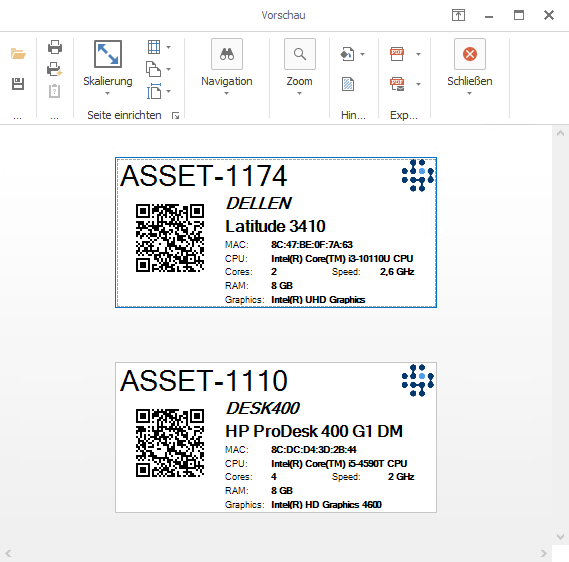
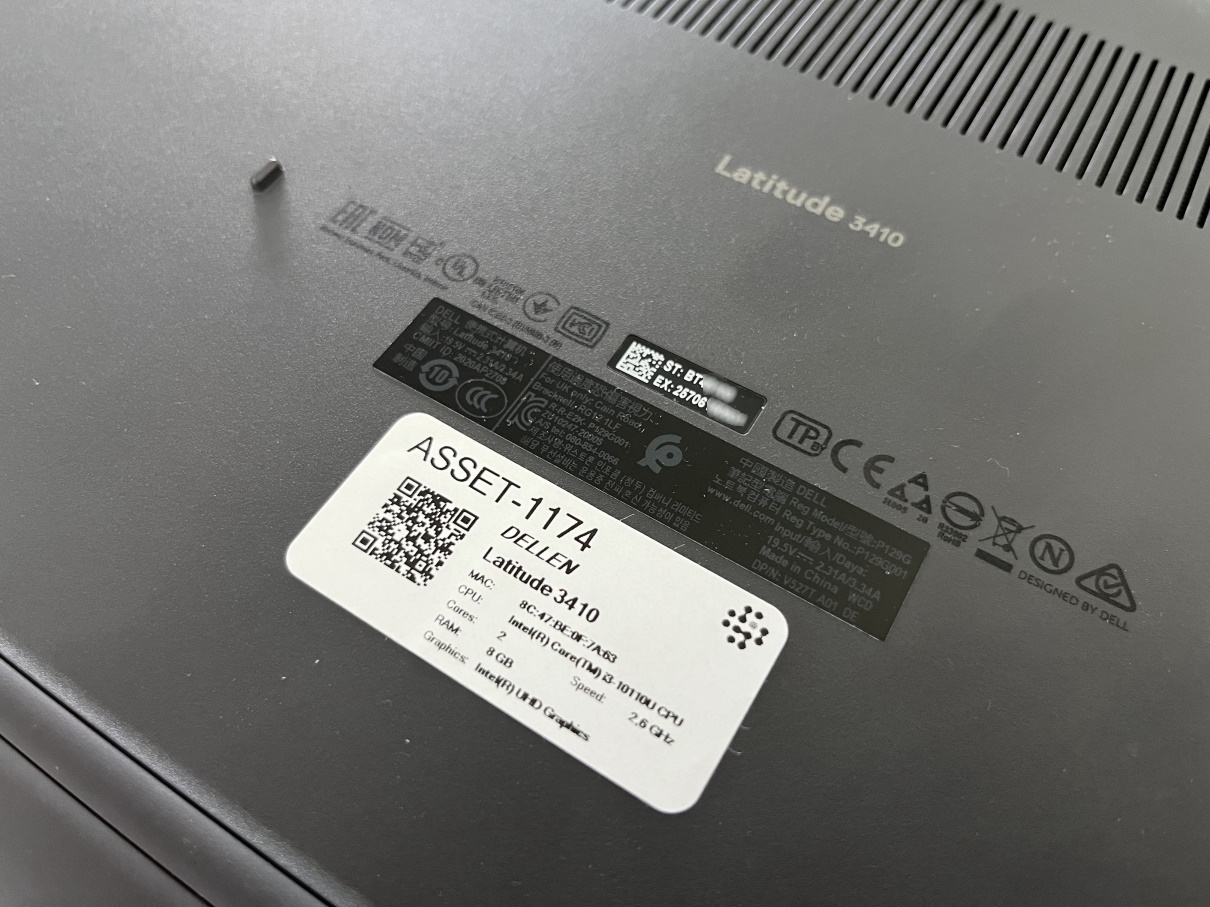
If everything works as desired, you can print the report on the label printer and apply the appropriate labels to the devices.
Warning
Before the productive printout of labels, please note the information regarding the URL used in the QR code. You should refrain from using the host name of the LOGINventory server!
Documentation of the Hand Out via Smartphone
If the QR code is scanned via smartphone, a URL like http://inventory-server/LOGINventory/details.aspx?invnr=Asset1001 opens. If you use the recommended settings of the IIS, you will be asked for a user name and password when calling this page (=Basic Authentication).
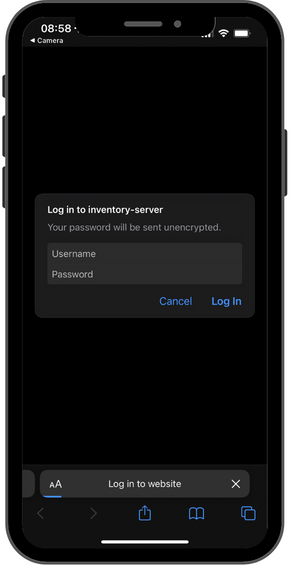
Use the username and password of a domain user who has the permission level Power User or Administrator in LOGINventory.
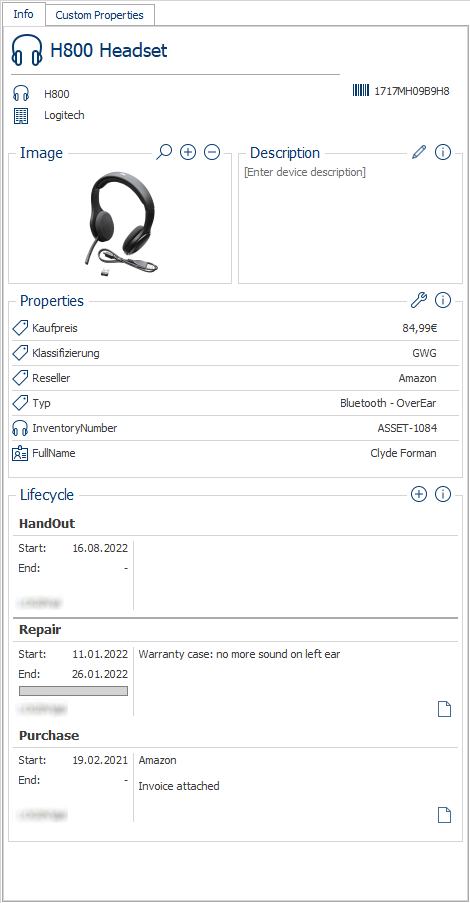
On the page that opens, you will now see various details of the device. Via the menu Lifecycle, you will see the two buttons Hand Out & Return. When the corresponding button is selected, further options will appear below.
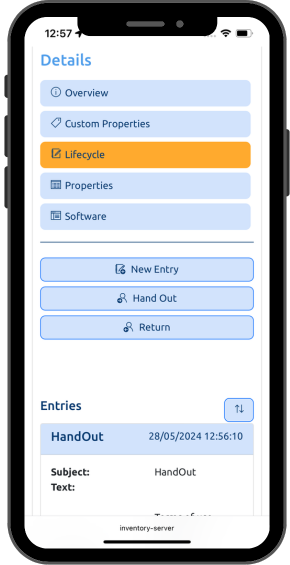
Thus, in the case of a Hand Out, a user can now be selected here to whom the device is to be transferred. Furthermore, there is
- a field to add a note
- a field to select a date
- a field to add tags (this option has to be enabled in the settings beforehand)
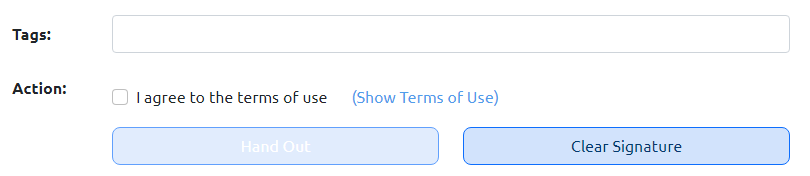
- a checkbox to accept terms of use and an option to open the terms of use (this option has to be enabled in the settings beforehand)
- a signature field where the user can sign with his finger.
Info
The Active Directory acquisition fills the user list, which is available for selection here.
Tip
Tilt your smartphone to landscape mode if the signature field is too small.
Completing the hand out process using the Hand Out button deposits a lifecycle entry on the device containing the entered data and signature, and updates the Owner ( main user) of the device.
If the Return of the asset is to be documented, the procedure is similar, but there is no field for selecting the user and no option to accept the terms of use and the Owner property is cleared.
Transfer of Multiple Assets
If several assets are to be transferred during the hand out or return process, the Additional Assets toggle button can be selected. This opens a search window in which further assets can be selected. The name, chassis type, inventory number, serial number and the name of the owner can be used to search.

The assets selected in this search window are then visible below the search window. From here, the assets can also be deselected again with a single click.
Tip
In the event of a return, all other assets for which the same user is also entered as the owner are automatically preselected if the Additional Assets option has been selected. This eliminates the need to manually search for other devices. 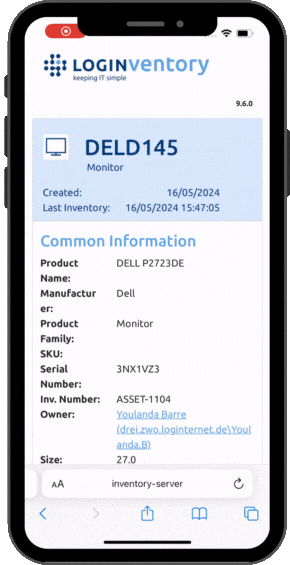
In this way, the lifecycle entries are stored for all selected devices and the owner of all devices is set or cleared.
Further Features in the Web Viewer
In addition to documenting the hand out or return of assets, there are other options available in the Web Viewer on the Asset Details page.
Adding Photos
Using the corresponding button on the Asset Details page, it is possible to add a photo / image to the asset. On a smartphone, the camera can be opened to take a photo and store it. The local photo storage can also be searched on the smartphone.
On a computer, the hard disk can be searched to upload a suitable image.
The image stored here can then also be viewed / changed in the info widget.
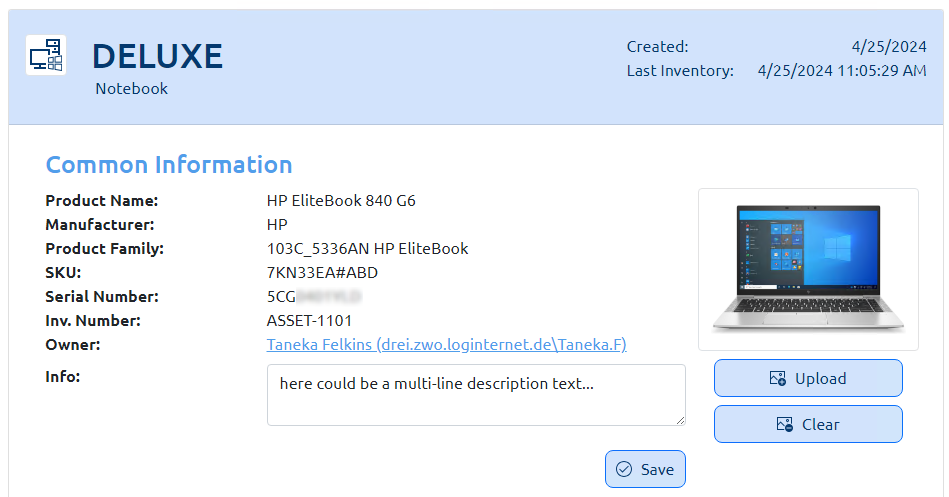
Editing Custom Properties
An asset's custom properties can be viewed and edited via the Custom Properties tab. The Save button must be clicked for changes to be applied here.
Creating General Lifecycle Entries
The Lifecycle tab can be used to create not only entries for documenting the hand out and return (including owner changes in each case), but also to create general lifecycle entries. These entries additionally have the fields Category and End and can be used, for example, to document maintenance, repairs or similar.
In addition, all lifecycle entries stored on the asset can also be viewed here.
Customizing the Description Field
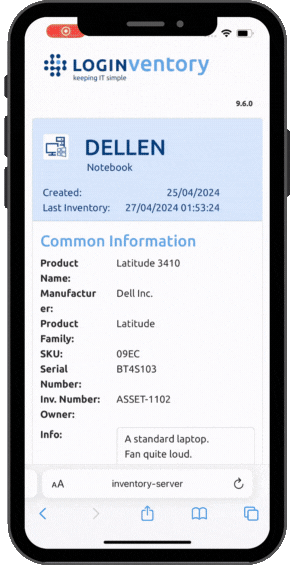
The description field (Device.Info), which is also visible in the info widget, can be customized via the Asset Details page.
Tracking of Handed Over Devices
By handing over / taking back a device, on the one hand the Owner (main user) of the device is updated, on the other hand a lifecycle entry is stored at the device (visible in the Info Widget, among others), which is linked to the corresponding user.
The evaluation of these entries is possible at different places in LOGINventory.
View via the Web Viewer
Every user - even if they have not been assigned a role in the authorization concept - can use the Web Viewer to view which assets are assigned to them and also see all the lifecycle entries linked to them. To do this, the user must open the User Details page (user.aspx), e.g. http://loginventory-server/LOGINventory9/user.aspx. Depending on the configuration, integrated Windows Authentication (i.e. in the context of the user currently logged on to the Windows computer) or Basic Authentication (i.e. user & password query) is used when logging in.
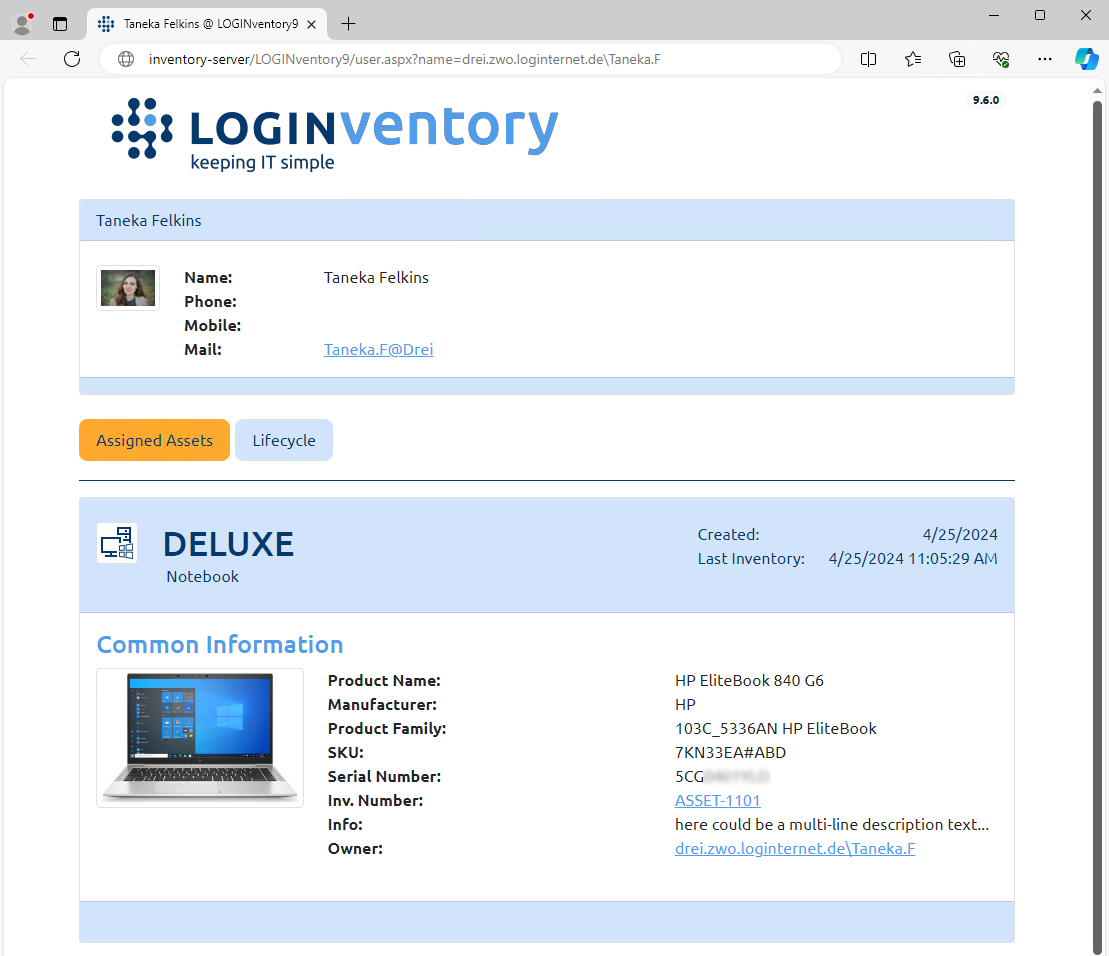
LOGINventory users with the role of Power User or Administrator can also view the details of all users and thus also use the Web Viewer to evaluate who currently owns which assets.
If the corresponding checkbox has been checked in the user roles settings, Guests and Users can also have read-only access to the pages.
Evaluations of the Owner
Many included queries (e.g. Assets nodes, Peripheral Devices nodes) have the Owner property selected by default. Of course, you can adapt all existing queries or create new ones and, for example, add the columns Owner.UserAccount.FullName or Owner.UserAccount.Department to get additional information about the main user in the respective evaluation.
Info
For example, even when scanning a QR code, you will see in the overview page in the web viewer who is the current Owner of the device.
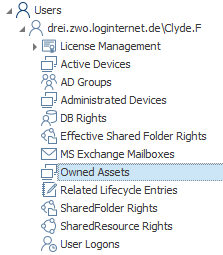
If you open the details of a user in the supplied Users query by double-clicking, you can also see here, among other things, the devices for which this user is entered as the Owner. Many other included reports also use the Owner field by default.

Also in the expanded tree structure below the user you can see the user's Assigned Devices.
Evaluations of Lifecycle Entries
To view the Lifecycle entries of a device, the device can be selected in a Device, PeripheralDevice or HardwareAsset entity query (e.g. Assets node, Peripheral Devices node) and then the Info Widget can be opened.
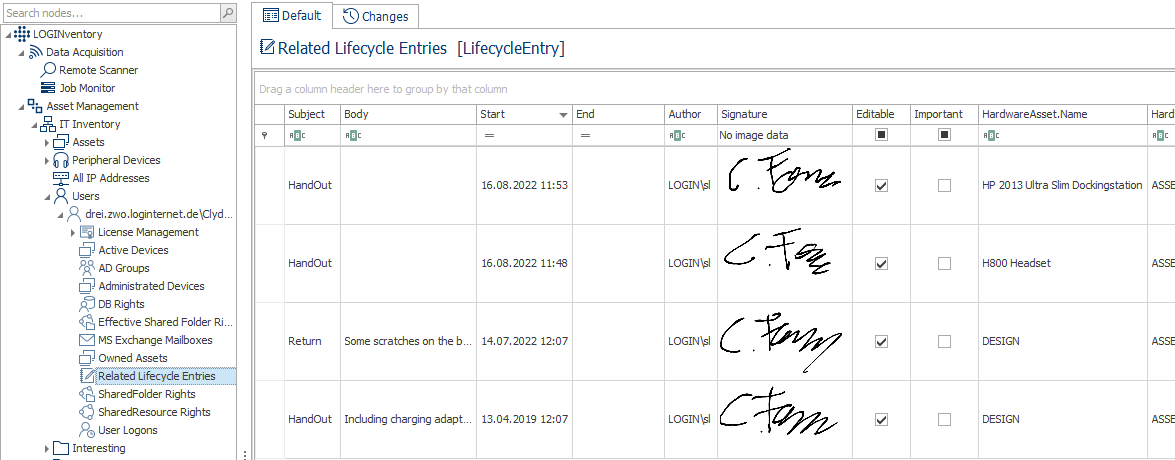
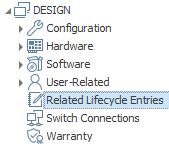
Furthermore, the entries are also visible under Related Lifecycle Entries by double-clicking on a device or user.
In many of the supplied reports, the lifecycle entries are also displayed.