Settings
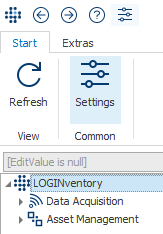
The settings can be accessed via the ribbon menu Start and offer the possibility to customize the behavior of LOGINventory.
Info
Depending on which components of LOGINventory have been installed and with which rights the application is started, there are different setting options for general behavior, asset management and acquisition.
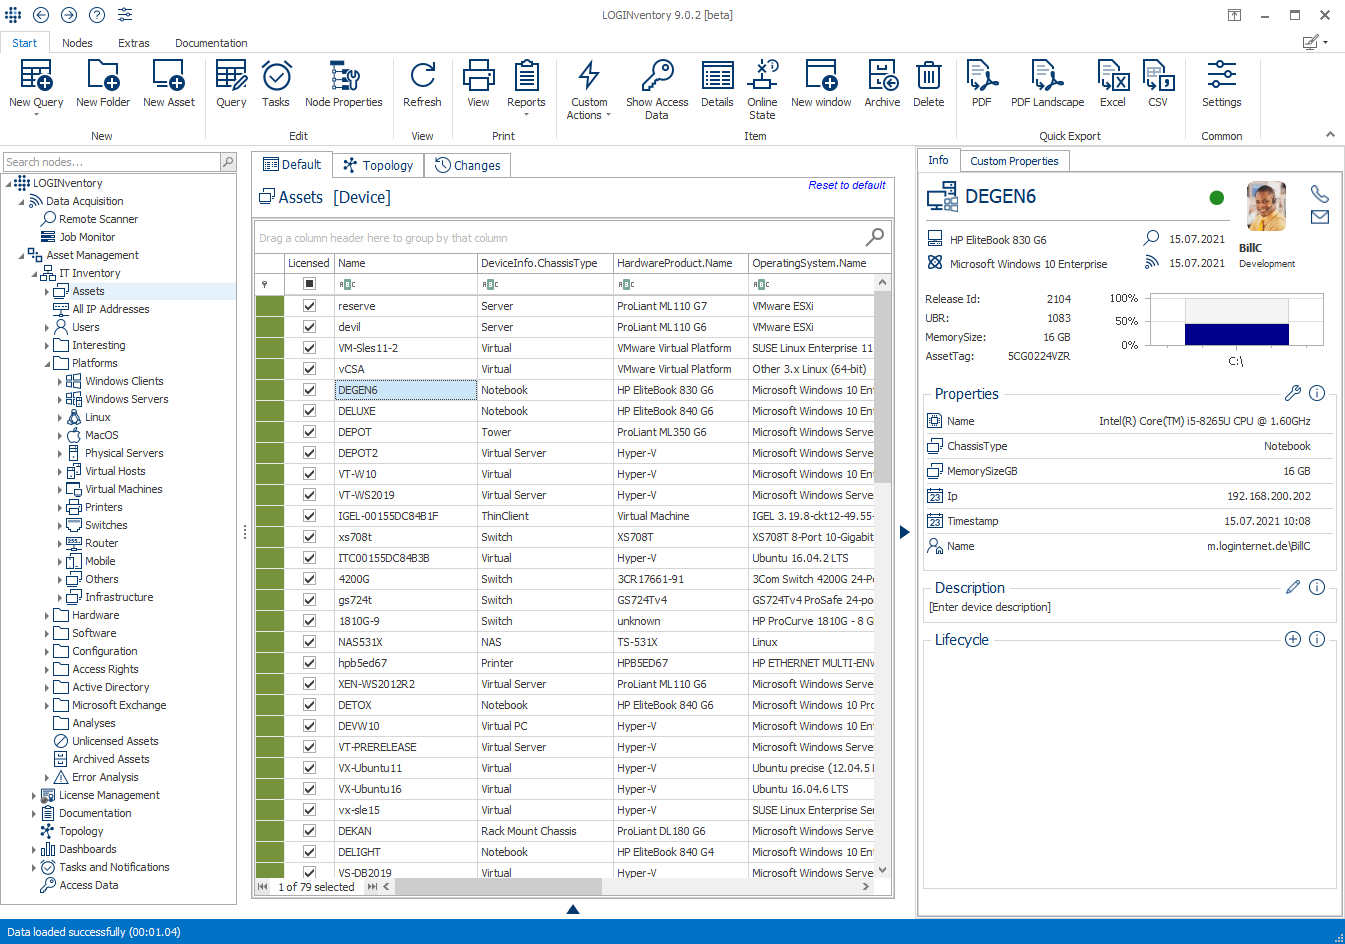
LOGINventory Settings
Attention
If you are using the portable version of LOGINventory, not all settings are available; only the user specific ones!
Common Settings
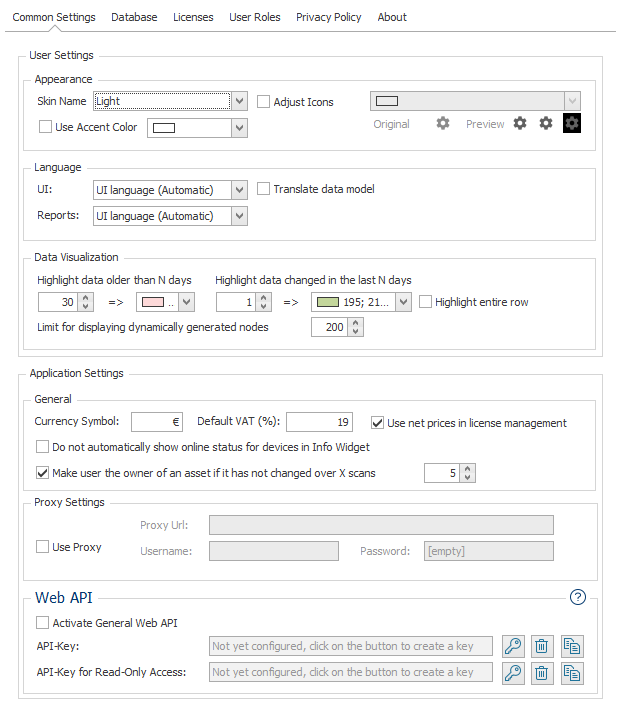
User Settings
These settings are user-specific, i.e. every user of LOGINventory can make his own settings here.
Appearance
Different themes can be used for LOGINventory. Among other things a dark mode is supported, where the background is dark and the icons and fonts are lighter. The icon color and accent color (used in headings) can also be set for each theme. The font color is automatically determined by the theme.
Info
The theme "Light" without adjusting the icons or accent color corresponds to the default settings.
Attention
After changing the theme, it may be necessary to restart the application so that all icons appear in the new theme color
Light:
Colorful:
Gray:
Dark:
Language
When setting the language of the user interface, you can choose between German and English.
You can define your own language settings for the reports. The reports for the selected language will then be available in the ribbon menu when applying reports.
Data Visualization
To visually highlight data in detail views, "newly scanned data" and "no longer current values" can be identified by certain colors. The reference date is the Modified timestamp of the data record.
Here you can define up to which limit value dynamically generated nodes (displayed semi-transparently) are expanded in the tree structure. In the example of the default limit value "200", this means that the subnodes are only displayed directly when the arrow next to the node is clicked, if there are less than 200 dynamically generated nodes below them. For reasons of clarity, the system does not expand tree structures that have more than 200 dynamically generated subnodes.
Example
If the limit value is set to 50 and 49 devices have been successfully inventoried so far (49 entries for the asset node), double-clicking on an asset causes 49 dynamically generated nodes to be created below the asset node and the selected asset is selected.If there are 51 devices in the asset node, double-clicking on an asset causes only this asset to be created as a dynamically generated node.
Tip
If you refresh the affected section of the tree structure, dynamically generated nodes disappear again.
Application Settings
The application specific settings apply to all users of the LOGINventory installation and the portable version.
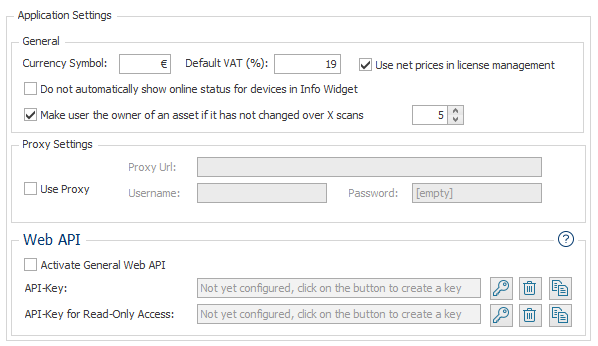
General
Here you can set the currency format that is used for storing prices and in reports. You can also define which standard VAT rate should be used in license management in the price calculator and whether gross or net prices should be used.
In addition, it is possible to set that the respective device is not automatically pinged as soon as the info widget is opened (show online status).
Furthermore, the Automatic initialization of the Custom Property Owner (main user) can be deactivated. By default, this setting is enabled, which automatically assigns the last logged-in user (LastUser.Name) as Owner when a new device is added.
Additionally, the Automatic update of the Custom Property Owner (main user) can be activated or deactivated and a threshold can be set, after how many consecutive scans with the same last logged-in user (LastUser.Name) the Owner should be changed.
Info
If there was an automatic change, this can be seen in the change history. Here you will find an entry, where the Property Owner has changed the value. As Account the value DB-Trigger is being displayed. 
Proxy Settings
Enable the checkmark to use proxy settings when LOGINventory connects to the internet (e.g. when looking for updates, gathering data from Cloud Subscriptions).
Web API
Use the checkbox to activate the General Web API. If this is activated, users with administrative rights can access all data in LOGINventory via HTTP requests.
API keys for accessing the Web API and the MCP server of LOGINventory can also be created and managed here. Exactly one API key for read-only access and one API key for full access can be created.
Important
If API keys have been generated, you must follow the instructions here! After that, authentication with username and password is no longer possible; instead, a valid API key must be provided in the HTTP header X-Api-Key.
AI Assistant
Through this setting, the AI Assistant LIA can be deactivated. If LIA is deactivated, the function remains visible in the user interface, but when accessed, a message is displayed indicating that LIA is not activated. This ensures that users do not accidentally access LIA if they are not allowed to use it.
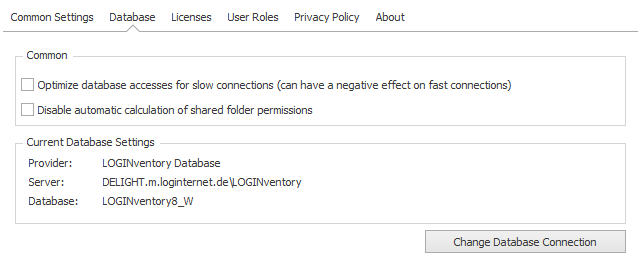
Database
The currently configured database connection can be viewed in the setting.
Info
The checkbox is used to disable the automatic recalculation of access rights for shared folders (system task "RebuildSharedFolder"). This calculation is carried out daily at 4 a.m. by default and is very calculation and memory intensive. Especially for large databases with several thousand users in the AD, it may be desirable not to perform the calculation daily, but only when required for performance reasons. This manual calculation can be initiated via the ribbon menu (Recalculate on Server).
Click the Change Database Connection button to change the current database configuration. To do this, the Management Center closes and a new window for changing the database opens.

Attention
By default, no settings need to be made here if the installation of the integrated LOGINventory database Microsoft SQL Server Express Edition was not deselected during setup. Then a Microsoft SQL 2012 Server Express Edition is created in the instance "LOGINventory", which has already been configured for ready use and productive operation.
Info
The LOGINventory database created by the setup has by default the SQL authentication with the user "sa" and the password "LOGINventory6" set up. Furthermore, all local administrators in the instance "LOGINventory" are also DBO.
When selecting the Data Provider, the options LOGINventory Database, Microsoft SQL Server, and Microsoft SQL Server Express are available. If LOGINventory Database is not selected, a server or instance can be selected from the drop-down menu.
Attention
If you are using your own existing SQL Server instance, please note the following recommendations, which can have a major impact on database size and performance:
- Set the recovery model to "simple".
- Use at least Compatibility Level 130 (equivalent to SQL Server 2016)
- Use "Latin1_General_100_CI_AS" as collation
With Name an existing database can be selected or the name of a new database can be entered. This is then created by clicking on Create, or the connection to the selected database is checked by clicking on Verify.
When verifying the connection, the database version is also checked and, if necessary, an update of the database is suggested.
A sub-item of the Verify button is the Integrity Check. This function can be used to check that the database does not contain any incorrect data records.
Transfer Database
In LOGINventory it is possible to transfer the data of an existing LOGINventory database into a new database (also from another database provider). For this purpose the sub-command Transfer database of button Create is selected with the settings of the previous database. The database is copied to the clipboard.
![]()
Now the new database provider is selected and the database parameters are specified. Finally, the Transfer button completes the copy operation. To cancel the copy operation, select the Cancel transfer sub-command from the Transfer button. The previous database setting then remains unchanged.
![]()
Create Database via Script
The LOGINventory database on the SQL server can also be created "manually" using the following individual steps:
- Generating database script: The Generate Script sub-command of the Create button can be used to create an SQL script. This can be used to create the database on the database server (e.g. by the database administrator). A suitable script is copied to the clipboard and displayed in the text editor. Finally, it can be executed on the database server.
- Creation on the SQL server: The database administrator can create the desired database and create the table structure using the script generated above.
- Initializing the database: After a database has been created on the database server, the node structure should be reloaded using the function Initialize database (sub-command of Create).
Optimizing the database
To speed up the search within the database, indexes are being created automatically in the background. In order to delete all indizes and create new ones, you can use the Optimize function.
Similar to creating a database, you can also optimize the database using a script file. This script file can be created using the Generate Script subcommand of the Optimize button.
Licenses
LOGINventory is delivered with a license for 20 assets as a "test version". After purchasing a license corresponding to the amount of assets to be inventoried, the supplied .license file can be inserted into the database using the "+" button. This automatically deactivates the test license. Since the license is now stored in the LOGINventory database, it does not need to be installed on every PC on which LOGINventory is used.
Several licenses can also be imported here if additional licenses have been purchased.
User Roles
The roles Administrators, Power Users, Users and Guests described in the Authorization Concept can be assigned here. Groups or users can be selected from the ActiveDirectory.
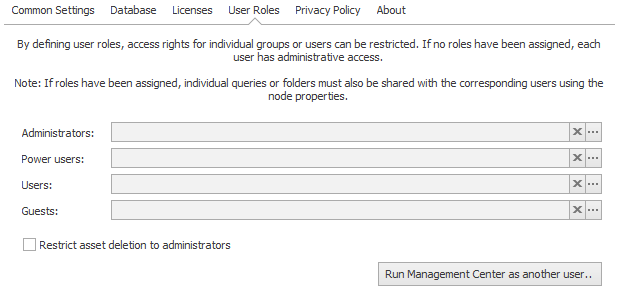
If no roles are assigned, each user is an administrator. When adding roles, you should make sure that an administrator is explicitly set first.
It can also be specified that only members of the "Administrator" role may delete assets. Normally, "Users" and "Power Users" are also allowed to do this.
Furthermore, it can be set that Guests and Users are allowed to access the asset and user detail page of the web viewer. They will, of course, only have read access and cannot perform any hand outs or returns or make any other changes (custom properties, lifecycle, photo, description text). Only Administrators and Power Users are allowed to do that.
LOGINventory can also be started here in the context of another user in order to test which data the corresponding user sees. The user's password is not required.
Data Maintenance
Data Cleansing
To remove data from the database, various criteria can be selected and the cleanup can be performed using Execute selected tasks button.
Clean Inventory Data
Attention
Data cleansing does not delete or archive any assets. To see old devices that have not been recorded for a long time, you can sort by the LastInventory.Timestamp. Devices can then be archived or deleted from the asset list.
In any case, we recommend switching on automatic cleanup, otherwise performance can suffer greatly over time when there are millions of data records! This especially affects the entry "Change log". 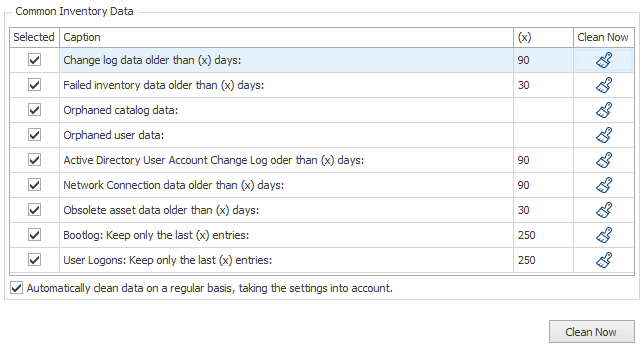
The following actions are performed during cleanup:
- Change log: Entries older than X days are removed from the history.
Info: Cleansing of the Change log
This entry should in any case be cleaned up regularly (preferably automatically).
Cleaning up the change history will never delete assets but you can no longer see which changes were logged X days ago.
For example, cleaning up the data to the last 30 days will ensure that you can no longer see which exit code a service had 40 days ago. The current value is always kept, however! - Failed Inventory: All entries older than X days are deleted from the list of incorrectly inventoried devices.
- Orphaned catalog data: For example, if a certain version of a software package is found on a computer, a catalog entry is created for it. However, if the package does not exist later in this version (e.g. because an update was carried out), a catalog entry still exists, but without a link to a computer, i.e. with 0 installations. Cleansing orphaned catalog entries removes these entries without linking.
- Orphaned user data: The "Users" table collects all users that have been referenced somewhere (e.g. because they have installed a software package). This list can be cleaned up so that only those users are left to which a reference still exists.
- Active Directory User Account Change Log: The change log of user data read from the AC older than X days will be deleted.
- Active Directory accounts and groups obsolete for more than (x) days: Cleans up AD data that has not been included in an AD scan for an extended period.
Background on AD acquisition
You can specify in a scan definition that either the entire AD or only specific parts (OUs) are captured. The collected data is then entered into the database, and existing records are updated. However, what cannot happen is that AD accounts that no longer exist are deleted, because we cannot be certain whether you have captured the entire AD or only a part of it.
Using the automatic cleanup function, such "obsolete" objects can be automatically deleted after a configurable period (e.g., 7 days). For each domain, it is checked how long an object has not been captured—based on the last successful scan of the respective domain.Example
Suppose there are two AD domains and the limit for cleanup has been set to 7 days:
- In Domain 1, User A is deleted.
- In Domain 2, User B is deleted.
Afterward, an AD scan is immediately performed in both domains → both users are missing but remain in the database with a
timestamp, indicating that the data was not included in the last scan.Eight days later:
- A new scan is performed only in Domain 1, followed by the cleanup process.
- The cleanup detects that User A has not been present for over 7 days → User A is deleted.
- In Domain 2, no new scan has occurred → the
timestampfor User B is 8 days old, but since there is no newer scan, no deletion occurs.
Important to know: The 7-day period always refers to the last capture of the respective domain. It is therefore important to perform regular scans for all connected domains to ensure outdated objects are reliably identified and cleaned up.
- User CloudSubscription data obsolete for more than (x) days: Cleans up cloud subscription data (e.g. Microsoft365) that has not been included in a cloud scan for an extended period. The same conditions apply here as for the cleanup of Active Directory accounts and groups (see the previous bullet point).
- Network Connection data All entries of the table NetworkConnection older than X days will be deleted.
- Obsolete asset data: If no entries for a specific catalog, e.g. software packages, have been entered for a device for longer than X days, the corresponding catalog is deleted from the device. This behavior occurs, for example, if the acquisition was previously performed with Windows APIs, but lately only via SNMP.
In addition, user-related data (e.g. software packages installed in the user context, network drives,...) are removed if they have not been encountered for X days (e.g. because the scan was no longer run in the user context). - Bootlog: The cumulated list of boots and shutdowns of computers can be cleaned up to the last X entries (per device).
- User Logons: The cumulative list of logons of users to computers can be cleaned to the last X entries (per device). If a check mark is set for "Automatically clean data on a regular basis, taking the settings into account," the data will be cleaned daily based on the defined limit values. This is performed by the corresponding System Task during the night.
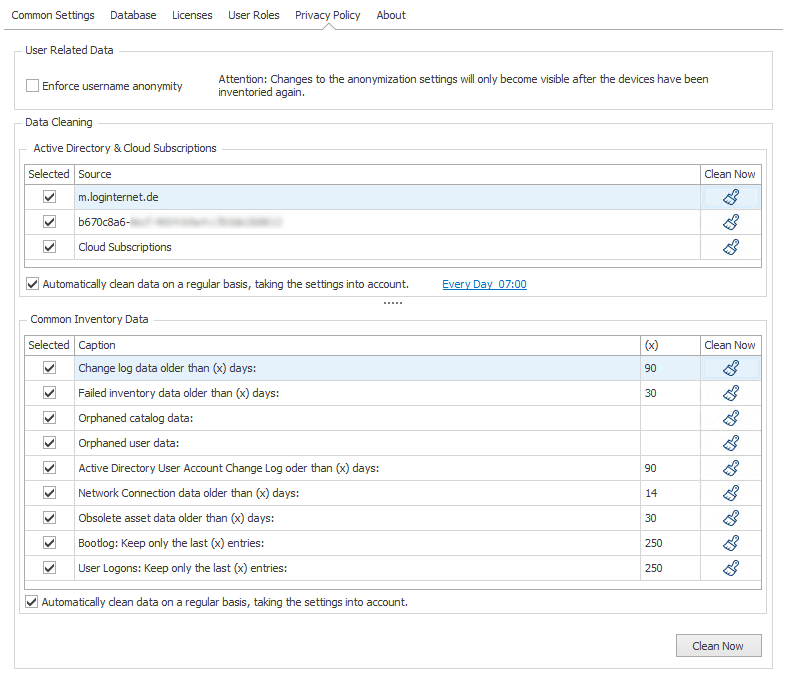
Delete Active Directory & Cloud Subscriptions Data
The settings allow you to remove all recorded data per domain for user accounts, computer accounts and group memberships, as well as for Cloud Subscription data (e.g. Microsoft365). The data can also be cleaned regularly according to a freely definable schedule.
Tip
If only selected accounts or groups are to be deleted, this can be done in the corresponding queries in the "Active Directory" folder in the user interface.
User Related Data
If anonymization of user names is enabled, all future user names entered in the database will be stored in encrypted form. This means that it is not possible to display the names in plain text, nor can these user names be supplemented with information from the Active Directory. Anonymous user names can no longer be made "readable" (and vice versa). After the option has been switched, the user names are only replaced after the devices have been scanned again.
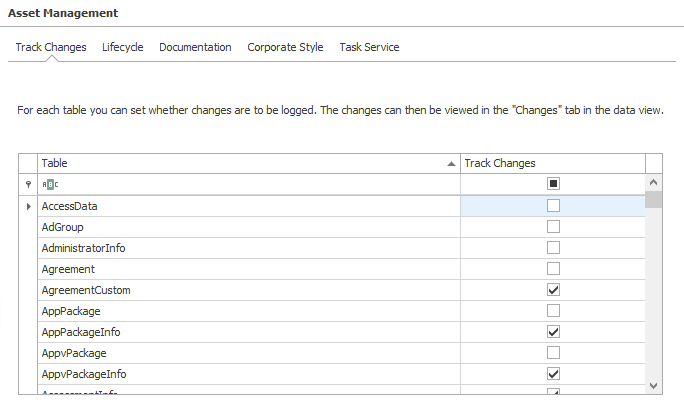
Asset Management Settings
Track Changes
For each table, you can specify whether changes are to be logged. The changes can then be viewed in the tab Changes in the data view.
Lifecycle
The settings here relate to the Asset Details page in the Web Viewer and influence which options are available when storing lifecycle entries and when documenting the hand out and return of devices.
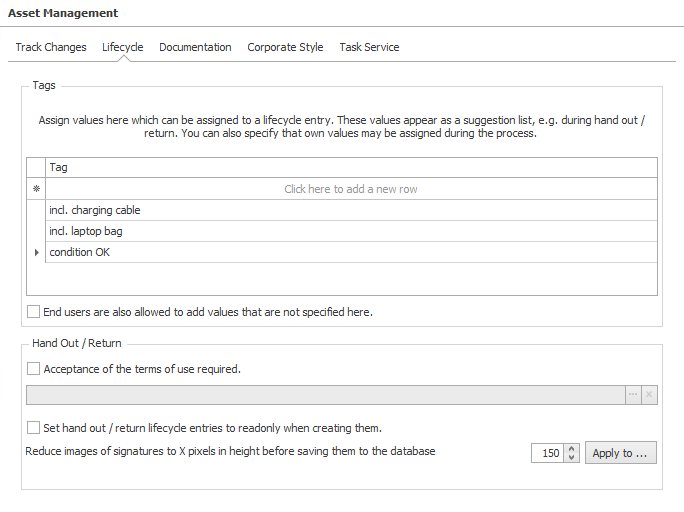
Tags
This list can be used to create tags, e.g. frequently used keywords that are to be made available when creating lifecycle entries and when documenting the hand out and return of devices via the Web Viewer.
These are suitable, for example, for documenting that devices have been handed over “incl. charging cable” or “incl. laptop bag”, which means that this information does not have to be typed manually into the comment field and the handover process can be completed more quickly.
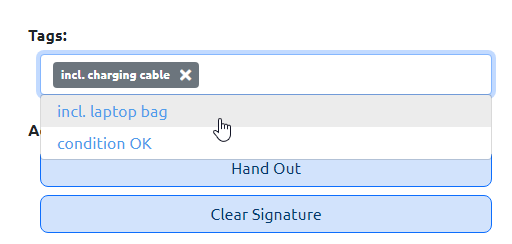
By activating the corresponding checkbox, end users can also add their own values via the web interface, which are not specified here.
Hand Out / Return
If desired, a document in PDF format with terms of use for the company devices can be stored here. If the corresponding checkbox is set, the user must accept these conditions during the output process in order to complete the hand out process. The terms of use can be viewed in the web browser.
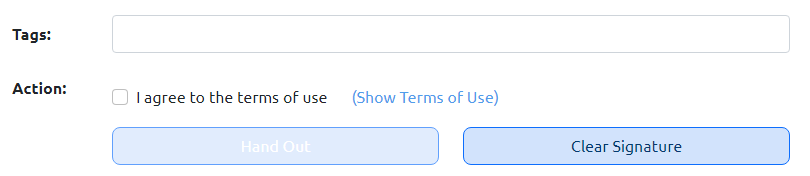
The text “Terms of use accepted” is then added to the end of the note field of the generated lifecycle entry.
Info
When you have just added a PDF file in the settings, it may be necessary to recycle the Application Pool in the IIS Manager in order to be able to see the file via the Web Viewer.
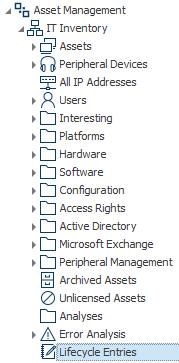
If the option Set lifecycle entries to read-only when creating them is selected, lifecycle entries can no longer be subsequently edited and can no longer be deleted via the info widget. Deleting entries is then only possible by users with the Administrator or Power User role (see authorization concept) via a query with lifecycle entries. Such a query can either be created yourself or can be found in the supplied queries under IT Inventory.
You can also configure that signatures are reduced to X pixels in height before saving. By default, this value is set to 150 pixels and can be adjusted if required. Signatures that are already in the database can also be reduced to the desired height using the corresponding button.
Documentation
The selected tables are available as base tables when you create new dynamic documents, reports and dashboards.
Tip
Usually, the five tables Device, PeripheralDevice, HardwareAsset, SoftwareProduct, and User are sufficient, because from here you can navigate to most relations.

Corporate Style
Both Reports and Dynamic Documents use the logos stored here. For example, company logos can be integrated into the documentation. The stored color palette is used as well for both forms.
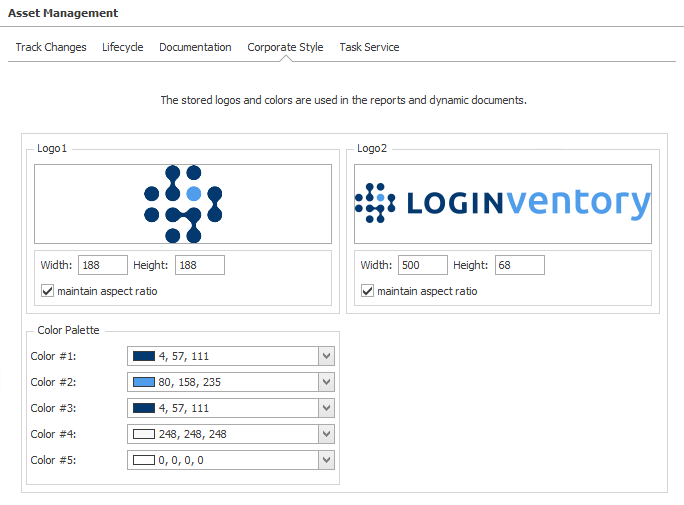
By checking the box Use Logo2 and Colors #1, #2 in the Web Viewer, you can set these settings to be used in the Web Viewer.
Tip
We recommend using Logo1 as a square logo and Logo2 as a wide logo. The height should be at least 76 pixels.
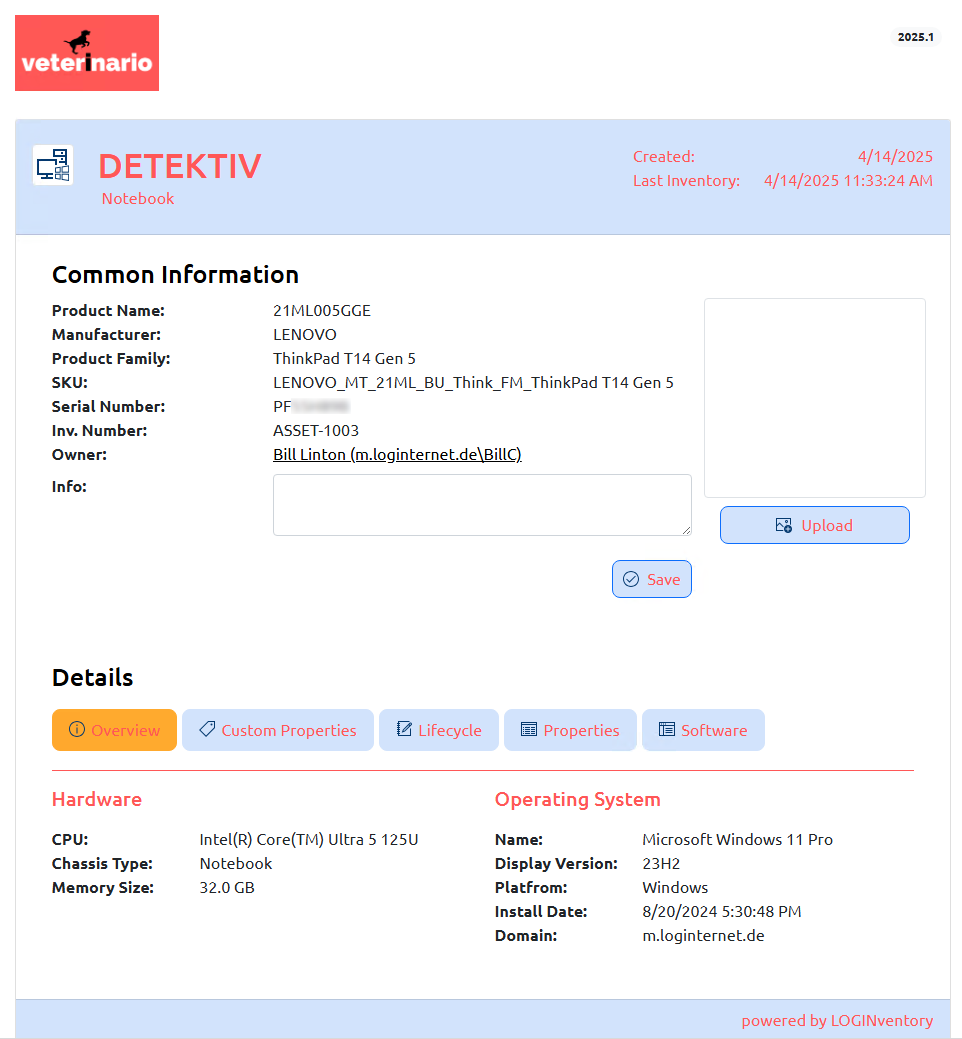
Example
The following settings result in the Web Viewer appearing as shown below: 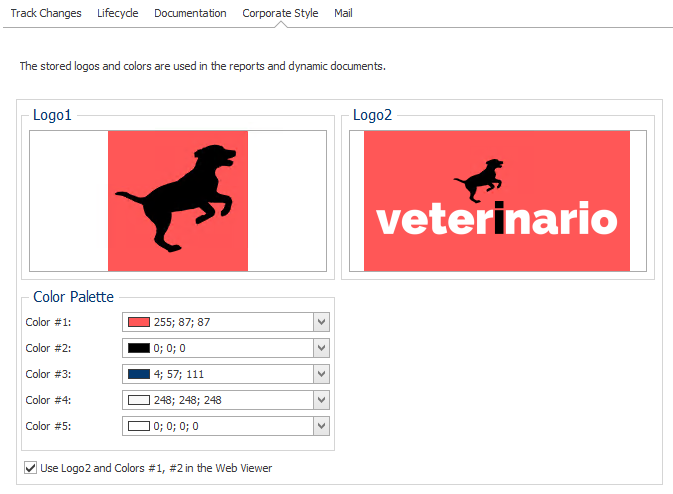
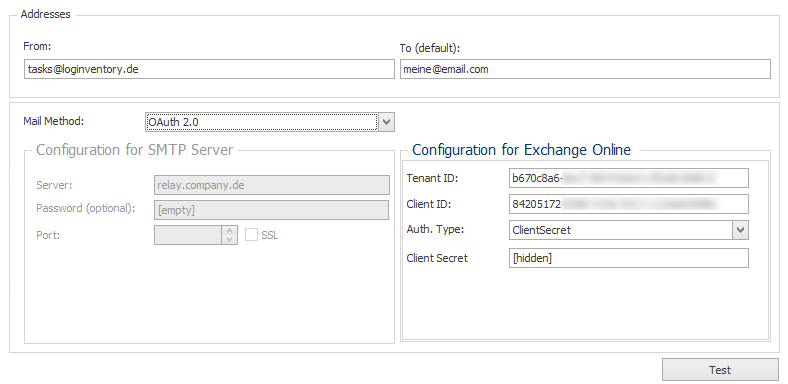
Mail server settings and default e-mail addresses for Notifications.
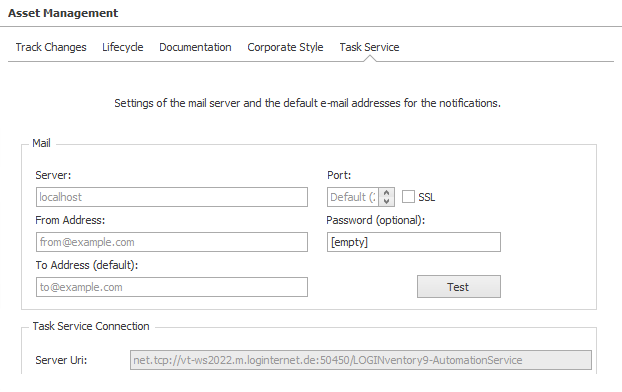
Here you can enter either an SMTP connection or an OAuth 2.0 connection to an Online Exchange Server.
Info
From mid-2025, Online Exchange Servers will no longer support SMTP connections, so an OAuth 2.0 connection using an app registration in the Azure Portal must be set up if no on-premises relay or other SMTP server is available for sending emails.
To set up an app registration in the Microsoft Azure Portal and grant the correct permissions, follow this guide. In Step 3, it is necessary to grant the app registration the right to send emails.
The data for Tenant ID, Client ID, and the Client Secret (or the Certificate Thumbprint) must then be entered here in the settings.
Tip
It may also be useful to use different app registrations for reading cloud services and sending emails, rather than giving all permissions to a single app registration.
Danger
With the configuration made here, an email can be sent on behalf of any user. If the permission of the app registration should be restricted to specific users/mail addresses, this is possible according to the following Microsoft guide: https://learn.microsoft.com/en-us/graph/auth-limit-mailbox-access
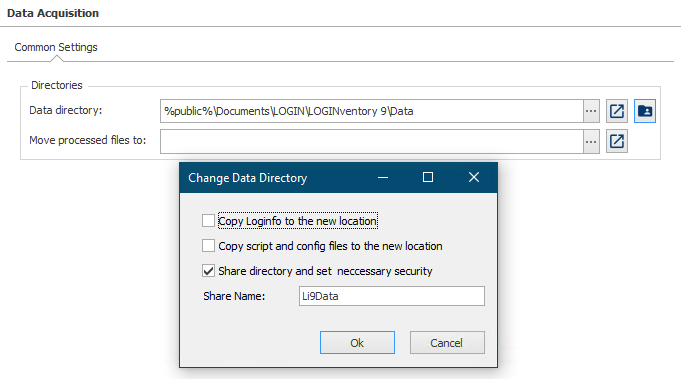
Data Acquisition Settings
Common Settings
The storage location of the data directory can be specified here. The data directory is the path in which the result files (.inv files) of the different inventory methods are stored. All users of the data directory need write access to this directory, i.e:
- All users whose computers are inventoried via Logon-Script
- The LOGINventory Data Service service
With the share button, the directory can be shared and the necessary rights for the Logon-Script can be set. The following rights are set in the file system: Authenticated users: Full; Local service: Modify.
Attention
This must always be a local path! If an access from other machines to the data directory is necessary (e.g. in the logon script), this directory can be shared. In addition, you can set whether, and if yes, where the processed .inv files are to be copied afterwards. This makes it possible to keep the inventory files after they have been processed by the Data Service.
Danger
Usually the second path (Move processed files to) should be empty! If you enter a path here, all inv files will be kept after they have been entered into the database. This is usually not required and may lead to a massive amount of data piling up.
Use this option only if you have good reasons to do so! For example if data should be entered in more than one database or for debugging reasons. Always make sure that processed files are deleted afterwards (e.g. if transferred into a second data directory of another installation)!