Multitenancy
With LOGINventory it is possible to manage network inventory and license management for different clients or end customers with only one installation. Different clients can be created and managed for this purpose. Per client:
- a separate database is created;
- own acquisition methods and scan definitions can be used;
- own licenses must be imported into the respective database;
- you can define your own tasks and notifications.
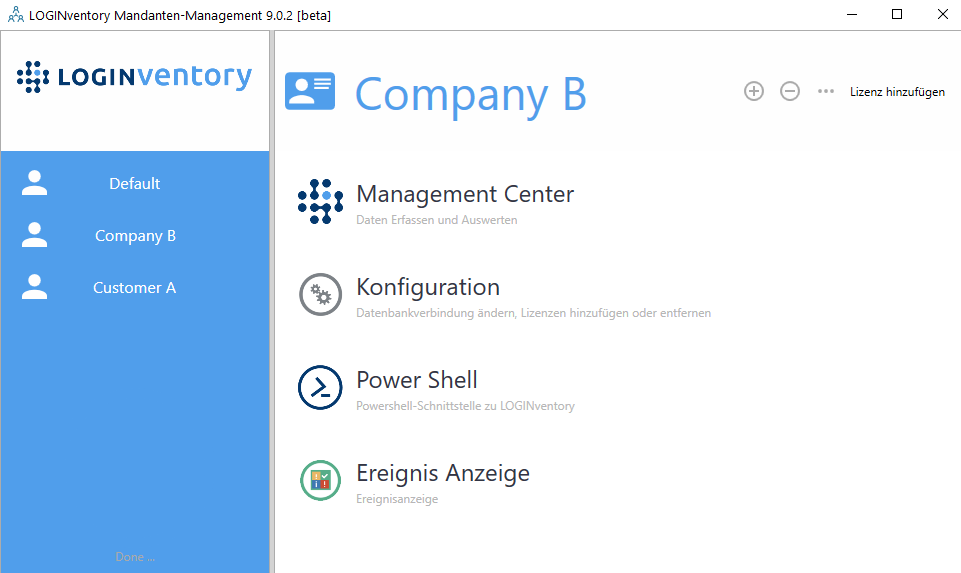
Managing Clients
If no mandates were created, all settings for acquisition, evaluation, and so on apply to the default profile.
With the help of the program Multitenancy Management it is however possible to create further profiles and thus support different clients from one installation. Multitenancy Management can be run from the Start menu.
By clicking on the "+" sign, you can create a new profile and also copy the settings of an existing profile. Then, for a new profile (e.g. "Customer_A")
- a new database (name here
Customer_A) is created. - an own data directory is created: Here, all .inv files created by the respective data acquisition methods must be written (here by default
C:\Users\Public\Documents\LOGIN\LOGINventory 9\Customer_A). - a new profile is created in the LOGINventory Data Service which monitors this new data directory of the end customer.
- a new service has been set up that performs agentless acquisition for this end customer (here
LOGINventory9-InventorySvc-Customer_A). - a new service has been created which manages the tasks and notifications for this end customer (here
LOGINventory9-AutomationService-Customer_A).
Warning
The LOGINfo.exe has to be exchanged manually in the respective data directories after installing an update. This does not happen automatically within the setup!
The LOGINfo.script file is not automatically transferred, as this may not be desired under certain circumstances. If you want to use the LOGINfo.script file for the newly created tenant as well, you have to copy it manually into the subfolder "Script" of the tenant data directory.
Then you can call the Management Center, Configuration, PowerShell, and Event Viewer in the context of the client using Multitenancy Management.
Tip
In the title of the Management Center window, you can see in which context the program was started. Of course, simultaneous starts in the context of different mandates are also possible.
Existing profiles can be deleted by clicking on the "-" sign. However, the database is not deleted as a result, but remains in the SQL Server instance.
Acquistion and Evaluation with Different Mandates
All existing data acquisition methods can of course be used for each client. Typical application scenarios are presented in the following, but of course other combinations are also conceivable.
Attention
With all data entry methods, care must be taken that the .inv files are stored in the correct data directory. Otherwise, the devices entered are assigned to the wrong client.
Acquisition via a VPN Connection
If there is a VPN connection from the LOGINventory computer to the network of a client, this connection can be used for agentless scanning. To do this, you can start the Management Center in the context of the relevant client. Then the appropriate definitions and user accounts and, of course, a schedule for recording can be stored under Acquisition.
Acquisition with a Laptop at the Client
If there is no permanent connection to the client network and nothing is to be installed there, the devices can be captured using a laptop if it has access to the network during visits. To do this, a distinction must be made between whether the database in which the customer data is to be entered is located on the laptop, or whether the data is only to be collected from the customer and then later entered into a database in the service provider's network.
Directly into the Database
If you want to write directly into the database, a complete installation of LOGINventory can be used. The corresponding definitions for the scan process are stored and executed in the client context. No further settings are necessary.
Afterwards into Another Database
If only scanning is required, it is sufficient to install the acquisition module during installation or to stop the LOGINventory9-DataService service during a complete installation. This prevents the .inv files created during the acquisition process from being processed directly. When the acquisition is complete and the acquisition laptop is back in the service provider network, the resulting .inv files can be copied to the correct data directory of the LOGINventory server (for the appropriate client). They are then automatically entered into the correct database.
Acquisition without Direct Regular Access to the Client Network
If data is to be collected without direct regular access to the client network, software must be installed or distributed at the client. The Offline Agent can thus be configured in such a way that the data can be transferred to the service provider's database via the Internet even without an existing LAN connection. For this approach, the Offline Agent is beeing installed on every device.
Warning
Only Windows, Linux & macOS devices can be scanned via Offline Agent. If printers & switches, the Active Directory, an Exchange server, etc. are also to be captured, the Remote Scanner must perform the capture (see next paragraph).
A leaner, simpler option requires only the installation of software on a single device at the client's site: A Remote Scanner Only Installation] and the Offline Agent are installed on one Windows computer at the client. With the stand-alone version of the acquisition module, all computers in the client's network are regularly scanned. Then, only a way has to be found to transfer the resulting .inv files to the service provider's full installation. This can e.eg. be done by the Offline Agent by configuring it so that the .inv files of all devices (and not only those of the client's own device) are transferred.
Info
The Offline Agent always monitors the path 'C:\Users\Public\Documents\LOGIN\LOGINventory 9\LocalData'. (This path cannot be adjusted).
Important
To ensure that the Offline Agent does not only transfer the data of the computer on which it is installed, the data to be transferred must be entered in the directory 'C:\Users\Public\Documents\LOGIN\LOGINventory 9\LocalData'. Thus, in settings of the remote scanner the data directory can be configured so that it is no longer 'C:\Users\Public\Documents\LOGIN\LOGINventory 9\Data' but 'C:\Users\Public\Documents\LOGIN\LOGINventory 9\LocalData'. Then all collected .inv files are automatically transferred.
Alternatively, the .inv files could be zipped and sent by e-mail with the help of a scheduled task. Or the data is transferred manually using a USB stick. In any case, it must be ensured that the data is stored at the end in the correct data directory for the respective tenant.
Tips for Evaluation
If the data of the different clients were stored in different databases, no evaluation of all databases is possible at the same time (e.g. "Which client still uses Windows 7?"). Instead, the queries of interest must be executed in the respective databases.
Tip
With the help of the export and import function of nodes you can create typically required queries in a database and import them into other databases.
Tip
For each database you can of course also create your own tasks and notifications, so that e.g. certain reports or exports are automatically made available to the customer via e-mail on a regular basis.