Installation and Migration
LOGINventory can only be installed on Windows computers, but can also be used on other operating systems. LOGINventory requires a Microsoft SQL Server database to manage the collected data. This is already included in the setup. The system requirements for installation are described here.
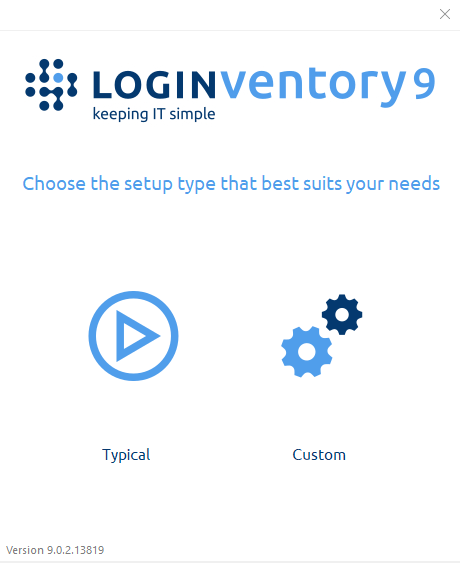
New Installation
Attention
Before the installation, you should check that Windows does not need to be restarted due to the previous installation of Windows Updates, otherwise it can come to problems with the installation of the Microsoft SQL Server.
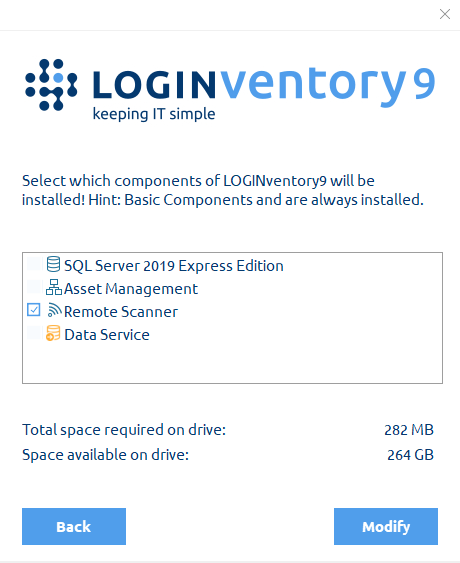
When installing LOGINventory, individual components can be deselected. In order to enjoy the full range of functions, however, all components should be installed.
By default, the LOGINventory database is preset on the computer on which LOGINventory was installed. In the settings is described how to transfer the database, change, or select another provider.
Update Installation
If a version of LOGINventory9 has already been installed, a more recent setup can be run at any time. LOGINventory will be updated as long as the installation is done into the same directory.
Important: Updating the Offline Agent
If the offline-agent is used, the clients may need to be provided with a current version of LOGINfo.exe so that the data sent by the clients still matches the database version. The update for the clients can be provided after the setup by running the offline agent wizard again and selecting the option "Create loginfo_script.zip for selfupdate".
Important: Updating the portable LMC
If the portable LOGINventory version is used on client machines, it must be updated after setup so that users of the portable version also work with the current version. To do this, the wizard for publishing the portable LMC must be run again. This only works if the portable version is not used by any user during this time, otherwise the files cannot be overwritten. This option is automatically offered at the end of the setup if the portable version had been created before.
Remote Scanner Only Installation
If the Remote Scanner is to be used as a standalone version (e.g. at other sites / clients), it can be selected in the setup that only the Remote Scanner components are installed. For this purpose, the setup type "Custom" is selected in the normal LOGINventory setup.
In the next step, the checkboxes can then be set to install only the remote scanner.
Tip
If no other settings are made, the standalone Remote Scanner will create .inv files that simply accumulate in the site data directory. These must then still be transferred to the central installation, e.g. by a Scheduled Task, Robocopy or the use of the Offline Agent. This setup is described in detail e.g. here.
Migration from Previous LOGINventory Versions
LOGINventory9 can be installed in parallel to previous versions, but must not be installed in the same directory as a previous version. Only then will the previous version remain intact.
If you want to migrate all your data, follow these steps. Alternatively, consider these hints if you want to start over from scratch.
Preparation
Danger
For security reasons, we recommend that you create a backup copy of the LOGINventory8 database before installing LOGINventory9, so that you can still productively work with version 8 in case of problems.
In order to create a copy of your database within LOGINventory, you have to open database setup dialog in the previous version and select the Transfer database-function. Then enter a new name in the database name field (e.g. "LOGINventory-Backup") and select Transfer to complete the copying process.
Installation of LOGINventory9
Info
LOGINventory9 requires .NET Framework 4.8 and Visual C++ Redistributable for Visual Studio 2015-2019, we recommend installing these programs before LOGINventory setup, otherwise these components will be added by LOGINventory setup. After installing the .NET Framework, it may also be necessary to restart the computer.
Once the backup of the database is created, you can start the installation of LOGINventory9. If you want to continue using your existing database server (e.g. installed by LOGINventory8), the setup without database is sufficient.
Migration
Start the LOGINventory9 Management Center.
In the database setup dialog, select the database to be migrated (e.g. your backup copy) and click Verify. Two warning messages will then appear, confirming that you really want to perform the migration -> The database will then no longer be compatible with older versions.
After you confirm the warnings with "OK", the actual migration will happen.
Migration of User Data
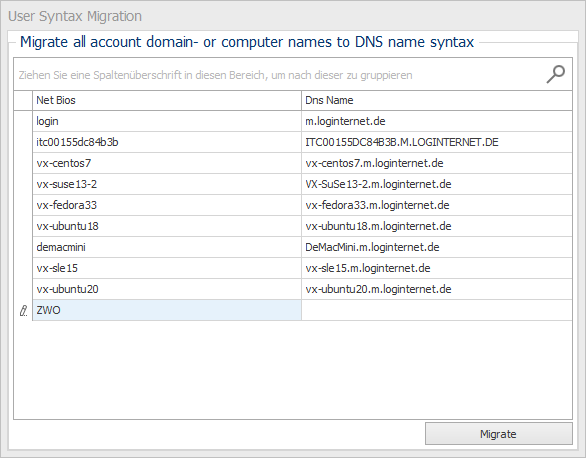
LOGINventory9 now uses DNS syntax for all account, domain or computer account names. Therefore, all domain names that were entered with LOGINventory8 (using NetBios syntax) must be migrated. As part of the migration process, you will be asked to check the correctness of the determined FQDNs and fill in any missing values. Please note that for "Dns Name" every line must be filled! This may look like the following:
Example
In this case the domains "login" and "ZWO" were found and only for "login" the correct DNS name could be determined automatically. Now the DNS name must be entered for "ZWO", in this case "zwo.loginternet.de". The other names should also be checked for correctness and corrected if necessary.*
If you do not know the DNS name and, for example, the Netbios name is entered, this will result in only "old" references to the user from the domain and these can be removed over time via data cleansing.
Migration of Microsoft Cloud Subscriptions
With LOGINventory9 it is possible to manage Microsoft Cloud Subscriptions (Microsoft 365) data of multiple tenants in one database. If your database already contains data on cloud subscriptions, you will be asked to specify which tenant this data belongs to as part of the migration. To do this, you will need to enter the tenant ID. This can be retrieved at this link: https://portal.azure.com/#blade/Microsoft_AAD_IAM/ActiveDirectoryMenuBlade/Properties
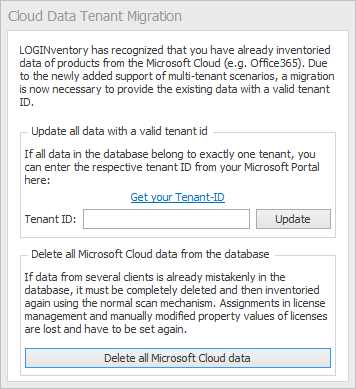
If you are unable to retrieve the tenant ID, you can also delete all cloud data and then have it re-recorded - in the future, the correct ID will also be read out.
Importing the LOGINventory9 License
Following the data migration, you will notice when adding your LOGINventory9 license that your licenses (version 8, 7, 6, etc.) that were previously imported into the database are displayed as "errors". This behavior is normal because we now rely on a different encryption mechanism for the license files. You can simply ignore this error message or mark and remove the old licenses and then add your new LOGINventory9 license.
Further Notes
During the migration all AD data will be deleted, because it cannot be migrated (new structure, group memberships of computers will be read now). Therefore, you should run the Active Directory capture again after the migration, so that all data is available again. Note: In the previous step we migrated user data that is not necessary the same to Active Directory data (e.g. for local user accounts).
Tip
Of course, it is also advisable to perform all other acquisitions after the migration, so that all values newly determined with version 9 can be read in.
In the tree structure itself, a few new queries (e.g. in the "Interesting" folder) appear as a result of the migration.
In addition, a few reports have been changed compared to version 8. However, since you have the option to customize all reports yourself, the reports we changed were not overwritten. Instead, the report templates from version 8 that might be affected by the changes are located in a "Version 8" folder below the "Documentation" node.
Optional: Upgrade the Offline Agent to Version 9
Read here, how to update the Offline Agent in general. For the upgrade to take place from a previous version, you will to provide the Offline Agent in version 9 in the folder where version 8 is looking for its updates = selfupdate directory.
Optional: Usage Metering Data
The LOGINuse usage metering service must be available in version 9 on the device to be scanned so that the usage data is also collected. If the Usage Agent in version 9 is installed first and then the one in version 8 is uninstalled, the usage data from version 8 will be taken over and you will not start with a local empty database.
To distribute the Usage Agent, follow the instructions in the manual.
Optional: Upgrade Standalone Remote Scanner
If you use a standalone remote scanner (e.g. for capturing data from other locations), this remote scanner must of course also be upgraded. To do this, simply install the Remote Scanner in version 9 there and uninstall it in version 8.
Alternative: Start with an Empty Database
If your tree structure in LOGINventory8 has become more and more confusing (due to customizations by various people) and you also have many outdated assets in the database, it can also be helpful to start with LOGINventory9 with a new, empty database. However, you should not do this if
- you have already manually maintained properties of assets or stored documents (e.g. invoices)
- your products and licenses have been correctly stored in the license management system
- you want to keep the change history of the assets
- journal entries have been added
- or other entries have been made in the database that are important to you.
Tip
However, if you have only created your own queries, reports or dynamic documents with LOGINventory8, which you would like to continue using, these can all be exported with a right-click and also imported back into the new, empty database.
To start with an empty database, simply run the LOGINventory9 setup. Thereupon a new, empty database "LOGINventory9" is created. By the way, the scan definitions, stored accounts etc. will be preserved in any case.