Data Acquisition
Various options are available for data acquisition. In addition to the classic agentless scanning, a .exe file can be run locally, or agents can also be used to acquire the data of the various device types. However, agentless scanning is particularly suitable for gaining an initial overview of the network.
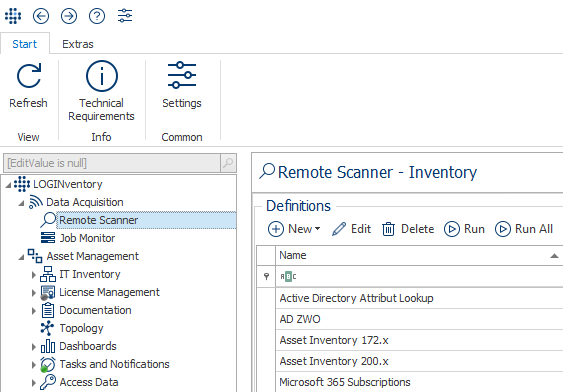
When you start LOGINventory for the first time, a wizard appears to help you with the agentless initial entry once you click the Remote Scanner node. You can define in which IP address range devices should be searched, whether the Active Directory and Microsoft Exchange should be read, and whether vSphere devices should be recorded.

In addition, administrative Windows credentials, SNMP communities and an SSH login can be stored.
Info
The entered passwords are always stored encrypted with the Microsoft Crypt API and cannot be read without authorization.
Afterwards, of course, further definitions and accounts can be stored.
Info
The technical details contain a detailed description of the prerequisites for agentless acquisition.
Tip
See the respective chapter to learn more about the differences between the acquisition methods with repect to the data collected.
Agentless Scanning
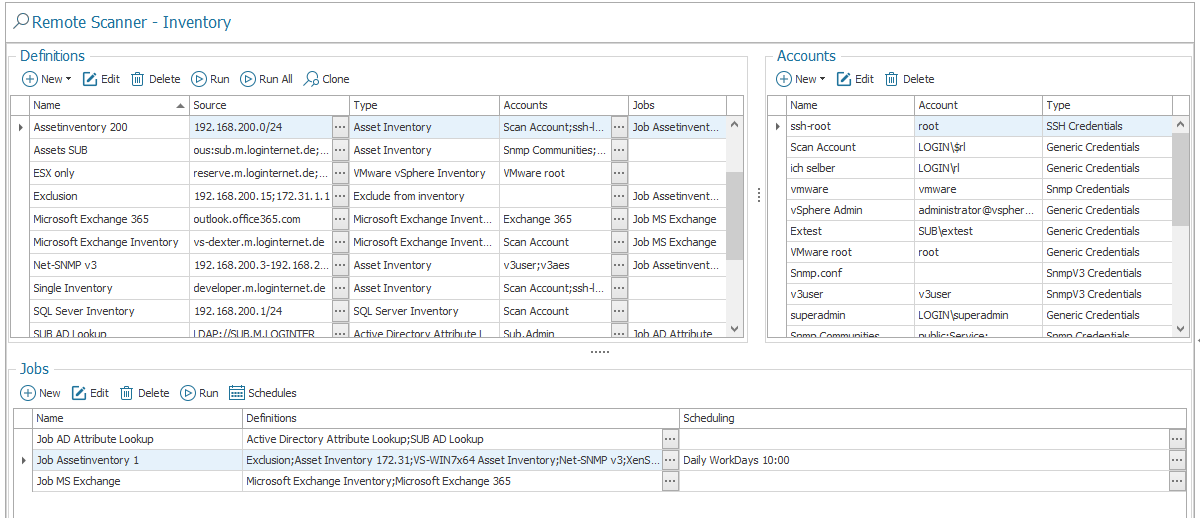
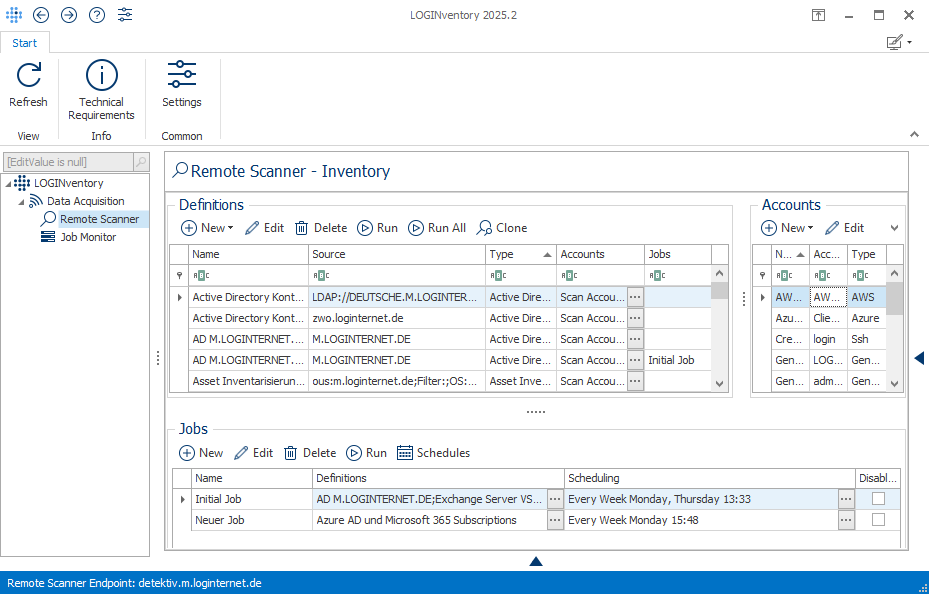
To scan agentless with LOGINventory, you have to select what should be inventoried (definitions) and how it can be accessed (accounts). These definitions can then be combined into jobs and executed automatically by task scheduling. The Job Monitor always shows the progress of the currently running scans and the results of past scans.
Info
The accounts can also be assigned to the definitions via drag & drop, just as the definitions can be assigned to the jobs via drag & drop.
Accounts
Basically, accounts can be divided into the following types:
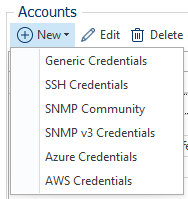
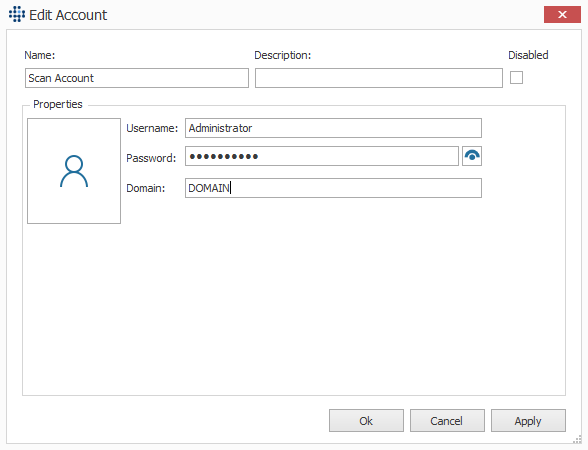
- Generic Credentials (with username, password and domain): Administrative accounts to query Windows, Active Directory, Exchange, vSphere, XenApp, XenServer, SQL Server & Office365
- SSH Credentials (for Linux and Mac) with login and password or login, key file and optional password phrase. The key file must be in OpenSSH format or in PPK format by PuTTY.
- SNMP Communities (read only): In order to inventory SNMP v1/v2c devices, such as network printers, switches, routers, etc.
- SNMP v3 Credentials (with correspondig parameters): In order to inventory SNMP v3 devices with Security Name (e.g. "v3user"), Security Level (e.g. "authNoPriv"), Auth Protocol (e.g. "MD5), Auth Key (e.g. "v3password"), Priv Protocol (e.g. "AES") and Priv Key (e.g. "privPassword")
- Azure Credentials: For storing access information for "Modern Authentication" at Microsoft Azure. The authentication is performed using a client secret or certificate.
- AWS Credentials: For storing access information for "Modern Authentication" at AWS. The authentication is performed an access key.
Tip
An unlimited number of accounts can be created, which can be assigned to individual definitions. Thus, different passwords or accounts can be tested one after the other within a definition until a device has been successfully scanned. You can also set the order of accounts using the arrow icons on the left. 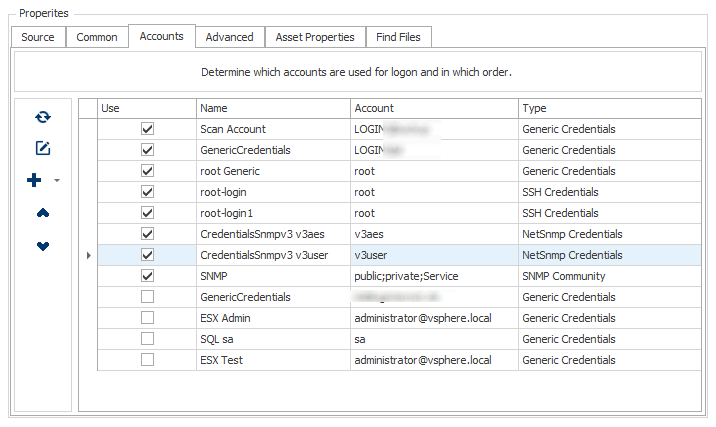
Scan Definitions
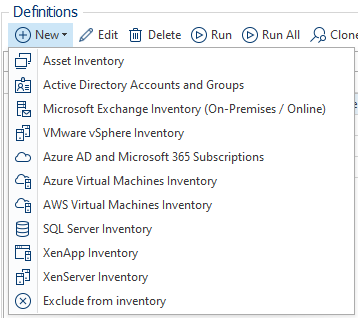
The definitions describe individual scan areas that can be combined into jobs. Each definition requires a type, a unique name, and optionally a description. The definitions can be divided into the following types:
- Asset Inventory: Inventories Windows, Hyper-V, SNMP (switches, network printers) and SSH devices (Linux, Solaris, MacOS, ...).
- Active Directory Accounts and Groups: Reads user, group and computer properties from Active Directory.
- Microsoft Exchange Inventory: Inventories a complete Exchange organization including mailbox information and mobile devices.
- VMware vSphere Inventory: Inventories VMware ESXi servers and their existing VMs.
- Azure AD and Microsoft 365 Subscriptions: Reads information from Azure Active Directory about users, groups and computers, as well as permissions in Azure AD. From Microsoft 365, LOGINventory reads which products are licensed and which users consume which licenses.
- Azure Virtual Machines:In Azure, LOGINventory reads out which virtual machines exist, as well as various configuration settings for these VMs.
- AWS Virtual Machines: In AWS, LOGINventory reads out which virtual machines exist, as well as various configuration settings for these VMs.
- SQL Server Inventory: Inventories Microsoft SQL Server instances, their databases and user rights
- XenApp inventory: Inventory of applications published on Citrix XenApp.
- XenServer inventory: Inventory Citrix XenServer and its existing virtual machines.
- Exclusion from Inventory: Excludes elements from Asset Inventory (used in jobs together with other definitions).
- Script-based Inventory: Enables script-based access to your own data sources, for example to generate assets from them, read license information or determine warranty data.
For all definition types, the general setting options are summarized under General, such as
- Number of parallel scans (select lower for slow network connection!)
- Maximum runtime for a single scan
- maximum response time for the PING to a device
- Additional command line parameters
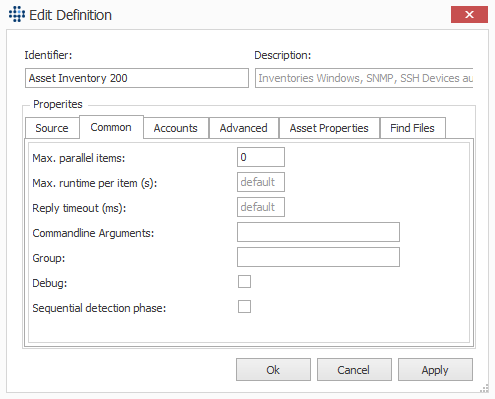
The following always applies here: If the corresponding fields are empty, the default value is used.
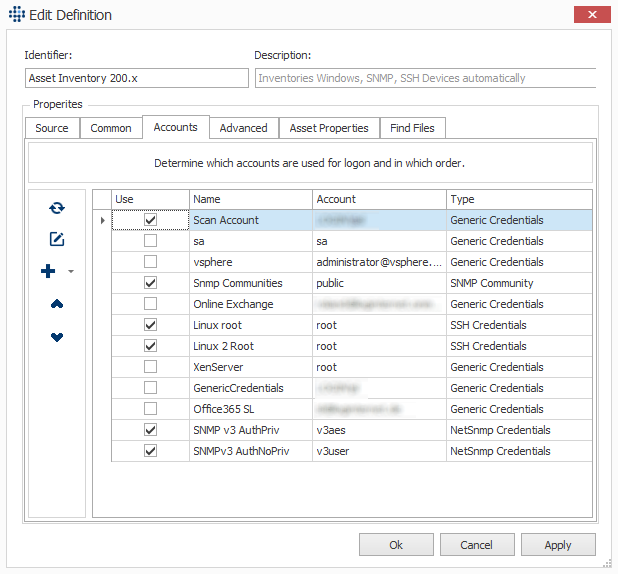
Attention
The tab Accounts must always be used to select which accounts from the pool of all accounts are to be used.
- For each device, all selected accounts are used one after the other (from top to bottom) until a scan is successful.
- You can use the arrow buttons to change the order of the accounts within the types.
-
The credential types are processed in the following fixed order:
- Generic Credentials
- SSH Credentials
- SNMP v3 credentials
- SNMP Community
-
At the top of the list should be those accounts that are valid for most devices in this definition.
Info
If a definition has been created and at least one user account has been selected, the inventory can be started manually. The progress is displayed in the Job Monitor. The evaluation then takes place in the "Asset Management" node.
Asset Inventory
For the definition type Asset Inventory, the Source specifies the scan area. There are the following types of scan areas:
- IP v4 Address Range (e.g. 192.168.200.1 - 192.168.200.121)
- IP v4 Subnet (CIDR) (e.g. 192.168.200.64/16)
- File List (Text file with names or IP addresses of the assets: one entry per row - IP ranges or subnets can also be specified in each line, e.g. “192.168.200.5-192.168.200.15” or “192.168.200.0/24”)
- List of elements
- Active Directory: You can scan the devices that have entries in the AD.
Info
The ping interval is adjusted dynamically and should only be changed manually in exceptional cases, e.g. if you scan one or more very large areas and are not satisfied with the duration of the ping phase. Too much reduction of the interval can lead to irregularities in the detection of devices.
Attention
If the Active Directory is specified as the source during the asset inventory, the AD itself is not recorded, but rather the computers present there and currently switched on. This means that switches or computers that are not in the AD are not detected.
If Active Directory is selected as the source, a distinction can be made between OUs and Sites and Subnets. By using the slider Explicit node selection you can switch whether all elements in the selected folder (and subfolders) should be scanned automatically or whether an explicit selection is necessary.
Under Advanced the data acquisition can be adjusted. For example, you can set whether Share-ACLs (shared folders), drivers, fonts, etc. should be captured. These settings can also influence the duration of the inventory.
Under Asset Properties you can specify special, freely definable properties for this definition (see Custom Properties). Use the Asset Properties to define values that should be assigned to all successfully inventoried assets of a definition! If, for example, your IP address ranges are already divided by location, you could assign the respective location as an asset property and then use this assignment in queries as well.
Under Find Files, the search for files on Windows devices can be configured. This topic is described separately in the Technical Details.
Important
When doing an Asset Inventory, all Hyper-V instances are also being scanned. Please refer to the notes on special considerations for hypervisor acquisition, which also explain how certain VMs are not scanned, why the VMs should also be scanned directly and how the hosts and VMs are assigned custom properties!
Info
If you want to exclude certain devices from being scanned, use the Scan Defintion Exclusion from Inventory.
Active Directory Accounts and Groups
Attention
This inventory type is used to read properties of AD accounts and AD groups from Active Directory. The AD acquisition does not create new assets. Instead, the retrieved data can be found, for example, in the folder "IT Inventory -> Active Directory." They can also be utilized in the Info Widget or in queries.
The source defines which entries are to be read from the AD. The fully qualified domain name can be specified here in the root directory. A subdirectory can be selected via the Active Directory Browser to restrict the search.
Via Advanced selected AD attributes can be read and entered in LOGINventory attributes. The name of the value from the AD must be entered and assigned to a custom value in LOGINventory.
You can also set here that group memberships of security groups are resolved recursively or resolved recursively even outside the specified scope (also in OUs that were not scanned), i.e. if a group is contained in another group ("Nested Groups"). You can find more parameters (including for resolving group memberships outside the specified OU) at the explanation of LOGINfoAD.exe.
Technical background for reading the AD
LOGINventory records members (users) of an OU and, depending on the setting, resolves their group memberships in direct and indirect (recursive) groups. If during scanning the path is set to an OU which contains only the group but not the user, the user is not a member of the OU unless he has been explicitly added there and is not recorded from here.
Only for security groups the memberships can be resolved recursively if the corresponding check mark is set. For distribution groups only the direct memberships are read out.
Example
User A is a member of Group X, and Group X is in turn a member of Group Y (both groups within the OU). → Membership in Group Y is only found when recursive resolution is enabled.
User B is a member of Group X (within the OU), and Group X is a member of Group Z (outside the OU being scanned). → Membership in Group Z is only found if the option recursive even outside the specified scope is enabled.
Tip
We recommend enabling the cleanup of obsolete Active Directory accounts and groups in the settings (and performing the AD scan regularly).
If the option Anonymize user name in the Settings is activated, the user data cannot be supplemented with Active Directory information, because an assignment is then not possible!
Microsoft Exchange Inventory
With Microsoft Exchange Inventory, information about the entire Exchange organization (2010 and later) including servers, DAGs, databases, mailboxes, and mobile devices can be remotely scanned from a Microsoft Exchange Server. If different Exchange Server versions are in use, the one with the latest version should be used. The specified user account must have sufficient rights in the Exchange organization, e.g. member of the group "Exchange View-Only Administrators", or "View-Only Organization Management" (on-premises Server).
Important
You can also specify a Cloud Server as the source, simply enter the address in the line of the server name, e.g. 'outlook.office365.com'.
Prerequisites for scanning Online Exchange Servers using an app registration
In summary, the following requirements apply to the scan:
- An Internet connection must exist.
- The ExchangeOnlineManagement PowerShell module must be installed on the LOGINventory machine.
This module is installed by entering the commandInstall-Module -Name ExchangeOnlineManagementin an administrative PowerShell on the scan server (the computer on which LOGINventory is installed, from which the data query is to be done).
If necessary, the NuGet provider must still be installed first via the PowerShell so that theExchangeOnlineManagementmodule can be installed. However, this will be pointed out by PowerShell if the above command is executed. - An Azure Credentials type account must have been set up and authorized according to the instructions and must be used for the scan.
- The app registration manifest must have been customized & the customization confirmed with administrator approval, see step 3, otherwise an "Access Denied" message will be shown.
Info
By default, all mobile devices connected via Exchange Active Sync (EAS) are also recorded and created as assets in LOGINventory via the Exchange Inventory. This behavior can be suppressed by checking No mobile devices (EAS) in Advanced. 
To prevent all Exchange servers from being captured, but only selected ones, a server filter
can be set
under Advanced. For example, by entering Serv* in the Server filter, only Exchange servers whose name begins with "Serv" will be included.
Info
If a Custom Property is to be given to the Exchange Servers and mobile devices (EAS) directly at the time of acquisition (analogous to Asset Inventory), then this is only possible by adding a corresponding command line argument. The syntax here is ///Custom.Property "Value". So the argument ///Custom.Floor "3rd floor" will create a "Floor" property with the value "3rd floor" for all captured Exchange Servers and mobile devices.
VMware vSphere Inventory
With VMware vSphere Inventory, ESXi and vCenter Server can be captured directly without the need for additional configuration steps.
As source select the type "list of elements" and add your ESXi Server, your vCenter Server or cluster as element (Full Qualified Domain Name (e.g. vcenter.m.loginventory.de) or the IP address).
Tip
It is not necessary to enter all ESXi hosts individually here, if a vCenter is used. In this case it is sufficient to enter only the name or IP address of the vCenter, all ESXi hosts will then be scanned automatically.
The user account must have the required administrative rights (at least read-only admin) on the VMware servers.
Important
Please refer to the notes on special considerations for hypervisor acquisition, which also explain how certain VMs are not scanned, why the VMs should also be scanned directly and how the hosts and VMs are assigned custom properties!
Azure AD and Microsoft 365 Subscriptions
On the one hand, this definition type is used to read out information from Microsoft Azure on user account, computer account & group memberships (analogous to reading out on-premises Active Directory), as well as permissions in Azure AD. On the other hand, it is possible to read out online which subscriptions (e.g. Office365, Microsoft Intune, Power BI Pro, etc.) were acquired and which licenses were assigned to which users.
Tip
So the inventory is interesting for pure Azure Active Directory environments, as well as for hybrid environments (on-premises AD with with AAD Connect, or AAD Sync).
Info
If both Azure AD and on-premises AD are captured in hybrid environments, no duplicates are created, but the data is merged.
Attention
To read data from the Azure AD, it is necessary to create an app registration in the Azure Portal. This procedure is described in detail in the Technical Details.
When assigning user accounts to the definition, only the Azure Credentials type can be used. A readout is not possible using Generic Credentials (username + password)!
We recommend using a client secret instead of a certificate for authentication, since the setup effort is significantly lower.
Prerequisites
In summary, the following requirements apply to the scan:
- An Internet connection must exist.
- An Azure Credentials type account must have been set up and authorized according to the instructions and must be used for the scan.
If the acquisition was successful, this can be seen in the job-monitor and the data from Azure AD is displayed in the corresponding Active-Directory queries in LOGINventory.
The Microsoft 365 Subscriptions data is then available below the "Software" node in the corresponding queries. Likewise, these cloud subscriptions can be added to the License Management.
Tip
We recommend that the periodic cleanup of Cloud Subscription data is enabled (and the scan is performed regularly).
Azure Virtual Machines
This definition type is used to read which virtual machines (VMs) have been created in Microsoft Azure, what their status is, and to determine various information about the operating system, IP address, size, location, etc..
Here, the Azure environment is considered a "hypervisor", so that an assignment of the VMs to this host (= the Azure environment) exists in LOGINventory.
As with the other hypervisor acquisitions, only running VMs are created as assets, see Hypervisor acquisition specifics.
Prerequisites
In summary, the following requirements apply to the scan:
- An Internet connection must exist.
- An Azure Credentials type account must have been set up and authorized according to the instructions and must be used for the scan.
- The app registration must have been assigned a subscription, see step 4. Otherwise, an "Access denied" message will appear.
Tip
To read out the details of the software, configuration, etc., it is recommended to install the offline agent on the virtual machine, for example.
AWS Virtual Machines
This definition type is used to read which virtual machines (VMs) have been created in AWS (Amazon Web Services), what their status is, and to determine various information about the operating system, IP address, size, location, etc..
Here, the AWS environment is considered a "hypervisor", so that an assignment of the VMs to this host (= the AWS environment) exists in LOGINventory.
As with the other hypervisor acquisitions, only running VMs are created as assets, see Hypervisor acquisition specifics.
Prerequisites
In summary, the following requirements apply to the scan:
- An Internet connection must exist.
- An AWS Credentials type account must have been set up and authorized according to the instructions and must be used for the scan.
Tip
To read out the details of the software, configuration, etc., it is recommended to install the offline agent on the virtual machine, for example.
SQL Server Inventory
SQL Server Inventory can be used to record individual servers by name or IP, or to define IP ranges to search for SQL Server installations. If possible, the user account used should have administrator rights on the database server; however, it can also be scanned with the user "sa" and the corresponding password (Generic Credentials).
Attention
For the acquisition of databases outside the own subnet using SQL server authentication (e.g. user "sa"), it may be necessary to assign Windows credentials as well as the SQL server user as accounts in the definition. (The instances are found via the Windows user, the SQL server user can enter them.)
Info: Access Rights
In order to be able to read out with a SQL server user the data to all databases existing on the server, the role sysadmin on server level is required.
To be able to read out from individual databases the information to name, record, server version & size, the role public on database level is sufficient. If also the assigned roles on database level are to be read out, the role db_accessadmin on database level is necessary.
XenApp Inventory
The applications published on Citrix XenApp servers and their access rights settings are recorded via the XenApp Inventory. No further prerequisites need to be fulfilled on the LOGINventory computer. When creating the corresponding definition, only one server from each XenApp server farm has to be inventoried. The name of this server must be entered in the appropriate field. When the drop-down list is opened, the members of the XenApp Servers group are displayed for selection.
XenServer Inventory
With XenServer Inventory, the individual XenServers to be captured can be added to Source via the Full Qualified Domain Name or via the IP address. The user account used must have administrator rights on the XenServer.
By default, port 443 (https) is used to connect to the XenServer. If this is to be changed, the command line argument /port <NUMBER> can be used:
Important
Please refer to the notes on special considerations for hypervisor acquisition, which also explain how certain VMs are not scanned, why the VMs should also be scanned directly and how the hosts and VMs are assigned custom properties!
Exclusion from Inventory
It is possible to exclude certain devices from a scan scope by running an Exclude from Inventory definition along with another definition (attention: this only applies to Asset Inventory definitions). To do this, they must be started together using multi-selection or combined in a job.
Info
If "List of elements" is selected as the source, wildcards can also be used to exclude devices. For example, "win*" or "192.168.20*.15" are valid values. The Job Monitor then shows the filter condition on the basis of which the devices are not recorded. 
If the exclusion is to be based on names, it is often advisable to work with wildcards or to explicitly specify an FQDN. The name comparison is performed with the name that is displayed in the Job Monitor. This is determined using nslookup and can therefore differ from the actual host name if the DNS entries are incorrect/outdated.
Danger
If the DNS entry does not match the name determined during the scan, the device may still be scanned. If this is also to be prevented, the acquisition can be aborted with a !Stop command in the LOGINfo.script file if a specific host name is determined during the scan.
Tip
If you want to exclude mobile devices, such as smartphones, from the inventory, this is only possible directly in the definition of the Microsoft Exchange Inventory under Advanced.
Tip
If certain VMs should no longer be detected, this can be set via command line arguments when detecting the respective hosts (see Tip "Excluding specific virtual machines (VMs)").
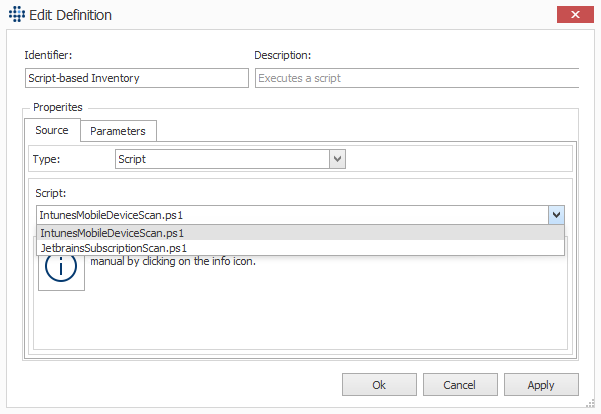
Script-based Inventory
Script-based Inventory enables you to run a Powershell script with transfer parameters to be called up via the Remote Scanner. This script can be used to read data from a data source and write it to an .inv file.
As you can create/edit the scripts yourself, you can specify which information is to be read from which data source.
Example
For example, new devices can be created in LOGINventory by using a script to access an API that can be used to retrieve device information. This could include management systems for thin clients, mobile device management solutions, etc. - i.e. systems for which there is currently no explicit interface in LOGINventory.
Further information on licenses managed in the cloud, warranty information from other manufacturers and more could also be retrieved.
We already provide some examples of scripts with various functions via the following Github repository:
https://github.com/loginventory/custom-scan-scripts
Tip
Detailed explanations of the syntax can also be found here. You can also share your own scripts with other users or improve existing scripts together with other customers. Feel free to exchange ideas with other users via the Github discussion function!
Please follow the instructions on Github and place the scripts you wish to use in the locations provided. You can then select the desired script from the drop-down menu.
Danger
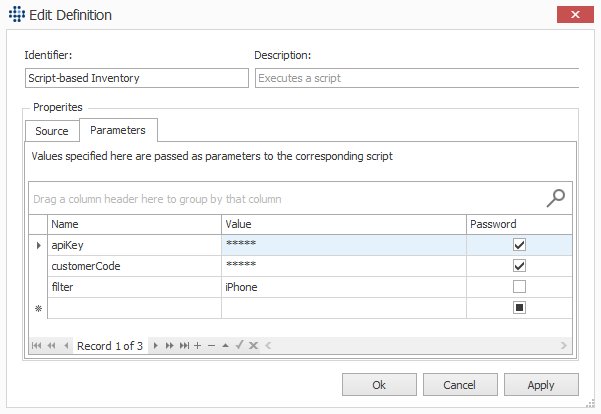
Anyone who has the option of exchanging this file or storing their own scripts in this directory potentially also has access to the Parameters stored in the definition. It is therefore essential that you ensure that only authorized persons have access to this folder, for example by adjusting the file system permissions accordingly.
No user accounts can be assigned to a definition of the Script-based Inventory type. Instead, parameters must be stored in the tab that are then to be used in the script. For example, access data, customer IDs, filter conditions or similar are transferred to the script via parameters, depending on what the script needs.
Jobs
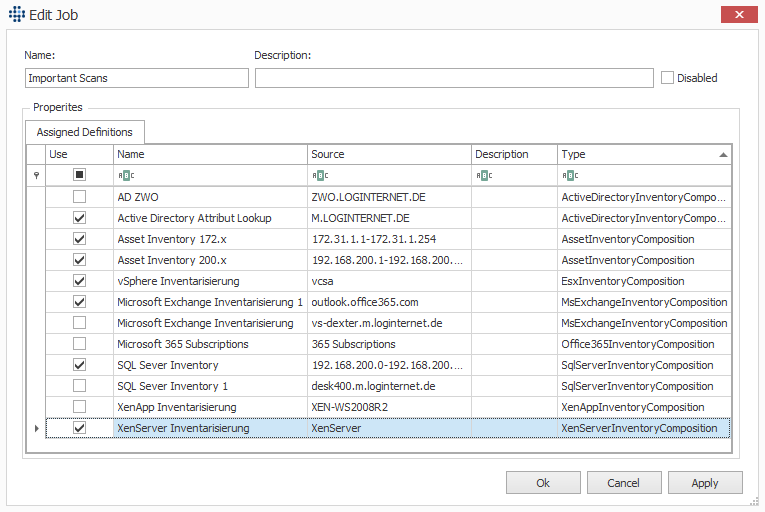
Jobs allow you to create combinations of scan definitions to optimally scan your network or sub-areas.
- If several scan definitions are to be scanned simultaneously, this task can be combined in one job. Thus the individual definitions do not always have to be selected.
- If you do not want certain assets in a scan area to be scanned, you can specify them by defining an exclusion inventory. If this definition is combined with inventory definitions, the excluded assets are not scanned.
- Scan definitions can be used in multiple jobs.
- Jobs can be disabled, whereupon the schedule is ignored and the jobs are no longer executed automatically.
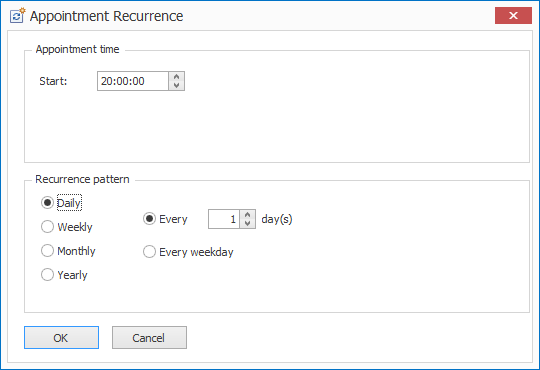
Schedule
You can use a schedule to specify when jobs are run automatically to scan the network regularly.
Important
Each job can also be executed several times a day with several schedules. 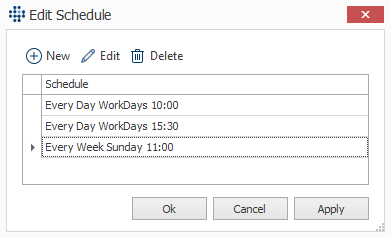
Help
We recommend scanning the network several times a day, preferably at times when your users are actually using the computers. The more frequently you scan, the more fine-grained the change history will be.
Job Monitor
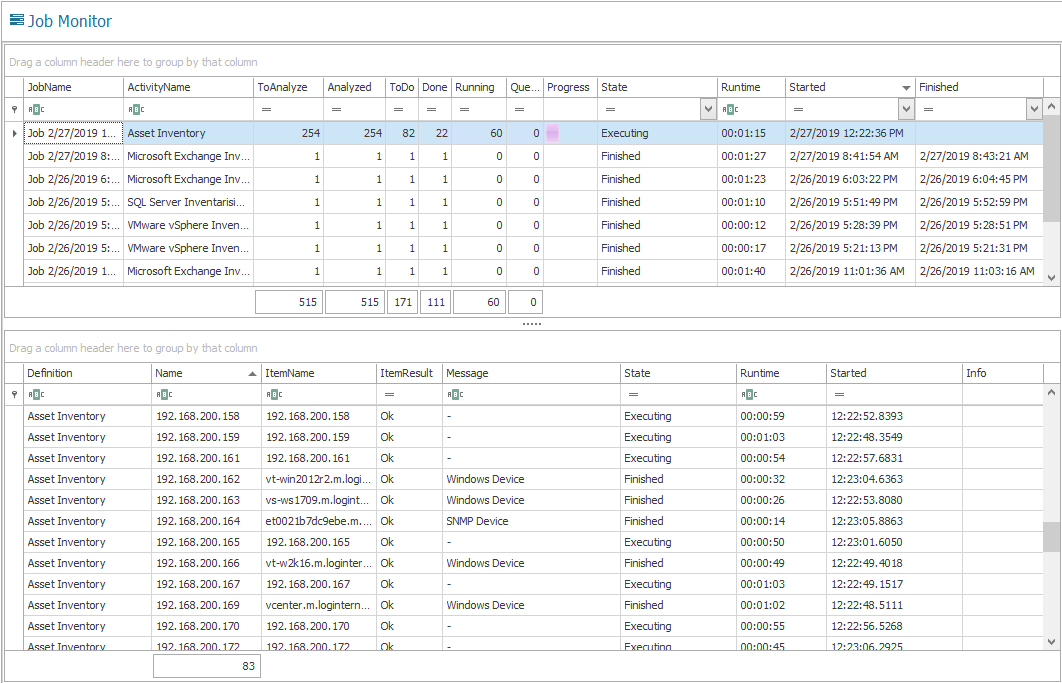
As soon as a job has been started (or a definition has been started), the progress of the inventory can be monitored via the Job Monitor. In the upper result list, all jobs that have run so far and those that are currently running are listed. If one of the listed definitions is selected, the status of the entry of this definition is listed in the lower result list. For the current inventory the course can also be observed here. For completed asset scans, the display shows, among other things:
- The status ("Finished", "Executing", "Queued" or "None")
- The result is "Ok," "Error," or "None."
- Information on start time and running time
In many network configurations, not all devices can be successfully captured with the first scans. If errors occur during acquisition, you should first check which type of device is behind the IP address that has not been successfully inventoried. For example, if it is an IP phone that does not have a remote interface, the device can be manually entered into the database. It may also be necessary to deposit additional accounts with the necessary rights, adapt the firewall configuration, or enable remote protocols on the devices.
Info
In the Job Monitor, you can call SSH Troubleshooting from the ribbon menu. With this tool different settings like port, username, password etc. can be tested. The textual output then shows which problems occur when establishing a connection or when querying the Linux devices.
Decentralized Scanning
If the central Remote Scanner cannot reach all locations/networks, or only a slow or non-permanent connection is available, it may also make sense to install one or more Remote Scanners at the respective locations/separate networks to perform the acquisition from there.
For this, the Remote Scanner can be installed in stand-alone mode on a Windows computer that has access to the devices to be scanned by using the normal setup for the LOGINventory installation, but then performing a Remote Scanner Only installation via Custom.
Now on this computer the normal agentless scan can be set up to scan devices. In this case, there is initially no connection to the central LOGINventory installation and all scan definitions, user accounts, and jobs to be used here must be created locally.
As always, the acquisition creates .inv files that are stored locally on this Remote Scanner in the local data directory. The location of the data directory can be adjusted in the acquisition settings, by default it is %public%\Documents\LOGIN\LOGINventory 9\Data.
Now it must be ensured that these .inv files are copied to the central data directory of the main LOGINventory installation so that the data can be entered into the database there. For this, for example, a script can be created which is executed regularly (e.g. using Robocopy, OneDrive, or similar) and automatically copies the files.
Alternatively, in addition to the Remote Scanner, the Offline Agent can also be installed on this computer to transfer the data to the central installation. In this case, the location of the local data directory of the stand-alone Remote Scanner must be adjusted so that the generated .inv files are placed directly in the directory monitored by the Offline Agent.
Therefore, in the acquisition settings, the path must be changed from %public%\Documents\LOGIN\LOGINventory 9\Data to %public%\Documents\LOGIN\LOGINventory 9\LocalData.

Logon Script Acquisition
Windows computers can be inventoried by calling LOGINfo.exe. This call can be positioned in the logon script so that computers scan themselves automatically when the user logs on.
Important
The great advantage of this method is that data can also be captured without administrative rights and with an existing firewall, since the scan is executed locally and in the user context.
Prerequisites
In order to set up the recording by means of logon script, different steps are necessary. As described in Data processing, .inv files are created when computers are acquired. These files must be stored in the central data directory, which is monitored by the LOGINventory Data Service. This service then enters the data into the database.
The program LOGINfo.exe, which is located in the data directory, is called to scan a computer. A legacy version called LogInfoL.exe is also available for download from the LOGINventory Helpdesk, which is used to inventory old systems such as NT4, ME or Windows 2000. You can also open the data directory via the task bar by selecting the service LOGINventory Data Service and displaying New inventory files.

The Data Directory Location can be adjusted in the settings. Here you can also share the directory, which is necessary for the inventory via logon script. By default, the share name Li9Data is used. If you share the directory via this dialog, the following rights are set in the file system: Authenticated users: Full; Local service: Modify.
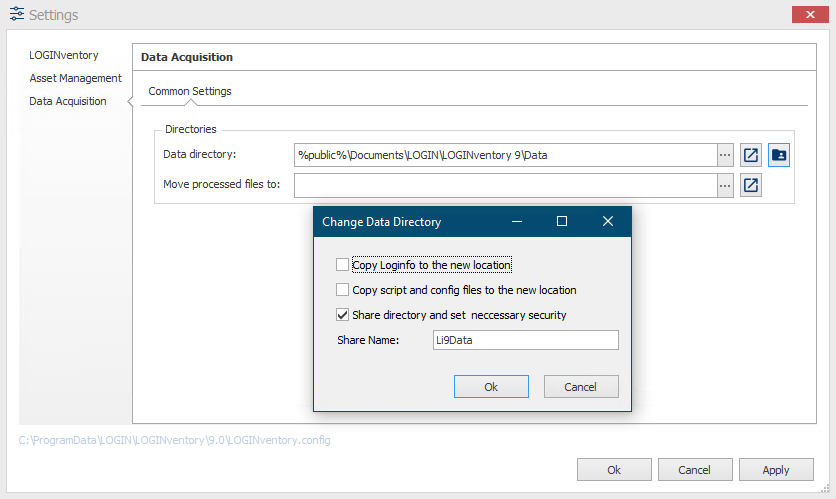
Warning
In order to share this folder from this dialog, you need to launch LOGINventory with administrative rights.
This allows all users and computers within the domain to access the directory and to execute LOGInfo.exe. An automation of this call is reasonable and can be configured via the logon script.
Configuration
The following call can be included in the logon script, for example, which does not display any output data:
START /B \\server\LI9DATA\LOGINfo.exe
If the scan is only to be executed for locally logged in users, the following command can be used:
If "%SESSIONNAME%"=="Console" START /B \\server\LI9DATA\LOGINfo.exe
Alternative: The following lines in the script cause LOGINfo.exe to run locally, after checking if there is a newer version of LOGINfo.exe on the server. The resulting .inv file is placed directly on the server. Furthermore, the capture is only started if the user is locally logged on to the console.
If "%SESSIONNAME%"=="Console" (
xcopy /d \\server\LI9DATA\LOGINFO.EXE %temp%
start /b %temp%\LOGINfo.exe \\server\LI9DATA)
Instead of "server" the name of the corresponding server has to be entered here. In addition, further parameters can also be passed when calling LOGINfo.exe, these are described in detail below; however, this is not necessary.
How a call of this kind is integrated into the logon script is described in detail by Microsoft. There are two variants:
- Assign user login scripts: https://technet.microsoft.com/de-de/library/cc770908(v=ws.11).aspx
- Assign scripts to start the computer: https://technet.microsoft.com/de-de/library/cc770556(v=ws.11).aspx
Now the respective computer is automatically inventoried when a user is logging on. In the query "Last Inventory Overview" you can check which inventory method was used and when the inventory took place by checking the columns LastInventory.Agent and LastInventory.Timestamp.
Note
If the entry for Agent ends with "(LOCAL)", the inventory was executed in the user context or by the computer, i.e. by calling LOGINfo.exe in the data directory.
Parameters
The behaviour of LOGINfo.exe can be adjusted by parameters. If a switch name is specified, this has priority over an entry in the LOGINfo.script file.
LOGINfo.exe [!IpAddress] [DataDir] [/parameter1] [/parameter2] ...
| LOGINfo.exe | Command line parameters |
|---|---|
/? |
Outputs information on how to use the parameters |
!IP address |
Remote Scan Address; Default: own computer |
Target directory |
The result file is saved in 'Target directory'. Default: current directory. The LOGINfo.script is also searched for in the "Script" subfolder of this directory. |
/NOWMI |
Do not use WMI on Windows computers. |
/DEBUG |
Use only on instructions from LOGIN support team |
//'Switch name' n |
Changes the value of a switch with the value 'n' (see Switches) |
/PINGLEN number |
Number of bytes in ping (default: 32) |
/PINGTIMEOUT wait time |
Ping wait time in ms (default: 2000 ms) |
/NOWIN |
Do not use Windows APIs |
/NOSNMP |
Do not use SNMP |
/NOSSH |
Do not use SSH |
/USESNMPFALLBACK |
Use SNMP even if no response to ping occurs |
/SNMPPORT port |
Use SNMP UDP 'port' (default: 161) |
/SNMPCONTEXT <context> |
Use SNMP Context ‹context› (default: empty) |
/SNMPCOMMUNITY community |
Use SNMP v1 Read-Community (standard: 'public') |
/USER Username Password |
Windows Access Data |
/NETSNMP |
Use Net-SNMP instead of Microsoft SNMP |
/NETSNMPCONF |
Use default Net-SNMP configuration file |
/SNMPUSER user |
SNMP v3 User; security level=noAuth |
/SNMPAUTH md5 | sha pass |
SNMP v3 Password; security level=authNoPriv |
/SNMPPRIVACY des | aes pass |
SNMP v3 Passphrase security level=authPriv |
/FindFiles "path" |
Triggers the File Search. e.g. "/FindFiles "C:\Temp*.*" |
/FindFilesRec "path" |
Triggers the recursive file search. Both search parameters can be used several times if you want to search at several locations. |
Examples
Acquisition of the computer with the IP "192.168.200.50": LOGINfo.exe !192.168.200.50
Acquisition of the own computer and storage of the resulting .inv file in "C:\Temp": LOGINfo.exe C:\Temp (Attention: Here, the LOGINfo.script file is searched for in the subfolder "Script" of the target directory, i.e. C:\Temp\Script\LOGINfo.script)
Important
Using switches (recognizable by //) many more adjustments can be made. These are all described in the Modification of the Data Acquisition part.
Windows Offline Agent for Capturing Computers Outside the LAN
The LOGINventory Offline Agent can be used on Windows computers with .NET Framework 3.5 or higher that are rarely or never in the LAN, but should still be inventoried. Since only devices that are available in the network can be inventoried using the acquisition methods presented so far, an additional acquisition variant is required, for example, to regularly inventory laptops belonging to field staff. LOGINventory provides the Offline Agent for this purpose. This ensures that relevant computers scan themselves automatically, buffer this data locally and, if a network connection is available, send the buffered data to the LOGINventory computer automatically.
If the Offline Agent is installed on a device, the device inventories itself and transmits the collected data to a previously configured target address. If the target address is a publicly accessible URL, devices outside the internal network (e.g., working from home or on the go) can also be captured.
Setup
Attention: Observe before setup
Before running the wizard, we strongly recommend that you make sure that the web viewer has been published and the data directory has been shared. Only then the wizard will automatically suggest the correct paths for the URLs.
If you are not sure whether these requirements are met, please check this or run the corresponding wizard again!
The publishing of the Offline Agent can be started via the ribbon menu Extras.

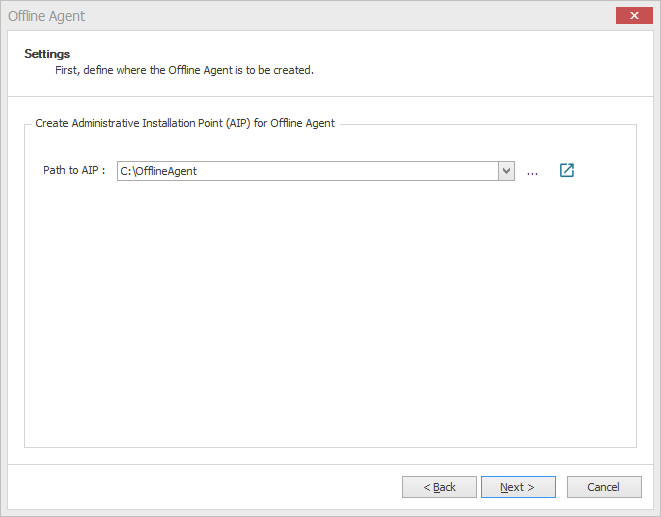
First, a directory must be selected, in which the appropriate files are to be stored. The configuration data is provided together with the MSI setups in an administrative installation point (AIP) - i.e. a directory from which the administrative installation can be executed.
Then, for the firewall profiles Public, Private and Work a URL and credentials can be stored, with which the data can be transferred.
Info
Before the transfer, the Offline Agent determines what type of network profile type the PC is currently in and then tries to reach the appropriate URL according to the stored data in Public, Private and Work.
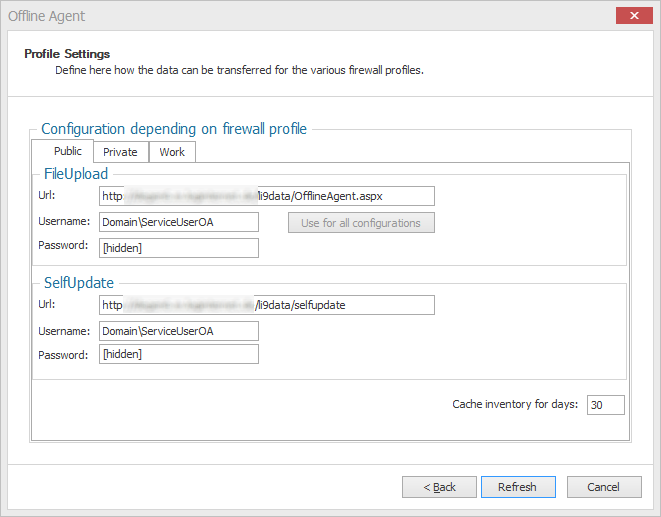
Danger
For data transfer, a user must be specified who can access the OfflineAgent.aspx page (published with the Web Viewer) or the Li9Data share. It is recommended to use a local user, not a domain user.
We explicitly advise against using a domain user, as the password is obfuscated and stored in a config file on the respective client PC, which could pose a potential security risk. The account used only needs read access to the file C:\inetpub\wwwroot\LOGINventory9\OfflineAgent.aspx and the virtual directory /selfupdate on the web server. Therefore, a corresponding user should first be created, and their credentials should then be entered in this dialog.
By default, any user can access the mentioned files, so it is sufficient to create a new local user on the LOGINventory machine and provide their credentials here. It is not necessary to assign additional permissions to this user.
For the "Public" and "Private" profiles, the default upload URL is suggested as http://<SERVERNAME>/LOGINventory9/OfflineAgent.aspx. However, this URL is typically not accessible from outside the corporate network. If it is desired that devices can send their data to the LOGINventory server over the internet, working from home without a VPN connection, etc., a publicly accessible URL should be specified here, e.g., https://inventory.mycompany.com/LOGINventory9/OfflineAgent.aspx, if the Web Viewer has been published at this address. This can be achieved using a reverse proxy, port forwarder, or DMZ server solution.
For the "Work" profile, the default URL file://<SERVERNAME>/li9data is suggested, which refers to the previously created share of the data directory. This URL is only accessible if the client PC is connected via VPN or directly within the corporate network. If this is not desired, a publicly accessible URL can also be specified here.
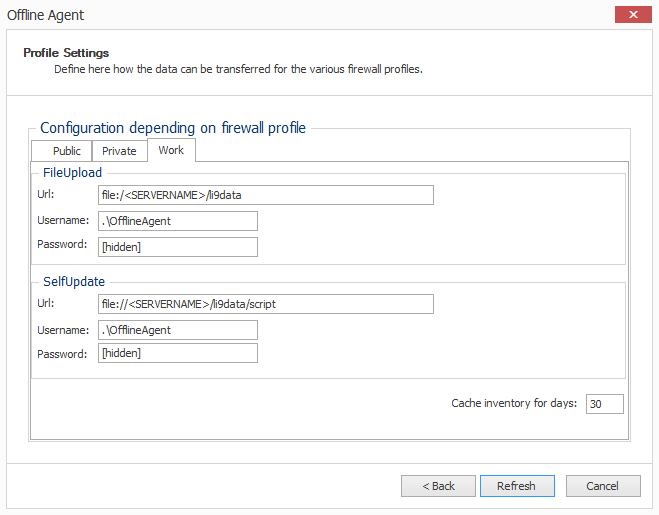
This default configuration of the URLs can also be used productively; however, data will never be transmitted in the public or private network profiles. The installation of the Offline Agent on a client PC ensures that the device still inventories itself twice daily and holds the data locally until a connection to the corporate network is established. Then, all generated .inv files are transferred to the share specified in the "Work" profile.
Additionally, the following should be noted:
- If a port forwarder to the LOGINventory computer is configured, then the LOGINventory Web Viewer and a certificate for https must be installed here.
- The data can also be received outside the LOGINventory Web Viewer from another server (e.g. in a DMZ) using ASPX or PHP. The button Export upload script templates can be used for this purpose. These script files can be customized if necessary. More information on this in the box "Using another web server" below.
- The Offline Agent has the option of updating itself, so a URL must also be specified under which the offline agent checks whether a new update is available and can download it if necessary.
If the web server to be accessed by the Offline Agents is also the local LOGINventory computer including published web viewer, no further configuration steps are necessary. Here, a special version of the file OfflineAgent.aspx for receiving the data is already available, which automatically stores the data in the currently configured data directory of the server. That is why this URL is also suggested as the default address.
Info
Please note that when using http(s) to transfer data to the IIS server, the server must be configured so that it can receive the data. If only Windows devices send data to the server, it is sufficient to activate Windows Authentication. If macOS/ Linux devices are also to be equipped with the Offline Agent, Basic Authentication must also be activated in the IIS configuration. You can find more information on this topic in the Helpdesk.
Using a different web server
If another server is to be used to receive the data, this is possible "at your own risk". In any case, this procedure requires that the data received by the other web server is copied/moved in some form to the data directory of the LOGINventory server so that it is automatically entered into the database. This transfer can be realized by your own script, for example. Either the IIS can be used on the other web server, for which the following prerequisites apply / files are required:
- IIS version 7.0 or later and ASP.NET 4.5 or later
- OfflineAgent.aspx (You can get this file by clicking on Create Upload Script Templates)
- OfflineAgent_msi.zip
or you use PHP:
- Apache version 2.4 or higher
- PHP version 5 or higher
- OfflineAgent.php (You can get this file by clicking Export Upload Script Templates)
- OfflineAgent_msi.zip
The following configuration steps are then required in the case of IIS on the other web server:
- Starting the IIS Manager
- In the Default Web Site, add an "Application" corresponding to the path you had defined earlier, e.g. "LOGINventory-OfflineAgent" pointing to the physical directory where the OfflineAgent.aspx file will be stored.
- Below that, an "Add Virtual Directory" named "selfupdate", which points to a physical directory where the OfflineAgent_msi.zip file is stored (see explanations for updating the Offline Agent).
- The web server or the user must be able to write to the data directory specified in OfflineAgent.aspx.
The web server uses an account from the group IIS_IUSRS (group that contains all ApplicationPool identities), or the account that is assigned to the corresponding ApplicationPool.
If the computer is not in the domain (DMZ), Basic Authentication must be activated on the IIS for the offline agent application.
The .inv files received from the Offline Agent are now stored in the data directory (by default %Public%\Documents\LOGIN\LOGINventory 9\Data).
By editing the OfflineAgent.aspx or OfflineAgent.php file, you can change the local location to suit your needs. However, for security reasons, this should not be the directory where OfflineAgent.aspx is located.
Finally, if another web server is used, the .inv files must be copied to the data directory on the LOGINventory machine be processed by the Data Service, e.g. by using Robocopy.exe.
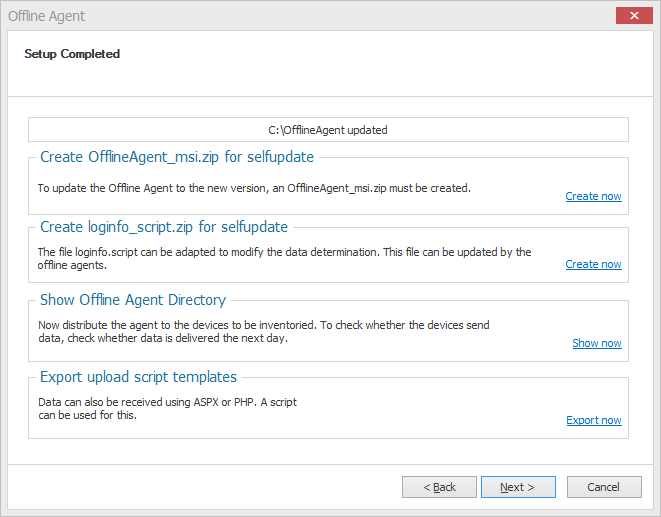
Several files are created in the folder selected at the beginning of the wizard, all of which are required for installation, including the appropriate MSI packages for 32-bit and 64-bit systems:
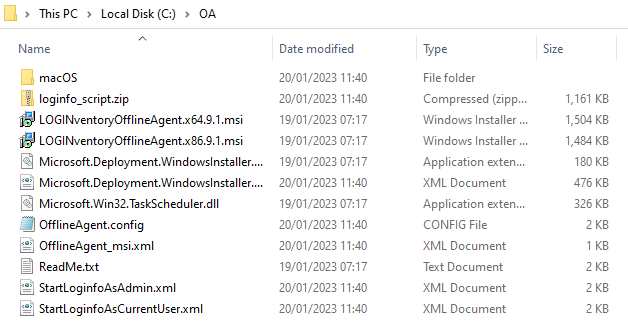
It is recommended to run the appropriate setup directly from the AIP to install the OFffline Agent on the clients.
Tip
After updating the Offline Agent to a newer version, also keep the previous versions in this folder, since they might be needed for the deinstallation on the client.
Info
In the "macOS" folder, a setup for the macOS operating system is also automatically created. The setup is explained below.
Mode of Operation
If the Offline Agent is installed on a computer, two scheduled tasks for inventory are executed every day by means of a local copy of LOGINfo.exe (see logon script method), namely:
- at 10:00 am in the user context of a logged-in user (caution: The task in the user context is created only when a corresponding user logs on to the device again after setup).
- at 8:00 pm in the system context, i.e. even if no user is logged in.
If the computer is switched off at these times, the scans are repeated within a maximum of 24 hours if the computer is switched back on.
Important
If the computer is switched on, .inv files are created - triggered by the Windows task scheduling. These files must then be transferred by the clients to the LOGINventory server. The service "LOGINventory Offline Agent" (display name) or "LOGINfoSvc" (name) tries to transfer the data to the URLs stored in the profile settings.
If the service "LOGINventory Offline Agent" finds new inventory files (*.inv) in the directory "C:\Users\Public\Documents\LOGIN\LOGINventory 9\LocalData" (local data directory), and a network connection exists, then it tries to transfer these files to the URL defined in the configuration - matching the current firewall profile - and then to perform a SelfUpdate (if available).
Summary
If everything is set up correctly, the corresponding devices will inventory themselves twice a day and then send the data to the LOGINventory data directory. Have a look at the values of LastInventory.Agent to see with which acquisition method the device was inventoried (here: "Local"). Also, on the LOGINventory machine, you can see in the Event Viewer when .inv files have been processed.
A daily log of communication with the central LOGINventory server is located on the client with the Offline Agent installed in the directory %ProgramData%\LOGIN\LOGINventory\9.0\Logs.
Info
If a transfer of the data should be executed directly after the installation for test purposes, the corresponding task can be executed in the Windows task scheduler with installed Offline Agent. 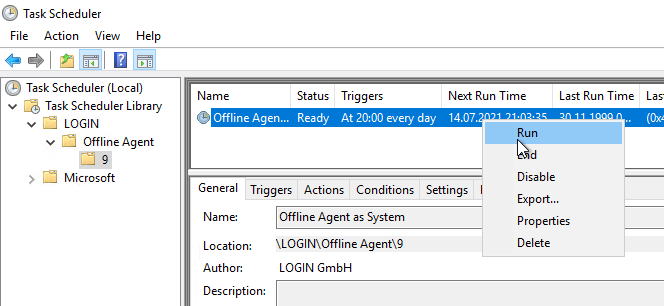
Updating the Offline Agent
There can be different reasons for providing an update of the Offline Agent:
- By updating LOGINventory, a change is made to the logic of the Offline Agent (e.g. to improve reliability). This is then explicitly pointed out in the LOGINventory changelog. These updates usually occur very rarely.
- An update of LOGINventory changes the LOGINfo.exe (e.g. new values are read out now). In this case, a new version of LOGINfo.exe should be provided to the clients so that they can benefit from the new features and provide data that is compatible with the currently installed database version.
- An adjustment of the LOGINfo.script file is made by the administrator, e.g. because a rule for setting custom properties depending on the IP address has been added. For this to apply to the clients, the updated version of the LOGINfo.script file must be made available to the clients.
- In the future, a different target URL is to be used when transferring the data or during the self-update, e.g. because the LOGINventory installation is moved to another machine.
Important
None of these changes will automatically change the installed Offline Agents, but the changes must be made available to the Offline Agents for so-called "SelfUpdate" by you.
Danger
It may take up to 24 hours for a client to download and install the update. The client checks for a new update to download only once per day.
There are two different types of updates you can provide. This is done in each case by running the Offline Agent Deployment Wizard again and selecting one of the two SelfUpdate options on the last page:
The button Create OfflineAgent_msi.zip for Selfupdate creates a zip file for the first of the cases described, which the Offline Agent installation downloads and thus updates itself. By the way, not only the update of the "logic" is included, but also the current LOGINfo.exe and LOGINfo.script are provided. Thus a "complete update" is provided. If you use a different web server, you must also copy this file manually to this server. An update on the basis of these files at the Offline Agent then takes place automatically at the next connection, but at most once a day.
However, if "only" the LOGINfo.exe or the LOGINfo.script have been changed (case 2 or 3), no "complete update" has to be provided, but it is sufficient to click the button Create loginfo_script.zip for self-update. Thereupon a file "loginfo_script.zip" is created, which contains the current version of LOGINfo.exe and LOGINfo.script. Also this zip file will be downloaded at the end of the next transfer from the client with the Offline Agent installation and thus a self update of only these two files will be executed.
For the fourth reason - i.e. a change of the upload / self-update URLs - the steps to be taken are as follows: In the wizard for republishing the Offline Agent, the new URLs are entered first. Then the action Create OfflineAgent_msi.zip for Selfupdate (i.e. the complete update) must be executed.
Info
You have deployed an update and want to know if it has been installed by the clients? You can find hints in the log file on the clients (%ProgramData%\LOGIN\LOGINventory\9.0\Logs).
Linux Offline Agent
With the Linux Offline Agent, Linux machines can inventory themselves and transfer the data independently to the LOGINventory server. Different package types for the respective Linux derivatives are delivered in the program directory in the subfolder LoginfoXScripts (by default C:\Program Files\LOGIN\LOGINventory9\LoginfoXScripts).
Warning
Please note that when using http(s) to transfer data to the IIS server, the server must be configured so that it can receive the data. If only Windows devices send data to the server, it is sufficient to activate Windows Authentication. If macOS/ Linux devices are also to be equipped with the Offline Agent, Basic Authentication must also be activated in the IIS configuration. You can find more information on this topic in the Helpdesk.
Installing the Agent
For example, the .deb package for Ubuntu and the .rpm package for CentOS can be used. To install the agent, proceed as follows:
- Transfer the desired package to the Linux machine (e.g. via WinSCP)
- Install
- the .deb package using
sudo apt install /path/to/package/name.deb - the .rpm package using
rpm -i /path/to/package/name.rpmKnown issue: Therpmcommand could complain about missingperldependencies. In this case, please add--nodepsto the command line.
- the .deb package using
- The installation created
- an inventory script
loginfo.sh(/opt/loginfox/loginfox.sh) - a daily cronjob which starts the collection at 10:00 a.m. and transfers the .inv file (
/etc/cron.d/loginfox)
- an inventory script
- To activate the automatic transfer of the files, the contents of two files have to be modified:
- The upload URL under which the .inv file created during the acquisition is to be stored (e.g. OfflineAgent.aspx):
/etc/loginfox/loginfox_url.config
e.g.http://my-inventory-server/LOGINventory9/OfflineAgent.aspx - The credentials to use for accessing the upload URL:
/etc/loginfox/loginfox.config
e.g.--user ACCOUNT@DOMAIN:PASSWORD
- The upload URL under which the .inv file created during the acquisition is to be stored (e.g. OfflineAgent.aspx):
Further information on setting up the upload URL can also be found in the description of the Windows Offline Agent.
Manual data transfer
If your Linux system does not support .deb packages or .rpm packages, you can also copy a .tgz file to an appropriate device, unpack it and run it yourself. The resulting .inv file must then be copied back manually, or a transfer itself must be set up.
The file loginfo.tgz can be extracted from the subfolder LoginfoXScripts on the Linux machine using tar xfz loginfo.tgz. The acquisition is then started with ./loginfox.sh.
macOS Offline Agent
Warning
Please note that when using http(s) to transfer data to the IIS server, the server must be configured so that it can receive the data. If only Windows devices send data to the server, it is sufficient to activate Windows Authentication. If macOS/ Linux devices are also to be equipped with the Offline Agent, Basic Authentication must also be activated in the IIS configuration. You can find more information on this topic in the Helpdesk.
Setup
Publishing the Windows Offline Agent creates a directory where the required setup files are located. This also includes a subfolder "macOS" where the files for installation on macOS are located.
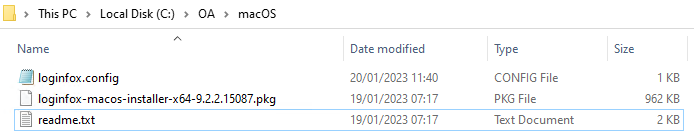
For installation on macOS the two files loginfox.config and loginfox-macos-installer(version).pkg are needed.
In the loginfox.config file it is defined where the macOS agent should send its .inv files. The URL and password stored in the "Public" tab of the publishing process are used and encrypted in the file. If the URL or user / password should be changed, it is recommended to go through the publishing dialog again, whereupon the loginfox.config will be updated. The encrypted information is stored unencrypted on the macOS device in the directory "/Library/loginfox/(version)/" by the installation, so that it can be used for the transfer. However, the rights to view the file have been limited to what is necessary.
Alternatively, it is also possible to store in plain text in loginfox.config where the .inv files should be sent to and with which user the transfer should take place by using the following syntax:
--user usr:pwd
--url https://{ADDRESS}{:PORT}/{UPLOAD-URL}
for example
--user OfflineAgent@domain.local:MyPassword123
--url https://inventoryserver/LOGINventory9/OfflineAgent.aspx
Attention
The transfer of files from the offline agent to the target server can only be done via http(s), not via fileservice or other methods.
To install on the macOS device, the two files loginfox.config and loginfox-macos-installer(version).pkg must be copied to the target device in the directory "/Users/Shared".
Danger
If not the directory "/Users/Shared" but the directories "Downloads", "Documents" or "Desktop" are used, security errors may occur during the installation and it may fail!
To start the setup, you can either double-click the pkg file and run the installation wizard, or execute the following command in a terminal window:
sudo installer -pkg /path/to/package.pkg -target /
After installation, the setup files can be deleted.
Mode of Operation
The installed offline agent consists of several components:
- Inventory script: The file "/Library/loginfox/(version)/loginfox.sh" performs the inventory of the macOS device
- Automatism for regular execution: Daily at 10am the offline agent is started by a
launchdprocess: "/Library/LaunchDaemons/com.loginventory.loginfox.plist" - Transfer of the .inv file: The resulting .inv file is transferred to the preconfigured http(s) URL via
curlcommand through the loginfox.sh file (see Setup).
Attention
Unlike the Windows Offline Agent, the macOS Offline Agent does not have a self-update mechanism! This means that the macOS agent may need to be updated manually if the capture logic or data model has changed with a new version.
Tip
You can see how a device was captured by checking the LastInventory.Method and LastInventory.Agent values. For example, if a device was captured with a macOS Offline Agent version "9.2.2.15136", the values look like this: 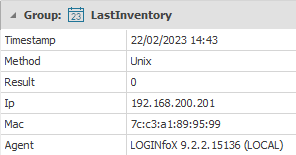
For a macOS device that was captured agentless, this would instead say LastInventory.Method = SSH and LastInventory.Agent = LOGINfoX 9.2.2.15136.
Software Usage Evaluation with LOGINuse
By default, LOGINventory uses the Windows Explorer statistics ("Last recently used" or "Recently opened programs") to determine the time of the last use of an application. This statistic is available in the respective user context of all supported Windows operating systems from 2000 onwards, but only considers applications started via Start menu, Desktop or Explorer - i.e. not the taskbar!
Info
LOGINventory offers with the help of the specially developed usage statistics agent LOGINuse the possibility to find out which software in your company is actually used by whom. In this way, expensive, unused software packages in particular can be identified and the number of licenses reduced. Thus LOGINventory supports you in minimizing unnecessary expenses for expensive software licenses.
In addition, LOGINventory also offers its own usage statistics agent: LOGINuse. All used applications (.exe, .jar, and .bat) (e.g. also via command line) are registered by all users of a computer. This also works on terminal servers. LOGINuse collects its information in its own local database. If a program has been started for the third time and has run for at least 10 seconds, this program is noted as "used". This data is collected during the normal inventory of the system and transferred to the LOGINventory database. If LOGINuse data is available, any existing data in the Windows statistics for this system will be ignored!
Attention
This means that without the distribution of the software usage agent, the data in license management must be evaluated with caution during usage evaluation! Only if the agent's been deployed, the data is reliable.
Info
The data is always evaluated in License Management.
Installation
LOGINuse is supplied in an MSI file which should be copied to a central installation point (AIP). From there, the distribution to the client systems takes place e.g. via group policies or another of the existing mechanisms.
Info
To make software usage monitoring available for distribution, the appropriate option can be accessed via the ribbon menu under Extras.
Since LOGINuse is a 32-bit application, the program is installed on the 64-bit systems under the path %ProgramFiles(x86)%\LOGIN. In addition, an automatically starting LOGINuse Service is configured (login with the local system account). As with all MSI setups, the original MSI file should be kept after the installation to be able to uninstall LOGINuse if necessary.
Info
As long as no changes are made to the LOGINuse program, the version number remains unchanged in the name, i.e. LOGINuse does not need to be rolled out again with every LOGINventory update as long as the LOGINuse version number does not change.
Rules for Acquisition
The following rules apply to the entry of LOGINuse:
- Only interactive processes that run in the user context are recorded.
- Only processes that were started outside %SYSTEMROOT% (incl. subdirectories) are recorded.
- Only processes that have more than 10 seconds between start and stop are recorded.
- Only processes that meet the above conditions at least three times are recorded.
- The results are visible at the earliest 8 hours later in the LOGINventory database!
The purpose of these rules is to ensure that only the real use of software packages is taken into account, that is:
- only packages that are not included in Windows are counted
- an accidental start (with immediate stop) is not detected
- the function test is not recorded after installation
- no direct monitoring of the users can take place
Examples:
| Action | Result |
|---|---|
| Use Notepad, Explorer, or Regedit | is never captured |
| Start all Office applications once and close them again immediately | is not captured |
| Start Microsoft Excel three times, run at least 11 seconds each | The software usage data is visible in LOGINventory after 8 hours at the earliest |
Suppress Readout
The readout of the LOGINuse database during scanning can be prevented via the switch //NoLoginUse 1. The switch can be set either as command line parameter in the scan definition or for the program LOGINfo.exe, or via the file LOGINfo.script.
Info
If you only want to prevent that the program usage information is collected from the Windows Explorer statistics, you can insert the switch !SET Ignore=ProgramUsage into the LOGINfo.script file. Then only the data of the usage agent is collected.
Configuration of the Data Directory
Unless configured otherwise, LOGINuse writes its data to the directory%ProgramData%\LOGIN\LOGINventory\9.0\LOGINuse. This can be reconfigured per computer by creating and setting the following registry value: HKLM\Software\LOGIN\LOGINuse, DataLocation. This can be done, for example, via the following command line (as administrator):
C:\ reg add HKLM\Software\LOGIN\LOGINuse, /v DataLocation /t REG_SZ /d "d:\LoginUseData" /f
The local database is deleted during an uninstallation. If this is not desired (e.g. because a new installation is planned afterwards), a backup of the local data directory should be made beforehand.
Manual Insertion of Data
In addition to the various automated procedures, it is also possible to manually insert data into LOGINventory.
Local Acquisition via USB Stick
If you cannot capture Windows devices remotely or via logon script, because they do not have a network card or their APIs do not support the procedure, you can also copy the LOGINfo.exe to a USB stick and execute it on the computer to be captured. The best way to do this is as follows:
- Copy the data directory including LOGINfo.exe (usually found under
C:\Users\Public\Documents\LOGIN\LOGINventory 9\Data) to a USB stick. - Remove the USB stick from the LOGINventory computer, go to the isolated PC and insert the USB stick.
- Start Windows Explorer, navigate to the USB stick, start LOGINfo.exe and wait until a .inv file has been created on your USB stick.
- Remove the USB stick from the isolated PC and return to the LOGINventory computer.
- Copy the new .inv file into the data directory of the LOGINventory computer.
- Make sure that the LOGINventory Data Service service is running and that the data is entered into the database (the .inv file disappears after a short time).
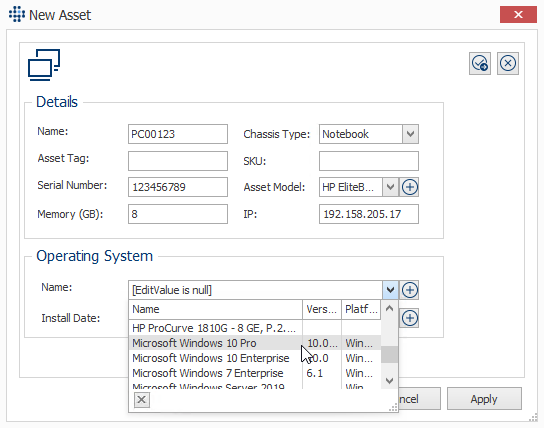
Creating Assets Manually
Assets can be created both in the LOGINventory Management Center (and thus also in the portable version) as well as via the web interface using the Asset Editor.
Tip
If many devices / items are to be created at once, it is often faster to import the data from .csv files than to create them manually. This is possible via the Data Import.
Asset-Editor
Info
The following descriptions refer to the Asset Editor in the LOGINventory Management Center. The functionality of the Asset Editor in the Web interface is very similar; however, it offers the ability to fill in Custom Properties while creating assets. 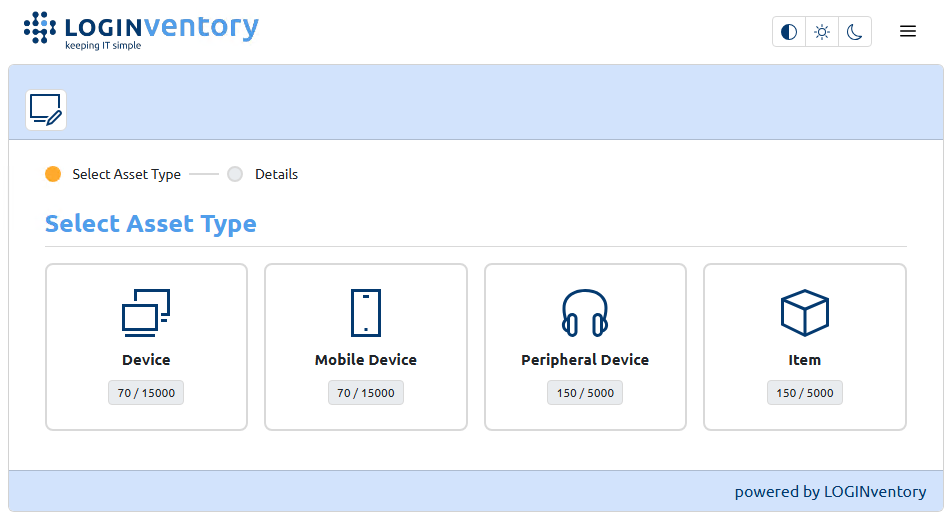
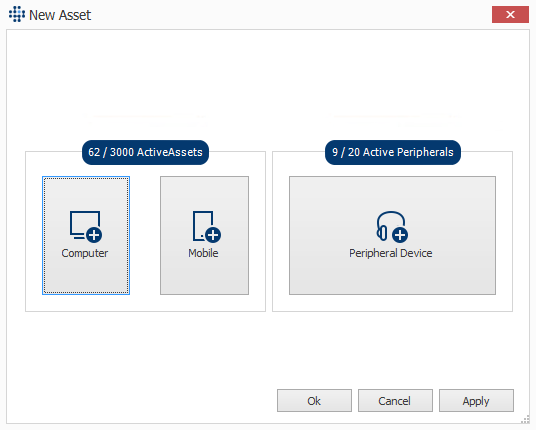
A New Asset can be created via the ribbon menu if you are below the Asset Management node.
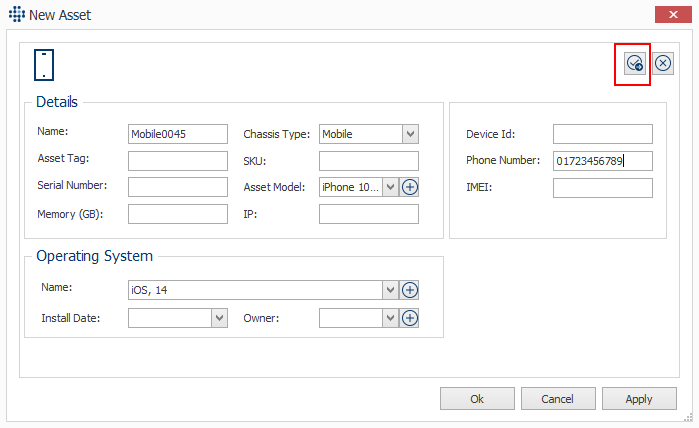
When creating manual assets, you can choose between four types: Device, Mobile Device, Peripheral Device & Item.
Info
For the manual creation of actually scannable devices (device / mobile), a "normal" asset license is required, as for every scannable device. Since this method is also used to create devices that are still in the process of being installed ("prestaging"), the manually created asset can be expanded with scanned information at any time by means of a successful scan.
The situation is different for peripheral devices & items: These require a add-on asset license.
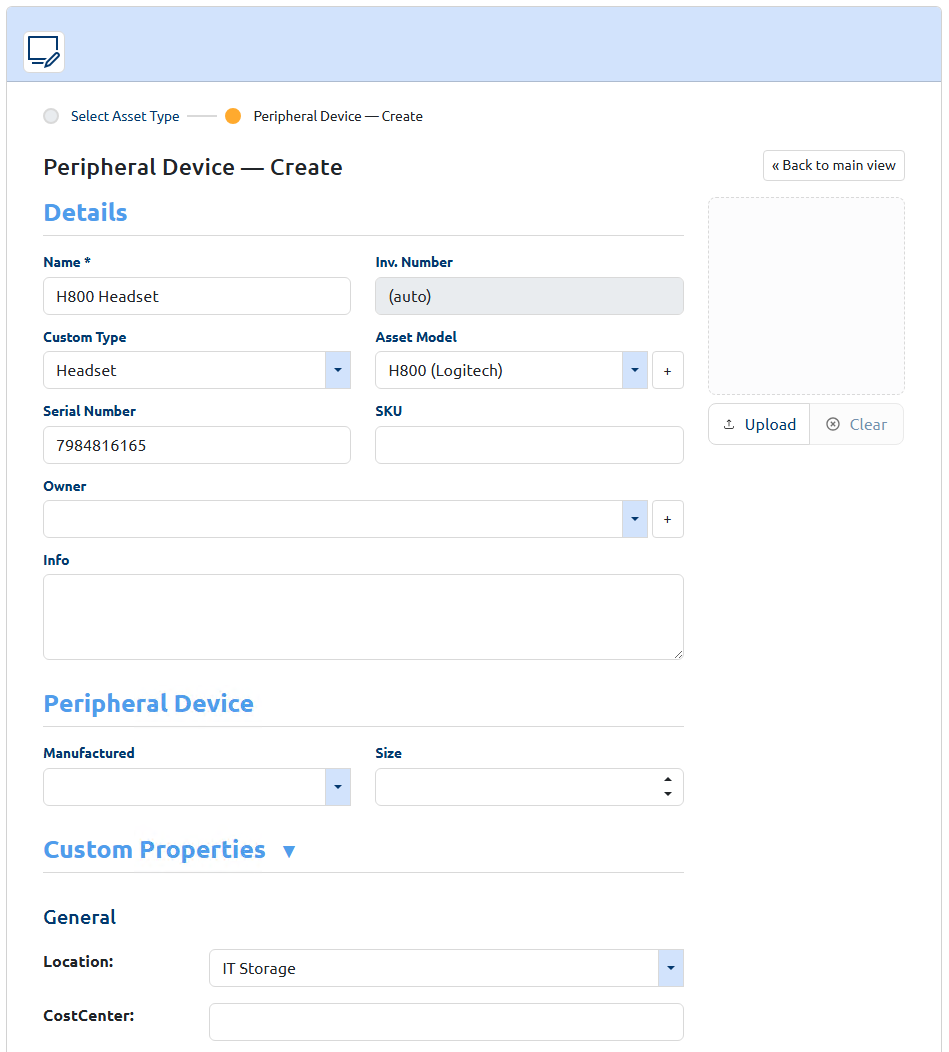
Depending on the selected type, other fields - relevant for the respective type - are available for filling. For catalog entries, such as Asset Model or Operating System Information, you can choose from the entries that have already been in the database or create new entries.
Info
If an incorrect entry, such as the asset model, is stored here, it cannot be deleted at this point. Instead, ensure that no device is associated with the incorrect entry. Then it can be removed through the cleanup of orphaned catalog entries.
By clicking OK, the Asset is created. If you want to create another similar device, you can click on the Save & Next icon in the upper right corner. This will save all previously filled entries except the name.
Tip
This way it is possible to quickly create several similar assets.
If a manually created asset is to be edited, this is possible by selecting the device in the Data View and then selecting Edit Asset from the ribbon menu.
Info
If you want to fill your own properties, you can do this - as with any other asset - via the Custom Properties - Widget.
Tip
If devices that could not be successfully inventoried (e.g. IP phones, TVs, etc.) should also be created as assets, you can select the Convert to Asset action from the ribbon menu in the list of unsuccessfully created devices (Failed Inventory inside the folder Error Analysis). The data that could be collected during the erroneous acquisition (name, IP, MAC, manufacturer) will then be transferred directly and the " faulty " asset will become a " proper " asset. 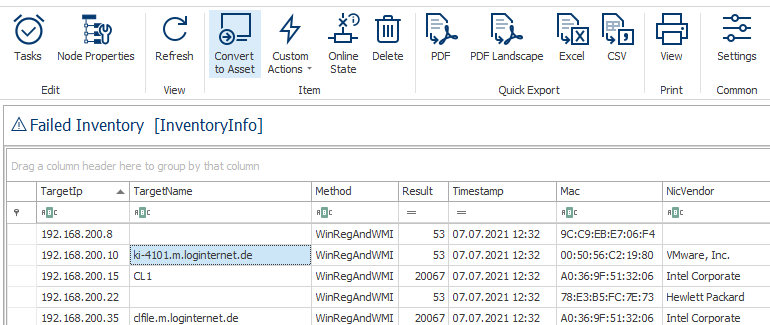
Creating Peripheral Devices
When creating peripheral devices, there are some special features to consider. However, all the comments mentioned for the Asset Editor still apply.
Info
LOGINventory can collect information about connected peripherals already by capturing devices. However, there are good reasons to create these devices as independent peripheral devices in LOGINventory:
- By default, information about connected devices is "volatile", i.e. if a monitor or USB device is unplugged, the information is for now lost because it is "currently disconnected" (it may still show up in the change history).
- When converting to a peripheral device, information may be added that cannot be read from the connected device by scanning a PC, e.g. serial number, model designation, etc.
- If additional information, such as custom properties, invoices (in the Documents widget), etc., is to be stored on the connected devices, these must exist as an independent device in LOGINventory.
- If a label is to be printed for the device, it must be created as a peripheral device and thus be assigned a unique inventory number.
- If the handing out and return of the device to a user is to be documented by using a smartphone, a separate web page must exist for the device - this is only the case for explicitly created (or automatically recorded) devices.
To create peripheral devices, either the Asset Editor can be opened via New Asset as described above, or, the information on connected / installed devices is taken over for certain data types:
- Monitors
- Docking Stations
- Drives / Hard Disk / USB Sticks
- via USB or Bluetooth connected devices
Tip
To do this, switch to a query that shows the just listed data types, or expand the details of a single asset and then go to "Docking Stations" or "Hardware" -> "Monitors" / "Drives" / "USB devices". Then, when you select one or more result rows in the Data View, the Create Peripheral Device option is available in the ribbon menu. 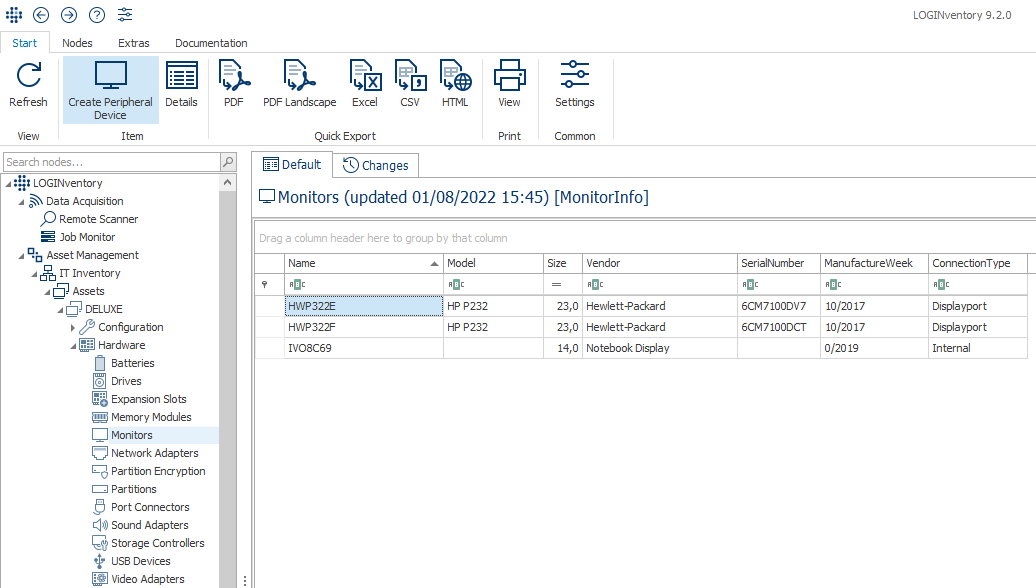 If only one result row is selected and the option Create Periphery Device is chosen in the ribbon menu, the details of the new peripheral device to be created can be edited directly.
 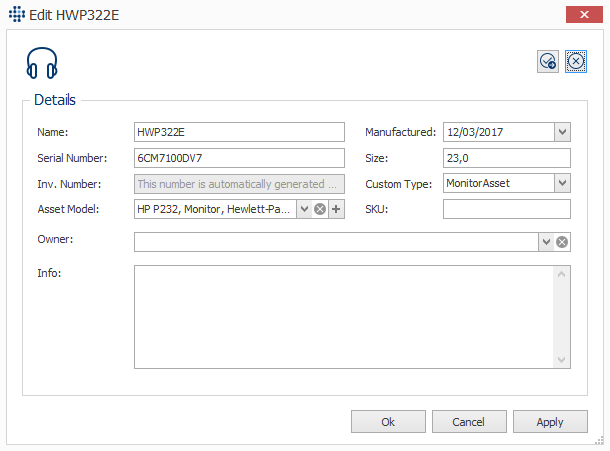 In case of multi selection all devices are created directly and can be edited afterwards as described above.
Info
The field "CustomType" fills the Custom Property "CustomType". This field should be used to specify the type of device (e.g. headset, webcam, docking station, etc.). If a name is selected for which an image with the same name is stored in the Resource Repository, the corresponding icon will appear in the Info Widget, among others.
All created peripheral devices are then visible in the query Peripheral Devices.
Tip
If you want to create evaluations that contain both scanned assets, peripheral devices, and items, use the HardwareAsset base table (see “HardwareAsset” class hierarchy).
Creating Items
Similar to peripheral devices, general items such as keys, keycards, tables, chairs, cars, etc. can also be created as standalone objects. To do this, select the Item type in the Asset Editor.
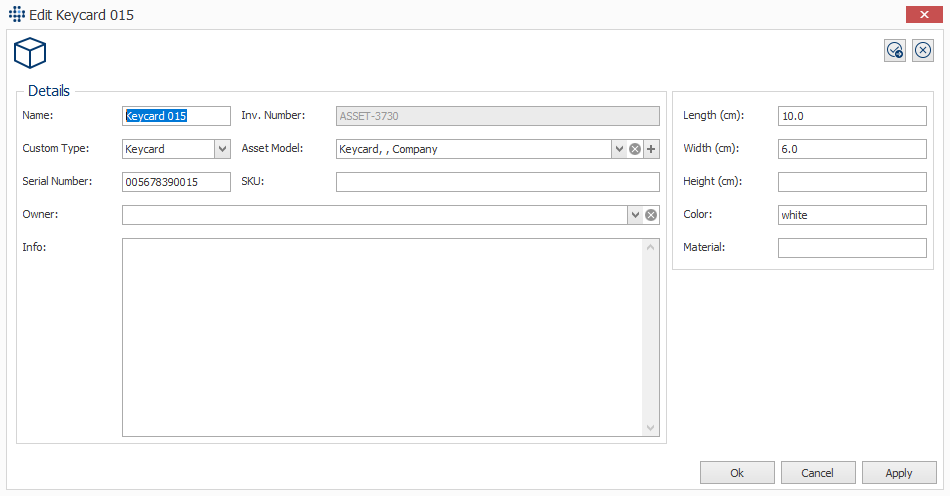
Otherwise, Items behave exactly like Peripheral Devices: They can be assigned to users, labels can be generated for them, handout and return can be documented, properties, documents, and lifecycle entries can be stored, and they can be included in queries, documents, and dashboards (entity Item).
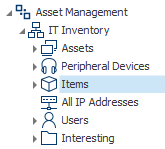
All created items are then visible, among other things, in the Items query.
Importing Assets, Licenses and Custom Properties from csv Files
Important
Data contained in .csv files can be automatically read and imported by LOGINventory by copying them into the data directory. To do this, a mapping must first be defined between the imported data and the columns in LOGINventory so that the values are assigned correctly.
If the mapping has been created correctly, assets can be created, custom properties (e.g. "Owner") can be imported or licenses including their properties can be imported.
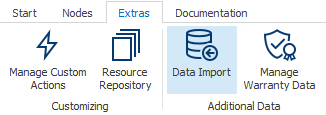
To define a mapping, the Data-Import can be called from the ribbon menu Extras. A .csv file, which can be located in any location, can then be selected to create an import definition. For each import, a unique Name has to be used. Then select a Table from the LOGINventory data model in which the key for the data is located.

Example
The "Device" table must be selected to import data for assets or custom properties that refer to assets. If data for licenses are to be read in, the corresponding license type can be selected. An overview of the available license types and their properties can be found in License Management.
Depending on the selected Table, different target columns are then available for the assignment.
When importing assets, a setting can be made in the Editable and Subtype columns: If the new devices to be imported should afterwards be editable via the Asset Editor, the Editable checkbox must be selected. Only if the Device table is selected a subtype can be specified that determines which Asset Editor is to be used to later edit the device: If it is a normal device, no Subtype must be selected; if it is a smartphone or tablet, the Subtype "Mobile" must be selected.
Info
The column names of the source file may not start with a number and may not contain spaces or special characters such as /, \, ? etc.
The import supports all common formats UTF7, UTF8, Unicode (UTF-16LE), BigEndianUnicode (UTF-16BE), UTF32 correctly. Default is the operating system Ansi code page, which e.g. writes Excel. In order to recognize the above mentioned formats, the so-called Byte-Order-Mark (BOM) MUST be set. In Notepad++ you can find both UTF8 and UTF8 BOM and only the latter works, because otherwise no information is written into the file header and therefore no encoding can be recognized.
So in a nutshell: Either with BOM or the standard code page is tried.
Note
In order for the assignment or updating of existing data to function correctly when reading in data, there must always be a so-called "key" on the basis of which an entry is uniquely identified. When importing assets, this key is the field Device.Name. If licenses are to be read in, the key is the field License.Number. If there is no such ID of a license in the source data, the fields Name, Version, Manufacturer, End and Begin are used as a temporary combination. This means that if there is no ID and one of these fields changes from a previous import, a duplicate license may be created.
Info
Only 1:1 relationships can be read in! It is therefore not possible to read in which programs all exist on one device (1:n relationship).
If the assignment was successful, the file can be read in by clicking on Apply.
Important
With the help of the File filter the file name can be adjusted with wildcards. So if "MyFolder.csv" becomes "My.csv", in the future all files starting with "My" and ending with ".csv" will be automatically read in* as soon as they are copied into the data directory. Therefore, you can also create different import definitions in order to handle different data differently (differentiate by file name).
Info
If custom properties are to be imported to assets, it must be ensured that the custom property already exists, otherwise it cannot be selected during assignment. If in doubt, you can first create your custom property and then restart the import.
Info
If date values are to be read in, it must be ensured that these are stored in the English format (MM.DD.YYYY) in the source file. This means that January 15, 2019 is entered as "01.15.2019" or "01/15/2019" in the file.
Example: Importing and Assigning Licenses
As mentioned above, licenses are uniquely identified by the field License.Number. Since software versions in combination with the product name (SoftwareAsset.CustomId) can also be uniquely identified, licenses can also be assigned directly to the correct product and version when importing. To find out what the CustomId of a software version is, the query "All versions" below "Evaluations" can be looked at, for example. Typically, however, the CustomId is the product name in combination with the version name (separated by a space).
For example, the following source file can be read in: 
Thereupon the following mapping can be used in the data import: 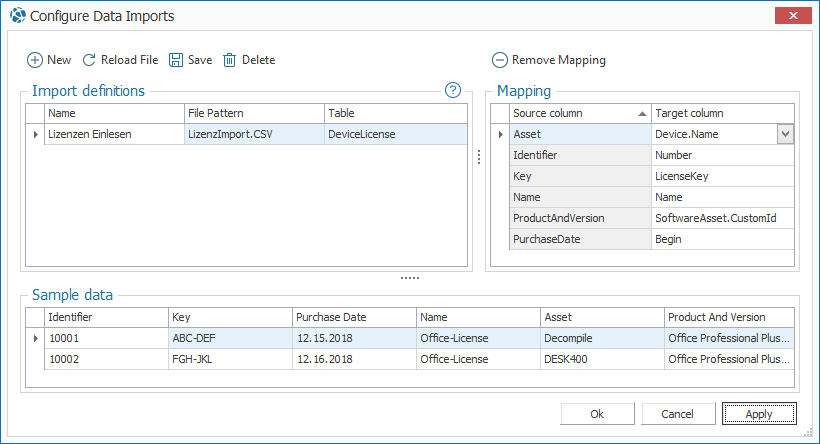
Manual Creation of Users
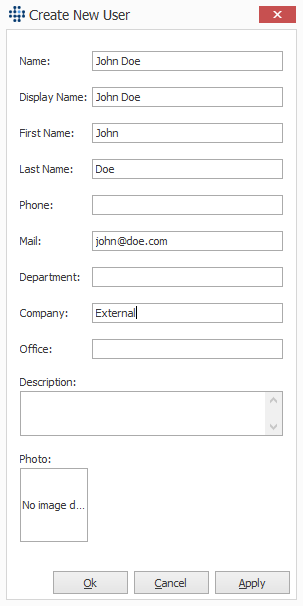
Normally, users are created automatically in LOGINventory through the inventory of Active Directory. However, if Active Directory cannot be scanned, or if there are people outside of AD who should be assigned devices, users can also be created manually.
Attention
This process must not be confused with assigning user roles!
This process here involves creating a user entry so that it can be referenced during normal work in LOGINventory, for example to assign devices to them.
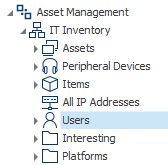
To do this, you must navigate to a query with the User entity, such as the supplied Users query.
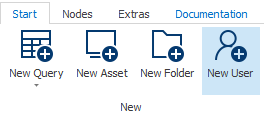
Then you can select the New User option from the ribbon menu to open the user editor.
Here you can enter common basic information about a user, such as name, email, telephone, or a photo.
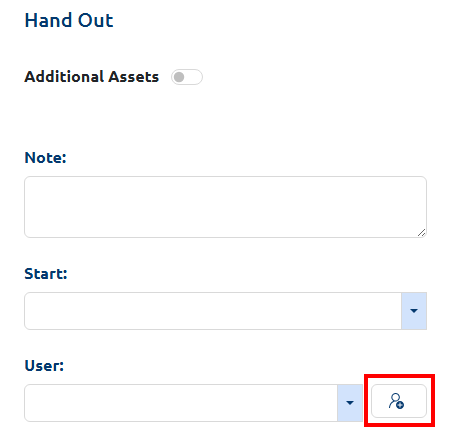
The same action (creating a new user) is also available in the web interface when generating lifecycle entries (which also include hand outs and returns).
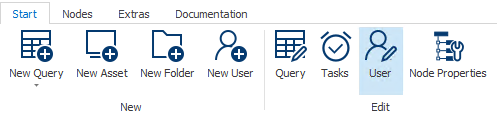
If a user created manually in this way is to be edited later, this is only possible in the LOGINventory Management Center (not in the web interface) by selecting the user in the data view and then selecting Edit User from the ribbon menu.
Info
Technically speaking, when a user is created manually, an entry is written in both the User table and the UserAccount table. The UserAccount table normally only contains data on users from Active Directory. When you added an entry manually, it can be recognized by the Domain field being set to "manually created". 
To delete a user, proceed as with automatically captured users: The user must be deleted in the UserAccount query, and subsequently the cleanup of orphaned user data must be performed so that the entry in the User table is also deleted. However, the deletion will only be successful if this user has no reference to any other entry. For example, if the user is assigned to a device as an owner, this assignment must be removed first before the user can be deleted.
Modification of the Data Acquisition
The information determined by default can be enhanced with your own rules. The agentless scans and the logon script with LOGINfo.exe use the file LOGINfo.script; this file is located in the subdirectory Script of the data directory (by default :\Users\Public\Documents\LOGIN\LOGINventory 9\Data). This script file is evaluated each time an asset is inventoried. This means that all adjustments here influence the entire capture process.
Attention
This does not apply to the acquisition of Linux-based systems. For these, another form of modification is possible, as described below.
Important
If LOGINfo.exe is called via the command line, a target directory can be specified (see parameter). The LOGINfo.script will always be searched in the "Script" subfolder of the target directory. If no target directory is specified, the location of the LOGINfo.exe is used as target directory. The .inv file is created in the target directory.
Example
This means that you can also read your own OIDs from SNMP devices, so that the information that really interests you is displayed for each device. Many manufacturers publish their MIBs online, so you can easily see where the data you're interested in is, and then insert the appropriate commands into the script file.
In this script file you can
- insert !SET-command switches, which are evaluated before the inventory. This way you can
- change the time-outs
- read additional data
- not read certain data ( e.g. Netinstall packages, software uninstall info, etc.)
To do this, the data that is no longer to be collected must be listed separated by a comma, e.g.!SET Ignore=BootLog,Event
- modify the data after inventory using additional commands:
- Values can be narrowed down using conditions and comparisons.
- Custom (freely definable) properties can be assigned asset-related, e.g. "location" information, environment variables, values from WMI or the registry, certain file properties.
- simple properties of the LOGINventory database can be changed directly, e.g. the value for the name of the read CPU can be changed or overwritten.
-
Using the command
Cpu.Name=%$Cpu.Name% X1234the entryAMD Athlon™ 64 X2 Dual Core Processorchanges toAMD Athlon™ 64 X2 Dual Core Processor X1234- Entries of list entries can be added, modified or removed.
- The command
!Modify NetworkAdapter Name=Broadcom NetXtreme-Gigabit-Ethernet, Name=Gigabit, DefaultGateway=10.11.12.14changes e.g. in the network adapter entry named "Broadcom NetXtreme-Gigabit-Ethernet" the name and the entry for the default gateway
The names of the properties correspond to the column headings in LOGINventory.
Available Commands
| Command | Explanation | Example |
|---|---|---|
; or # |
Comment | ;comment line |
!Include filename |
Include commands allow you to include additional control files that are located in the same directory. This allows you to combine rules for certain areas or topics in your own .script files and thus structure the entries better and make them clearer. | !Include ProductKeys.script |
!IF {regexist/ fileexist/ direxist/ oidexist:Path Action !ENDIF |
Query for presence | !IF{regexist:HKEY_LOCAL_MACHINE\Software\Oracle8} !ADD SoftwarePackag Name=Oracle,Version=8,Publisher=Oracle !ENDIF |
!Stop |
Cancel inventory (e.g. to exclude computers from inventory) | If the registry value "Site" does not have the value B96, this computer will not be inventoried: !IF {ne:{reg:HKEY_LOCAL_MACHINE\SOFTWARE\SMS-IC\Userinfo,Site},B96} !STOP !ENDIF |
eq/ ne/ lt/ le/ gt/ ge/ like/ notlike |
Comparison: equal/ not equal /smaller /smaller or equal /larger /greater or equal/ similar to /not similar to | !IF {eq:%$LastInventory.IP%,192.168.200.157} Custom.parking space=R4.192 Custom.printer name=accounting !ENDIF |
and/ or not |
Boolean operators: and/or/ not | !IF{and:{fileexist:%SYSTEMROOT%\win.ini}, {regexist:HKEY_LOCAL_MACHINE\Software\MySoft}} !STOP !ENDIF |
!FindFiles <PATH> & !FindFilesRec <PATH> |
File search and recursive file search | !FindFiles C:\Temp\*.exe |
Switches
Switches can be inserted into the LOGINfo.script file to further adjust the data entry process. The following syntax can be used: !SET command=value. Many of the offered settings are also directly adjustable in the respective scan definitions.
Info
The values presented below can also be used as command line arguments. In each case a // must be placed in front and instead of an assignment by a = a space is sufficient, e.g. LOGINfo.exe //TotalTimeout 300.
Attention
All switches set in the LOGINfo.script file are overwritten by command line arguments!
| Command | Explanation | Default value | Example |
|---|---|---|---|
AllCertificates = [0|1] |
Read all certificates that can be found on a computer and not only the certficates found in the SystemStore "My" | 0 | !SET AllCertificates=1 |
AllGroups = [0|1] |
Capture all groups: By default, only the members of the local Administrators group are captured. This switch can be used to enter all local groups. | 0 | !SET AllGroups=1 |
AllowOidsOutOfOrder = [0|1] |
OIDs to be read must not be provided in an ascending order by the SNMP device; this option significantly slows down acquisition. | 0 | !SET AllowOidsOutOfOrder=1 |
AllowWindowsSnmp = [0|1] |
Activate SNMP scan for Windows computers | 0 | !SET AllowWindowsSnmp=1 |
BlockNTLM = [0|1] |
Blocks NTLM authentication: When this switch is set, no fallback to NTLM is performed during remote scan. This means that device acquisition fails if no connection can be established via Kerberos. By default, Kerberos is attempted first; if that fails, NTLM is used as a fallback. This fallback can be disabled. | 0 | !SET BlockNTLM=1 |
BootLogEntries = NUMBER |
By default, only the last 50 BootLog entries (startup and shutdown of a machine) are captured. However, the list of BootLog entries is cumulated. | 50 | !SET BootLogEntries=100 |
ConnectionsMaxLocalPort = NUMBER |
By default, all network connections that are >11000 on LocalPort are filtered out. This ensures that only incoming connections are recorded. | 11000 | !SET ConnectionsMaxLocalPort=65000 |
DontResolveIpToFqdn = [0|1] |
By default, during agentless scanning, an IP address is first resolved to an FQDN via PTR record and then validated via A/AAAA record. Only if this forward and reverse resolution is consistent, the FQDN is used for further communication, since Kerberos requires name resolution on hostnames (SPN) (see also BlockNTLM). If this switch is set, the resolution is skipped and the IP address is used as the name instead, which normally means that only acquisition using NTLM is possible. |
0 | !SET DontResolveIpToFqdn=1 |
DontScanCurrent UserUninstall= = [0|1] |
Software Uninstall Key do not capture for current user | 0 | !SET DontScan CurrentUserUninstall=1 |
DontScanNetinstall = [0|1] |
Do not collect Enteo Netinstall packages. The Enteo Netinstall software distribution writes additional entries to certain registry keys when a package is distributed. When this switch is used, the additional entries are no longer captured (the corresponding registry keys are not searched). However, the actually installed packages are still captured. | 0 | !SET DontScanNetinstall=1 |
DontScanServices= = [0|1] |
Do not include services | 0 | !SET DontScanServices=1 |
DontScanUninstall = [0|1] |
Software Uninstall Key do not capture for the computer | 0 | !SET DontScanUninstall=1 |
EnableSnmpAlways = [0|1] |
Force SNMP: Ignoring Windows APIs | 0 | !SET EnableSnmpAlways=1 |
ForceAllPossibleData = [0|1] |
If this switch is used, the very likely incomplete data of the services (entity: Service) & scheduled tasks (entity: ScheduledTask) will be acquired. This captures the values that can be read in the context of an unprivileged user, although significantly more values would be available through an administrative scan. For more details see Technical details. |
0 | !SET ForceAllPossibleData=1 |
HiddenAcls = [0|1] |
Scanning of the permissions for shared folders also from hidden shares (ending on $ characters). Note: Administrative shares (Admin$, IPC$, C$, D$, E$, ...) are never recorded. |
0 | !SET HiddenAcls=1 |
Ignore = TABLE |
Prevent acquisition of properties: Exclude table names (e.g. SharedFolder, DeviceInfo, Mainboard, Font, ...) from the acquisition | !SET Ignore=Mainboard or !SET Ignore=BootLog,Event |
|
IgnoreFingerPrintRules=NameOnly |
Disables the fingerprint rule "NameOnly". More details here | !SET IgnoreFingerPrintRules=NameOnly |
|
IgnorePingTtl = [0|1] |
Perform Windows scan even if the ping TTL value indicates a non-Windows system | 0 | !SET IgnorePingTtl=1 |
IgnoreVMs "[Name:<NAME>][OperatingSystem:<OPERATINGSYSTEM>]" |
Exclude certain VMs from beeing inventoried as assets when scanning the host (see detailed explanation: Tip "Excluding specific virtual machines (VMs)") | //IgnoreVMs "[Name:A*][OperatingSystem:*Linux*,*Windows*]" |
|
InactivityTimeout = NUMBER |
If a client does not respond to a query command (e.g. a WMI query) for 600 seconds during the scan process, a timeout is reached. This value can be adjusted. | 600 sec | !SET InactivityTimeout=900 |
MaxDiskLetter TryCount = NUMBER |
Cancel search for local drives after a gap of X drive letter | 5 | !SET MaxDiskLetterTryCount=30 (Search for all local drives) |
NetinstallDispPrefix = PREFIX |
If Enteo Netinstall packages should be scanned (see switch DontScanNetinstall), but the names of the packages should have a prefix in the SoftwarePackages list (to distinguish them), a prefix can be added to the names of the packages by using this switch. |
!SET NetinstallDispPrefix = "NETINSTALL_" |
|
NetinstallKeyPrefix = PREFIX |
If Enteo Netinstall packages should be scanned (see switch DontScanNetinstall), but the KeyName of the packages should have a prefix in the SoftwarePackages list (to distinguish them), a prefix can be added to the KeyName of the packages by using this switch. |
!SET NetinstallKeyPrefix = "NETINSTALL_" |
|
NoAcls = [0|1] |
Authorization analysis: For performance reasons it may be desired to switch off the capture, since complete share folder structure on Windows servers must be searched recursively. | 0 | !SET NoAcls=1 |
NoCaching = [0|1] |
No local copying of the LOGINfo.exe to the machine to be scanned. Instead, always run it from the data directory. | 0 | !SET NoCaching=1 |
NoCDP = [0|1] |
Do not use Cisco Discovery Protocol (CDP): When inventorying switches and routers, CDP is typically used to discover a hierarchy (more directly connected switches or routers). This can be switched off. | 0 | !SET NoCDP=1 |
NoFailedLogons = [0|1] |
By default, all failed logon attempts are read from the event log (event id: 4625). However, this behaviour can be switched off. | 0 | !SET NoFailedLogons=1 |
NoFonts = [0|1] |
By default, all system fonts are scanned. However, this behaviour can be switched off. | 0 | !SET NoFonts=1 |
NoIPv6 = [0|1] |
No reading out of IP v6 addresses (e.g. for the value NetworkAdapater.Ip) | 0 | !SET NoIPv6=1 |
NoLLDP = [0|1] |
No use of the LLDP protocol for reading out connected MAC addresses at switches | 0 | !SET NoLLDP=1 |
NoLoginUse = [0|1] |
Reading Program Usage Data from LOGINuse agent can be prohibited. | 0 | !SET NoLoginUse=1 |
NoNetworkPrinters = [0|1] |
Do not record network printers connected to Windows devices. This switch does not affect the inventory of printers via SNMP. | 0 | !SET NoNetworkPrinters=1 |
NoSysName = [0|1] |
SNMP Do not accept SysName as asset name: If an inventory is made via SNMP, the PC name is read from the OID system.sysname and no longer via reverse DNS lookup. This can lead to different results for the PC name! | 0 | !SET NoSysName=1 |
NoTSPrinter = [0|1] |
Do not register network printer during Terminal Service sessions | 0 | !SET NoTSPrinters=1 |
NoUpdatesPending = [0|1] |
Do not look for pending Windows Updates when scanning Windows devices | 0 | !SET NoUpdatesPending=1 |
NoUsage = [0|1] |
Do not record usage statistics: This prevents the collection of usage data from the Windows Explorer statistics and from the Usage Agent. This also removes any previously existing user data from the database and creates a new entry: "Suppressed_by_rule" instead. | 0 | !SET NoUsage=1 |
NoValidate = [0|1] |
Ignore errors in the LOGINfo.Script file (Scan is also performed if there are incorrect entries.) | 0 | !SET NoValidate=1 |
NoVirtualSwitch = [0|1] |
No virtual switch and the corresponding MAC address table is recorded for hosts | 0 | !SET NoVirtualSwitch=1 |
NoVmWare = [0|1] |
No scanning of devices whose operating system name includes "ESX" or "VmWare". Note: These devices are usually scanned using LOGINfoESX.exe. | 0 | !SET NoVmWare=1 |
NoWMI = [0|1] |
Do not use WMI: Normally, information is collected via Remote Registry and WMI. Acquisition via WMI can be switched off. | 0 | !SET NoWMI=1 |
ReplaceControlChars = [0|1] |
Replace control characters: With this switch it is possible to instruct the inventory to replace control characters within a value like TAB, CR, LF by a space character. This can be desired, for example, when reading the operating system of a Cisco switch or router. |
0 | !SET ReplaceControlChars=1 |
RPC = [0|1] |
RPC = 0 -> no RPC scan By default ( RPC = 1) the LOGINfo.exe is copied to the computer and executed there. If this does not work, a fallback to RPC 0 is made -> complete remote API acquisition (only works in trusted environments with remote registry service enabled) |
1 | !SET RPC=0 |
RPCOnly = [0|1] |
Use RPC scan only (no fallback to RemoteRegistry & WMI) | 0 | !SET RPCOnly=1 |
RpcTimeout = NUMBER |
If a scan is performed via RPC, its process is aborted after 1200 seconds. This time period can be changed via this parameter. | 1200 sec | !SET RpcTimeout=300 |
ScanAppUpdates = [0|1] |
Microsoft App Update Package Capture | 0 | !SET ScanAppUpdates=1 |
ScanClusterIp = [0|1] |
Performing a scan even when a cluster IP is detected | 0 | !SET ScanClusterIp=1 |
ScanDrivers = [0|1] |
Reading driver information (to be found in the table "SystemDriver") | 0 | !SET ScanDrivers=1 |
ScanSqlServerDatabases = [0|1] |
For SQL Server databases, asset inventory captures the identifiable names of the databases, even though a dedicated SQL Server acquisition would provide significantly more values. | 0 | !SET ScanSqlServerDatabases=1 |
ScheduledTaskLevel = ZAHL |
Specifies which types of Scheduled Tasks should be read.0 = do not capture Scheduled Tasks1 = only tasks from the root folder2 = all except Microsoft folder9 = all |
2 | !SET ScheduledTaskLevel = 9 |
SnmpConnectTimeout = NUMBER |
If an IP address does not respond to PING, LOGINfo will still try to open an SNMP connection. This happens twice with a timeout of 10s. This timeout can be changed. | 10 sec | !SET SnmpConnectTimeout=2 |
StoppedVms = [0|1] |
Create assets even for stopped virtual machines | 0 | !SET StoppedVms=1 |
TotalTimeout = NUMBER |
The scanning process for an address is usually aborted after 5400 seconds (90 minutes) if there is no response. This time period can be changed via this parameter. | 5400 sec | !SET TotalTimeout=600 |
UseSnmpFallback = [0|1] |
SNMP Fallback: If an IP address does not respond to PING, no further attempt is made to connect to this node. Alternatively, an SNMP connection setup can still be attempted. | 0 | !SET UseSnmpFallback=1 |
Validate = [0|1] |
Validates only the LOGINfo.Script file without starting a scan | 0 | !SET Validate=1 |
WmiMonitors = [0|1] |
Depending on the manufacturer, the serial number of monitors is read differently. To force readout via WMI, the switch can be set to "1". | 0 | !SET WmiMonitors=1 |
WMIOnly = [0|1] |
Only capture devices that support WMI. (Ignored if NoWMI has been set) |
0 | !SET WMIOnly=1 |
WmiSmartData =[0|1] |
By default, an attempt is made to acquire SMART data from disks using the CDI method. If these data should be collected via WMI, this switch can be set to 1. |
0 | !SET WmiSmartData=1 |
Creating your Own Properties
You can create your own properties and assign values to them. To change the values of these properties, either an entry in the LOGINfo.script file is used - or you can do this interactively in LOGINventory.
The properties created via the script file always have the type String - in contrast to Custom Properties created in LOGINventory, which can have the type String, Int64 or DateTime. For more information on this topic, see the [Own properties] section (evaluation.md#custom-properties).
Do not use spaces or special characters (e.g. $#_&-) in the property name!
| Assignment of | Syntax | Example(s) |
|---|---|---|
| Constants | Property= Constant |
Custom.Company=LOGIN |
| Environment variables | Property= %Environment variable% |
Custom.WindowsDir=%Systemroot% Custom.UserPath=C:\Temp\%UserId% |
| LOGINventory-1:1-Properties | Property= %$Property% |
Custom.IP=%$Lastinventory.IP% Custom.Mainboard=%$Mainboard.SerialNumber%/%$Mainboard.Name% |
| WMI values | Property= {wmi:[[root\][namespace\]WMI class,value} (If the namespace is not specified, CIMV2 is assumed.) |
Custom.Year={wmi:Win32_LocalTime,Year} Custom.CName={WMI:root\CIMV2\Win32_ComputerSystem,Name} Custom.Part={WMI:CIMV2\Security\MicrosoftVolumeEncryption\ Win32_EncryptableVolume,DriveLetter} |
| Registry-Keys | Property= {reg:Key,Value } or Property= {reghex:Key,Value } |
Custom.IEPatches={reg:HKEY_LOCAL_MACHINE\SOFTWARE\Microsoft\ Windows\CurrentVersion\Internet Settings,MinorVersion} Custom.Serial={reg:"HKEY_LOCAL_MACHINE\!32!SOFTWARE\Vmware, Inc.\Vmware Workstation\License.ws.*",Serial} (Note: when using special characters and spaces, the key must be enclosed in quotation marks!) |
| SNMP values | Property= {OID:oid-in-dotted-Number} |
Custom.SystemUpTime={oid:.1.3.6.1.2.1.25.1.1.0} |
| File version | Property= {fileversion:FileName } |
Custom.IEVersion={fileversion:shdocvw.dll} Custom.MDACVER={fileversion:%CommonFiles%\System\ado\msado15.dll} |
| File Date | Property= {filetime:FileName } |
Custom.BOOTINIDATE={filetime:c:\boot.ini} |
| File Size | Property= {filesize:FileName } |
Custom.MDACSIZE={filesize:%CommonFiles%\System\ado\msado15.dll } |
| File language | Property= {filelanguage:FileName} |
Custom.Vblang={filelanguage:vbscript.dll } |
Modification of List Entries
Existing list entries (e.g. software packages) can be changed. This is useful, for example, if you want to add a serial number or change the software name of a specific software. The use of wildcards ? and * is supported. All entries that match the expression are changed.
Using the syntax !MODIFY table condition property1=value1[,property2=value2 ...] the entries are changed, e.g.
- Addition of product ID and product key to software package:
!MODIFY SoftwarePackage Name=Nero*, PRODUCTID=reg:"HKEY_LOCAL_MACHINE\!32!SOFTWARE\Ahead\Nero - Burning Rom\Info",user}, PRODUCTKEY={reg:"HKEY_LOCAL_MACHINE\!32!SOFTWARE\Ahead\Nero - Burning Rom\Info",Serial5} - Replace SW package name with constant name:
!Modify SoftwarePackage Name=*WinZIP*,Name=File Compressor. - Replace the SW package name with its name and version number :
!MODIFY SoftwarePackage NAME=Acrobat,NAME=$NAME$ $VERSION$. - Addition of product keys from the registry:
!MODIFY SOFTWARE PACKAGE NAME=VMware Workstation, PRODUCTKEY={reg:"HKEY_LOCAL_MACHINE\!32!SOFTWARE\Vmware, Inc.\Vmware Workstation\License.ws.*",Serial}.
The syntax !BLOCK table condition can also be used to prevent the entry of certain values, e.g. !Block SoftwarePackage Name=LOGINventory or !Block Hotfix Product=.Net*.
Examples
Setting a custom property "Location" depending on the IP range of the acquisition
!IF {like:%$Lastinventory.Ip%,192.168.10.*}
Custom.Location=Munich
!ENDIF

!IF {like:%$Lastinventory.Ip%,192.168.20.*}
Custom. Location=Berlin
!ENDIF
Note
The custom property "Location" does not need to have been created in the user interface before. If it does not exist yet, it will be created automatically and created as "Editable by Scanner / Agent", which also prevents it from being changed in the user interface by the user anymore.
Adding a software package entry, although there are no entries in the registry, nor in the "Add / Remove Software List " (happens e.g. with package managers installed via the command line):
!IF {fileexist:"%programdata%\chocolatey\choco.exe"}
!ADD SoftwarePackage Name=Chocolatey,Version={fileversion:"%programdata%\chocolatey\choco.exe"}
!ENDIF
Modifying the ChassisType for certain devices (depending on the read operating system name)
!IF {like:%$Operatingsystem.Name%,*SonicWALL*}
DeviceInfo.ChassisType=Sonic
!ENDIF
Preventing the capture of software packages installed from a specific path (e.g., through software distribution)
!Block SoftwarePackage InstallSource=*dfs\apps\*
Modification under Linux
The file LOGINfo.script is ignored if it is a acquisition of a Linux-based device. However, for this purpose a file can be stored on the device to be scanned with which it is possible to modify various entries or write new entries themselves.
For this a file "custom.xml" must be stored in the path /opt/loginfox/custom.xml, which has the following structure:
<?xml version="1.0" encoding="utf-8"?>
<Device>
<Name>custom name</Name>
<Custom>
<myvalue>myvalue content</myvalue >
</Custom>
<DeviceInfo>
<Description>device description</Description>
</DeviceInfo>
<OperatingSystem>
<Name>os name</Name>
<Version>os version</Version>
<Domain>os domain</Domain>
</OperatingSystem>
<SoftwarePackage>
    <NAME>F-Secure Policy Manager</NAME>
    <VERSION>14.20</VERSION>
    <INSTALLDATE.VALUE>2018-12-04T00:00:00Z</INSTALLDATE.VALUE>
    <PUBLISHER>F-Secure Corporation</PUBLISHER>
</SoftwarePackage>
<SoftwarePackage>
    <NAME>FileZilla Server</NAME>
    <VERSION>beta 0.9.60</VERSION>
    <INSTALLDATE.VALUE>2018-12-04T00:00:00Z</INSTALLDATE.VALUE>
    <PUBLISHER>FileZilla Project</PUBLISHER>
</SoftwarePackage>
</Device>
The 1:1 relationships set here (e.g. Device.Name, OperatingSystem.Name, ...) overwrite the values actually read out. The entries for the software packages are added to the entries that have already been read out.