Multi User Mode
Access to the LOGINventory database is possible in parallel with several users. The access can be done via the normal installation, via the portable version, as well as via the web viewer. LOGINventory offers an authorization concept and the possibility to share individual nodes, i.e. folders or queries from the tree structure, for specific groups or users. This ensures that only authorized persons have access to the data intended for them.
Authorization Concept
In the settings different roles can be assigned. The following roles are available:
| Role | Function |
|---|---|
| Administrators | Unrestricted access, sharing of data nodes, management of user roles and settings |
| Power Users | Creation and editing of queries (nodes), editing of data |
| Users | Editing data |
| Guests | Viewing data |
Warning
This does not apply for access data management. Whoever enteres the Master Password can also edit stored user data.
Users or groups from the AD can then be added here and individual roles assigned. When using Security Principals from other domains (via Cross-Forest-Trust), nesting is not supported. This means that a Global Group or account from another domain must be entered directly in the roles; if it is a member of a Local Group, this will be ignored.
Info
If no roles are specified, all users are automatically administrators with unrestricted access!
Attention
Always make sure that you add yourself to the role of administrators if you assign roles to other users!
Run Management Center as another user allows you to test which data other users can see. However, nodes in the tree structure must be shared for this.
Tip
If you only want guests to be able to see the data of the queries that have been shared with these users and no details of the assets / users can be viewed by double-clicking, the following setting must be added to the LOGINventory.config (to be found under C:\ProgramData\Login\LOGINventory\9.0):
<setting name="HideDetailsForGuests">
    <value>true</value>
</setting>
Sharing Nodes
If user roles are to be activated, corresponding shares must be set to nodes in the LOGINventory tree.
Attention
If no nodes are explicitly shared in the tree structure, users will not see any nodes in LOGINventory!
User roles defined in the settings specify the type of access to the database that the individual users or groups have (read-only, edit data, ...). User shares determine to which data users or groups have access! Different roles can be defined for each user or group on a share. If no additional roles are defined, the roles from the global definition in the configuration apply.
To share nodes (queries or folders), the node properties can be accessed via the ribbon menu. Then you can define in the tab Share, which group or user has which kind of access to this node and all subnodes.
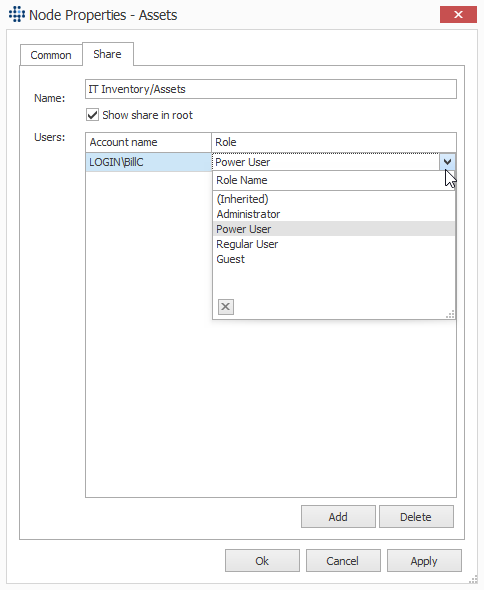 With role, the inherited authorizations (from nodes above or from the settings) can be overwritten and thus redefined.
Info
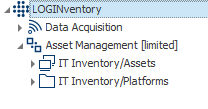
If all nodes are to be shared for a user, this can be done using the Asset Management node, since this is above all other nodes.
Important
The option Show share in root should be selected by default. Only in cases where the permissions on a node below another shared node should be different from the permissions on the node above, remove the check mark.
example
If members of the AD group "Technology" should have read access to all nodes except the folder "My Queries" (there: write access), then the access right for the group Technology is set to "Guest" for the node "Asset Management" and "Power Users" for the node "My Queries". To prevent the "Own Queries" node from additionally appearing on the first level, the check mark at Show share in root is removed.
Using the Portable LOGINventory Version
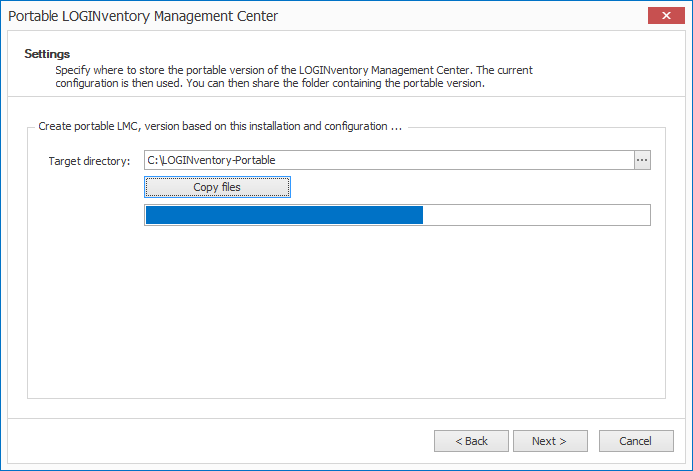
In the Extras tab in the ribbon menu, the Portable LMC can be published. This version allows you to use the LOGINventory user interface on other Windows computers without having to install or configure LOGINventory. For this purpose, the LOGINventory-Portable.exe of the portable version can be called from the shared folder.
Warning
The option to create the portable version is only available in the ribbon menu when you position the mouse on the "Asset Management" node or an underlying node.

When creating the portable version, all necessary configuration settings and data are stored in a directory in which, among other things, a LOGINventory-Portable.exe is located.
After publishing, this directory should be shared via Windows Explorer for all users who should have access to LOGINventory (e.g., the company's administrators group). If you now navigate to this shared directory from the client, you can run the LOGINventory-Portable.exe on the client by double-clicking it. The following happens:
- A copy of the portable version is copied to the
%appdata/Local/directory on the client. - A new shortcut named LOGINventory is created on the client's desktop.
- LOGINventory is started in the portable version on the client (by executing the LOGINventory.exe from the
%appdata%directory).
From now on, the portable version can be started via the desktop shortcut on the client. The following happens:
- The LOGINventory-Portable.exe is called from the shared folder with the portable version.
- It detects that a local copy already exists in the
%appdata%directory on the client and compares the version numbers. - If a newer version is available in the shared directory on the server (because LOGINventory was updated on the server), the new version is downloaded to the client. If the version is already up-to-date, nothing needs to be copied.
- The
LOGINventory.configfile, which contains configuration settings, is always copied from the shared directory to the local%appdata%directory. - LOGINventory is started in the portable version on the client (by executing the LOGINventory.exe from the
%appdata%directory).
This ensures that the portable version is usually already available locally, minimizing data transfer over the network and reducing startup time. However, if an update has been applied on the server, the client application automatically retrieves this new version at startup.
Info
The portable version provides all functionalities of the installed LOGINventory version except for changes to administrative settings, configuration of data import, and the publication of Web Viewer, Offline Agent, Usage Agent, and portable version. 
Important
Only members of the role Administrators can control the Remote Scanner via the portable version. Note that the scan is controlled from the client on the server. The name of the server currently being controlled is visible at the bottom left of the status bar. 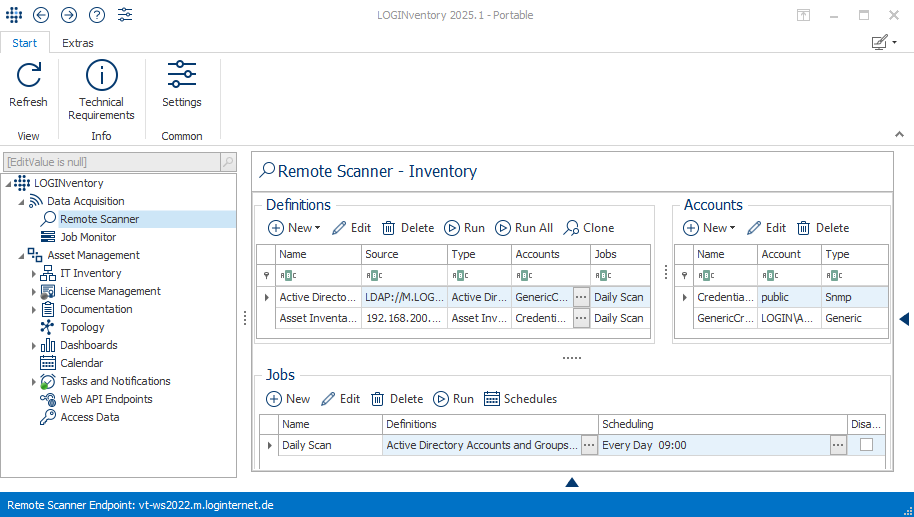
Note
As an alternative to starting the LOGINventory-Portable.exe, you can also call the LOGINventory.exe directly from the shared directory. However, this will start from the network directory, which may result in longer startup times.
The network access to the LOGINventory database server must be configured correctly. For Microsoft SQL Server Express, use the SQL Server Configuration Manager to check that the "SQL Server Browser" service is started and that the "TCP/IP" protocol is available.
Web Viewer
Via the Web Viewer, data from LOGINventory can be displayed and edited in a web browser. Before the Web Viewer can be used, some preparations are necessary. After that, the Web Viewer can be published and made accessible to other users.
Available Pages
Different pages are available in the Web Viewer for different use cases:
- Asset details for an individual device can be accessed via the
details.aspxpage, e.g. viahttp://loginventory-server/LOGINventory9/details.aspx. In addition to viewing the details of a device, this page allows you to document the handover of the device to a user (including signature), change custom properties and store lifecycle entries.
- User Details for an individual user can be accessed via the
user.aspxpage, e.g. viahttp://loginventory-server/LOGINventory9/user.aspx. Every user (even if not previously considered in the authorization concept of LOGINventory) can access this page and view which assets are assigned to them according to LOGINventory and which lifecycle entries are linked to their user account. This allows every user to check for which device handovers they signed and whether device returns were correctly documented in LOGINventory.
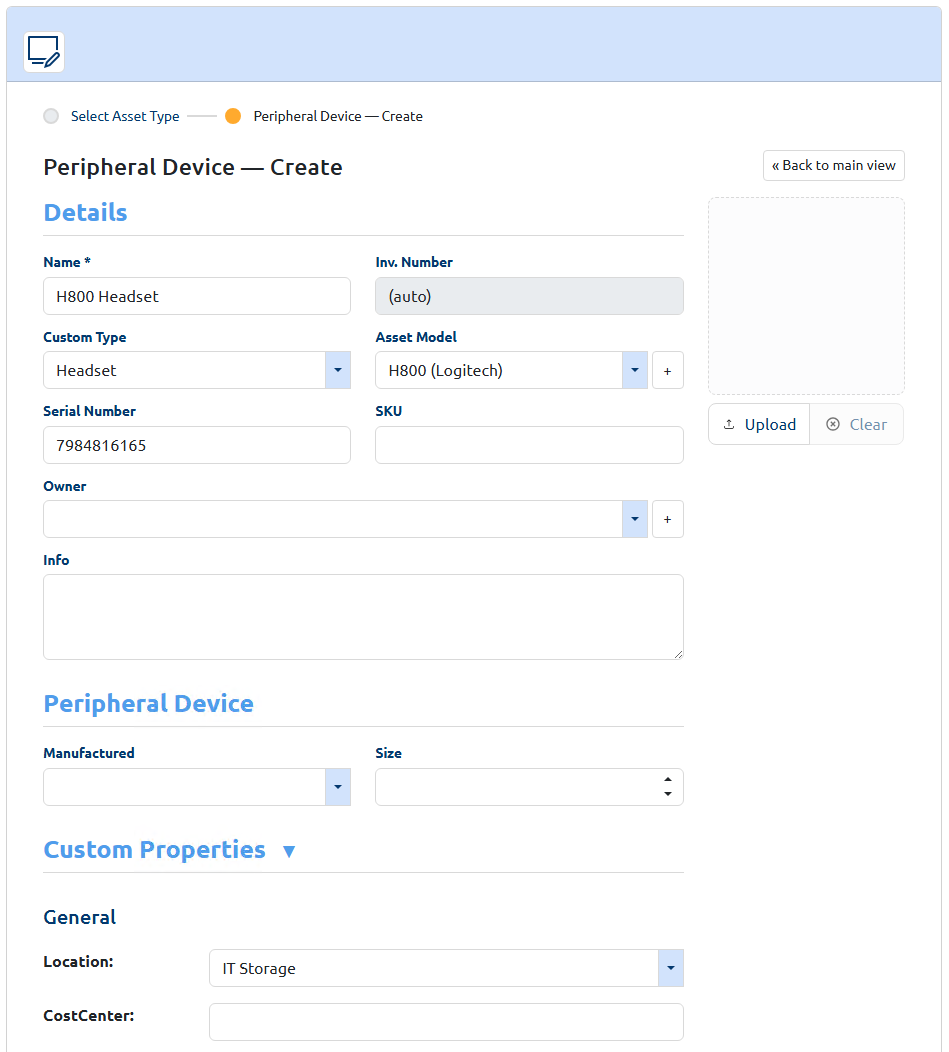
- The Asset Editor (see also Asset Editor) allows you to create new assets or edit assets that were previously created manually. This page can be accessed via the
asseteditor.aspxpage, e.g. viahttp://loginventory-server/LOGINventory9/asseteditor.aspx.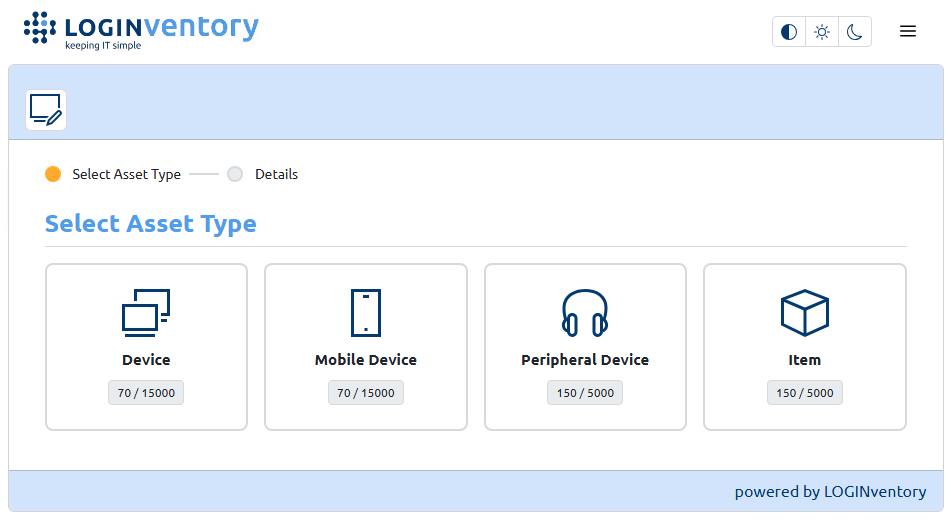
- The Search Page allows you to search for an asset or user and then jump directly to the corresponding detail page. This page can be accessed via the
search.aspxpage, e.g. viahttp://loginventory-server/LOGINventory9/search.aspx.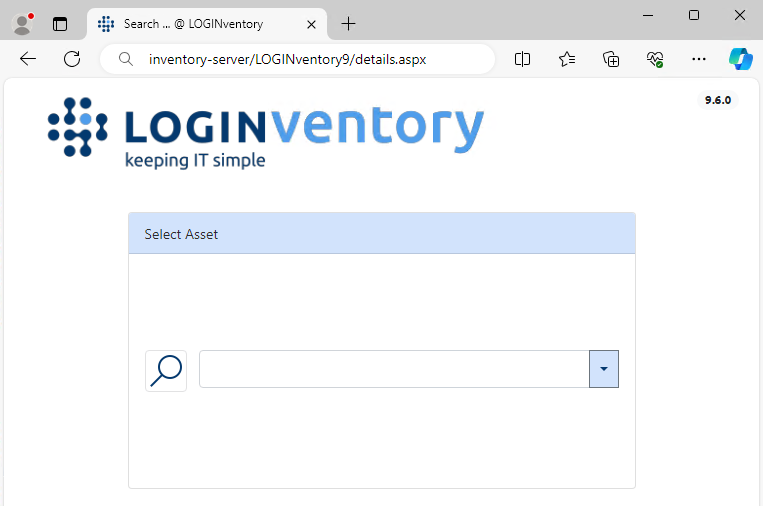
- The AI Assistant LIA allows you to ask questions about the data in LOGINventory in natural language and receive answers. More information here: AI Assistant LIA. This page can be accessed via the
lia.aspxpage, e.g. viahttp://loginventory-server/LOGINventory9/lia.aspx.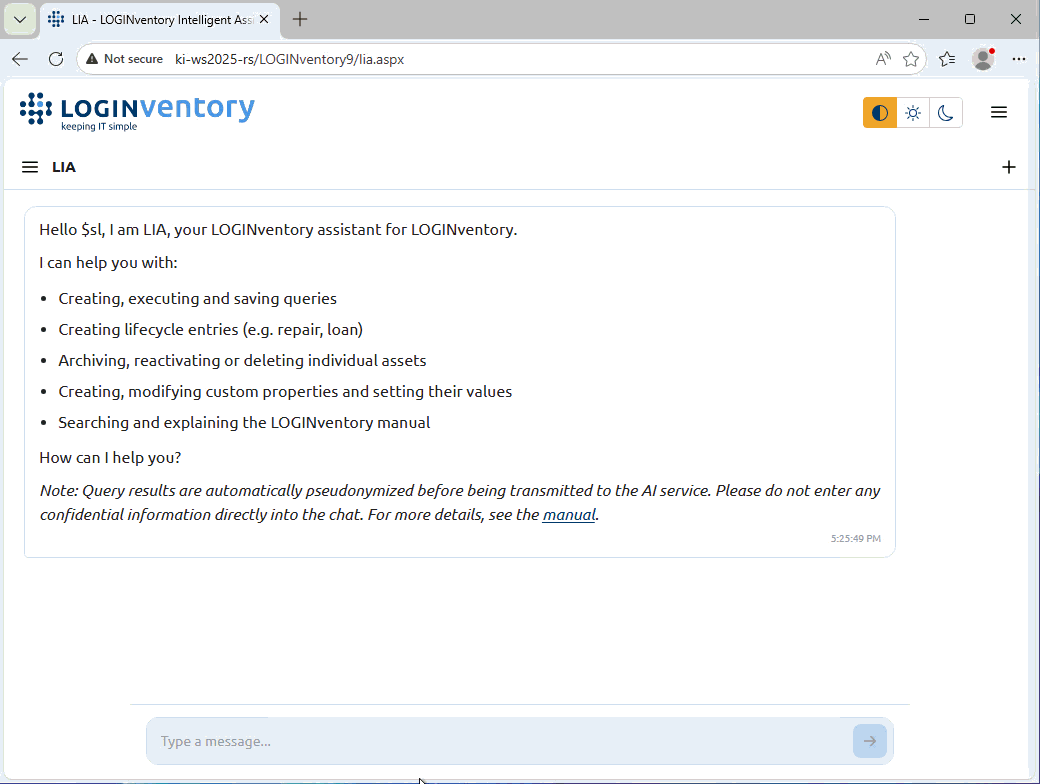
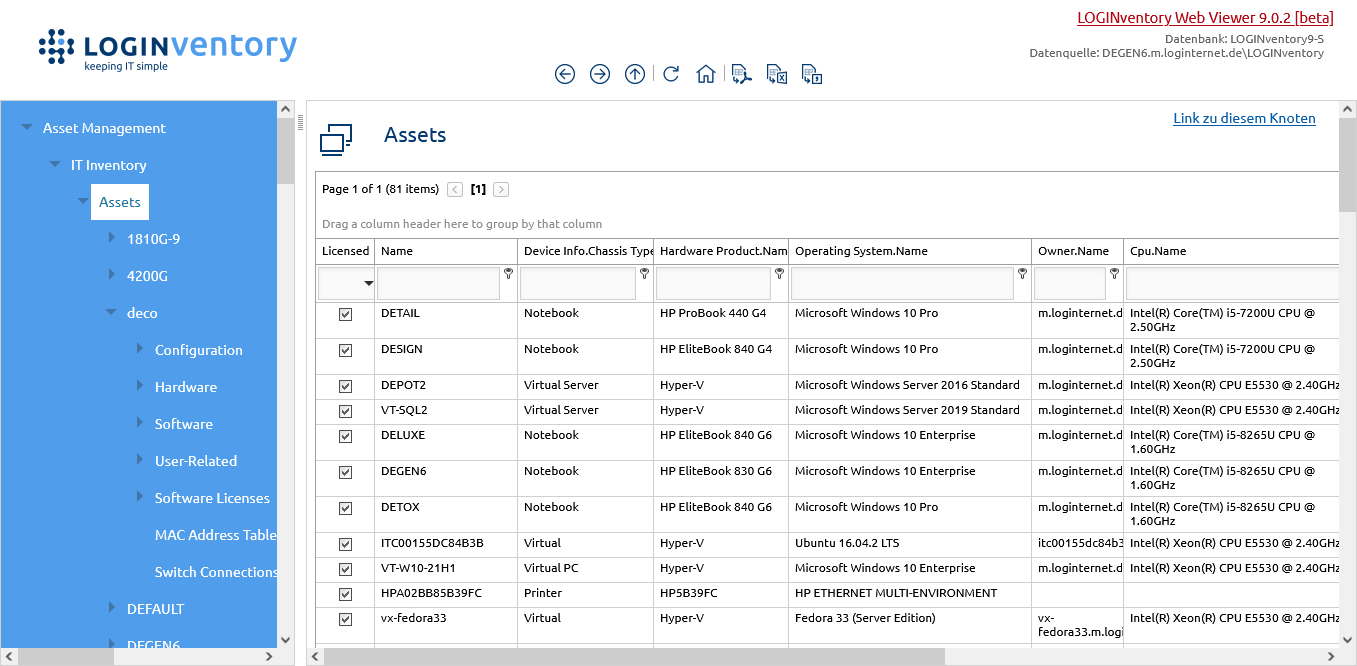
- The Web Console allows you to navigate through the LOGINventory tree structure and display queries and dashboards in read-only mode. The Web Console can be accessed via the
default.aspxpage, e.g. viahttp://loginventory-server/LOGINventory9/default.aspx(or justhttp://loginventory-server/LOGINventory9/). If only certain nodes have been shared with the user to open the page, the user can only see these nodes in the Web Console. It is also possible to export to various formats (e.g. PDF, XLSX) from here.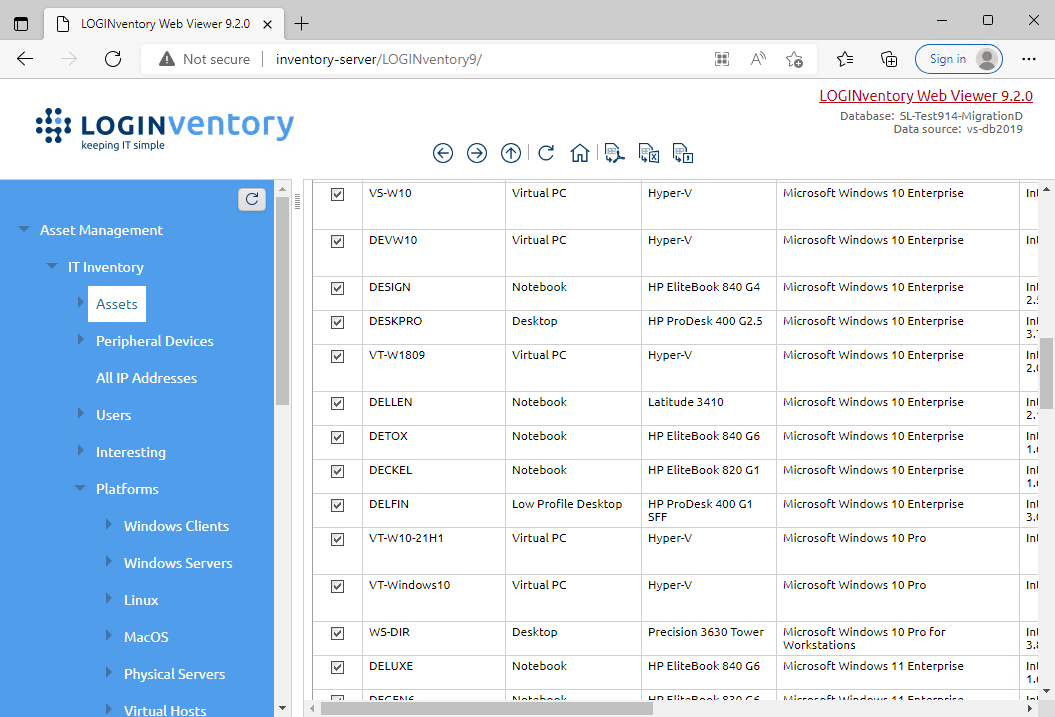
Info
All pages except the Web Console are responsive and suitable for access via smartphone.
The permissions required to access the individual pages are described in detail in the Access Permissions section.
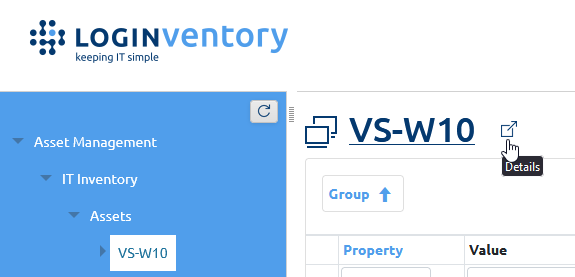
It is also possible to jump directly from the Web Console to the asset details page if a corresponding asset has been selected beforehand.
Info
With the Web Console it is not possible to create or edit queries and also not possible to store Custom Properties on devices. If you intend to do this from another computer, use the portable version!
All pages support the parameterized call, so that you can jump directly to individual devices, users or queries. More information on this below.
Preparation
For publishing, Internet Information Services (IIS) are required on the LOGINventory machine.
To add the necessary roles / features, you can select the option to add roles on Windows Server systems e.g. via Server Manager.
On Windows Client operating systems, you can get to this dialog by going to Enable or Disable Windows Features via Control Panel via Programs, for example.
Then select the role Webserver (IIS) (depending on the operating system version also "Internet Information Services").
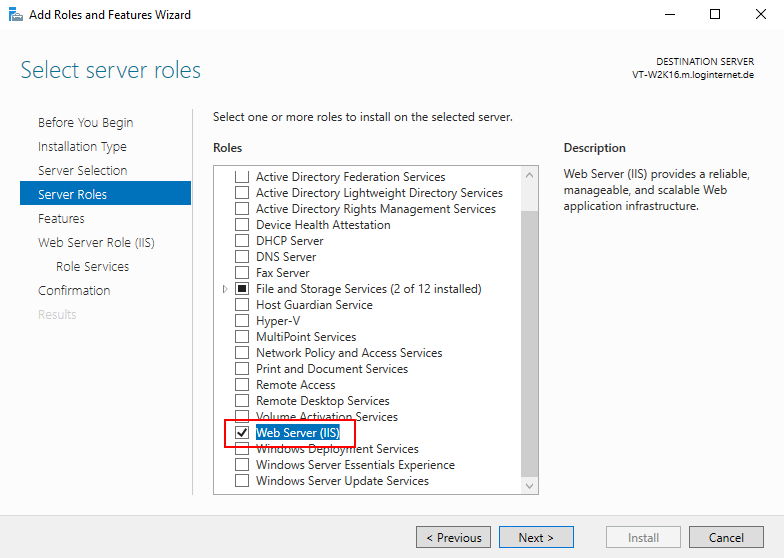
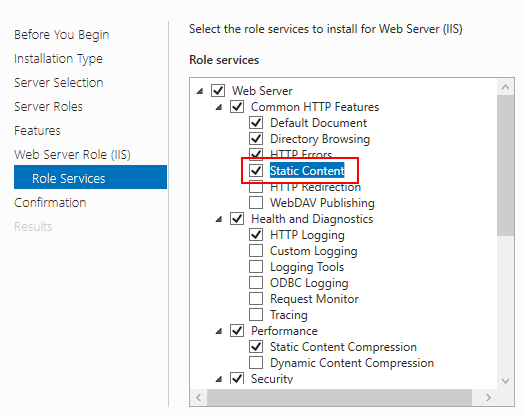
Add additionally the following options, or make sure they are selected:
- Common HTTP Features → Static Content
- Security → Basic Authentication (optional: allows use of browsers that do not support Windows authentication)
- Security → Windows Authentication (use Windows authentication by the web browser)
- Application Development → ASP.NET 4.X

The Configuration of the web application can be customized via the IIS Manager. For example, a certificate for using https can be configured.
Publishing
In the tab Extras in the ribbon menu the Web Viewer can be published.

Various settings can then be made in the wizard that opens.
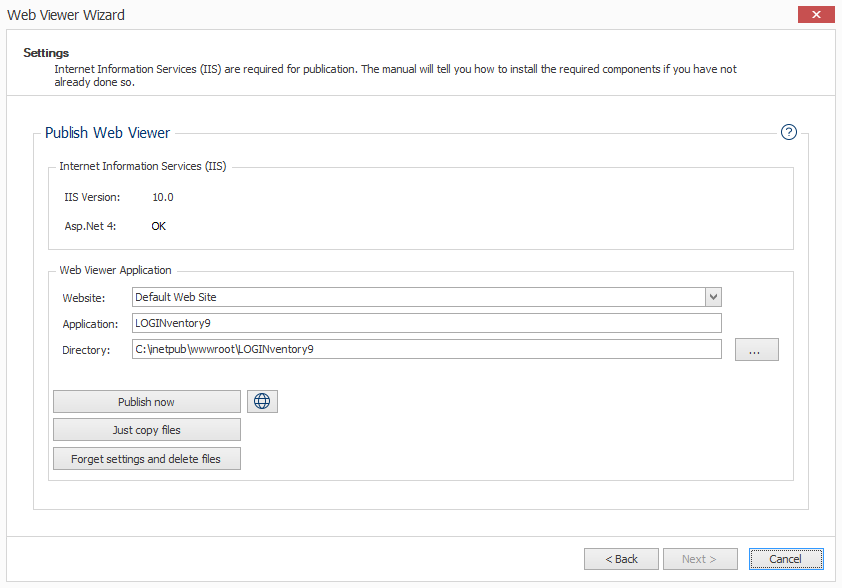
If the required features have been added on the server, a new application can be created in the IIS Manager via Publish now. We recommend using the default settings for Website, Application and Directory.
The browser icon can be used to access the website after publication and test the functionality.
Manual Configuration
If you did not select the default installation path during the installation of the web viewer, you must add a new web application to which you may assign the application pool.
If you selected *Just copy files* during the web viewer installation, you will need to convert the default virtual directory into an "application".
- Right-click on the "LOGINventory9" web page and use the "Convert to application" function.
- Confirm the setting with "OK".
The next page in the wizard provides various important settings for productive operation and permanent accessibility of the URLs used.
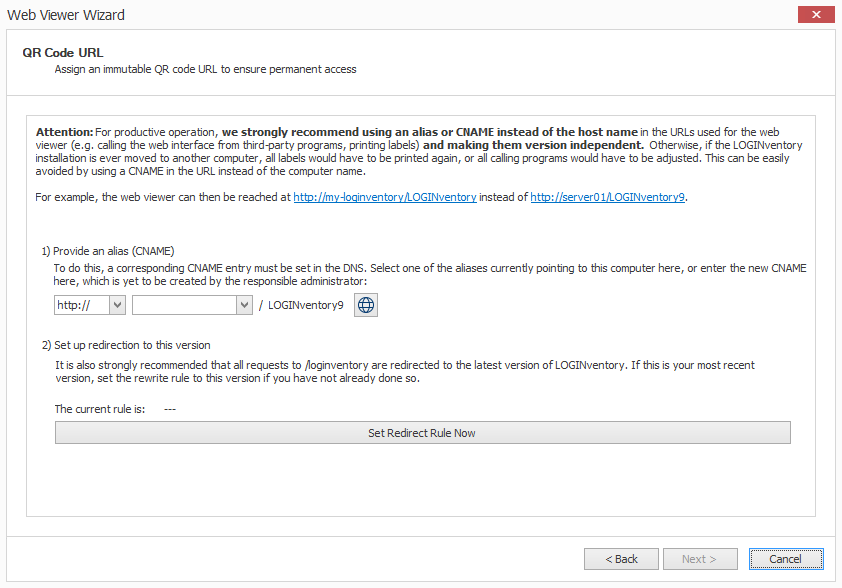
Alias / CNAME Setup
Danger
For productive operation, we highly recommend to use an alias or CNAME instead of the host name** in the URLs used for the web viewer (e.g. calling the web interface of third-party programs, printing labels).
If the LOGINventory installation is ever moved to another computer, all labels would otherwise have to be printed again, or all calling programs would have to be adapted. This can be easily avoided by using a CNAME or alias in the URL instead of the computer name.
For example, the web viewer is then accessible under http://my-loginventory/LOGINventory instead of http://server01/LOGINventory.
For this purpose, a corresponding CNAME entry must be set in the DNS. Select one of the aliases currently pointing to this computer here, or enter the new CNAME here, which is still to be created by the responsible administrator.
A CNAME can be defined in the DNS for example as follows:
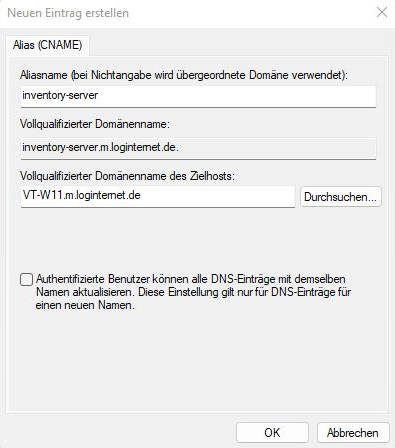
This entry can then be selected in the wizard:

Info
Since the CNAME used should not be adjusted afterwards in productive operation, the option to adjust afterwards is grayed out and can only be edited again by pressing STRG + E. However, you should only do this if you are aware of the consequences.
Important
If you want to use https to access the website, you have to make sure yourself that a certificate has been installed on the server and a binding has been set up in the web server configuration. If you do not do this, the web page will not be accessible via https. 
Set up Redirection to this Version
Since different major versions of LOGINventory can be installed on a machine in parallel, a separate version-specific application is created in the IIS Manager for each version by default.
Danger
To avoid having to reprint all labels or adapt all calling programs in case of an update of the main version (e.g. change from LOGINventory9 to LOGINventory10), we strongly recommend to use a version-independent URL instead of a version-specific one.
This can easily be achieved by setting up a redirection rule so that all calls from .../LOGINventory/... are redirected to .../LOGINventory9/....
The setup of such a redirection rule is possible by clicking on the corresponding button.
Since the redirection rule (URL rewriting) is not a standard feature of IIS, it may be necessary to install it later. To do this, the wizard downloads the setup for this feature from the Internet and executes it. If the machine does not have an Internet connection, the address of the download is displayed. The download can then be run on another machine and the setup copied to the LOGINventory machine. In any case, the default configuration can be used when setting up the IIS Rewrite Module.
Once the module is installed, you can create the corresponding redirection rule by clicking the button:
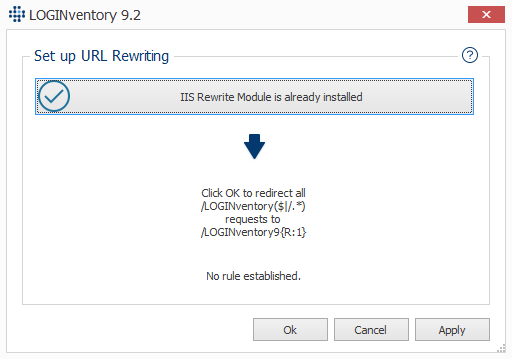
Now it is also visible in the wizard which redirection rule is currently active.

Tip
This way, when switching to a new major version, the upgrade can first be tested and all required settings can be made before "the switch is flipped" by adjusting the rule and all calls to the URLs point to the newly installed version.
Conclusion
The final page displays the URL where the web viewer is now accessible.
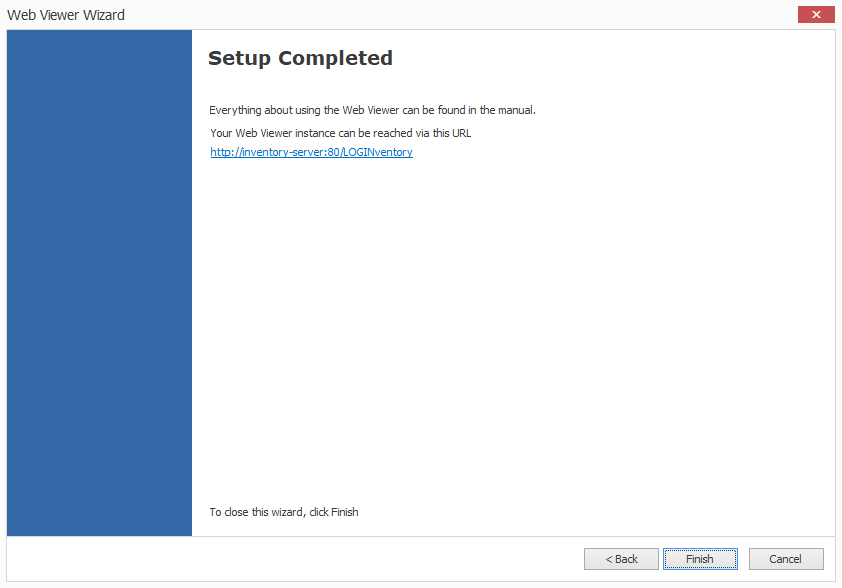
Appending /search.aspx to this address opens a web page with a search window. From here you can jump to the details pages of the respective devices.
Configuration
The published website can be configured via the Internet Information Services (IIS) Manager (found via the Start Menu -> Search for "IIS"). Especially the settings for Authentication should only be changed by experienced users who know what they are doing. By default the following settings are set here:
| Name | Status |
|---|---|
| Anonymous Authentication | Disabled |
| ASP.NET Impersonation | Disabled |
| Basic Authentication | Disabled |
| Forms Authentication | Disabled |
| Windows Authentication | Enabled |
Important
Only with these settings is it guaranteed that the Authorization Concept is considered and that users can only see the nodes shared for them.
Access Permissions
Users with the Administrator role have unrestricted access to all pages. Depending on the option "Allow read access for guests on the Web Viewer asset and user details page" in the Settings, the following access rights apply to the other roles:
| Page / Function | Without "Allow read access for guests…" option | With "Allow read access for guests…" option |
|---|---|---|
| Asset Details (write access) | Power Users | Power Users |
| Asset Details (read access) | Power Users | Guests, Users, Power Users |
| User Details (own user) | All roles (including Guests), but only own account | All roles (including Guests), but only own account |
| User Details (other users) | Power Users | Guests, Users, Power Users |
| Search Page | Power Users | Guests, Users, Power Users |
| Asset Editor | Power Users | Power Users |
| AI Assistant LIA | — (Administrators only) | — (Administrators only) |
| Web Console | All roles (only shared nodes) | All roles (only shared nodes) |
If different restrictions are desired, they can be configured on the LOGINventory server in the file system in the directory C:\inetpub\wwwroot\LOGINventory9 for the respective aspx files via share permissions to set which users or groups have access to these pages.
Info
If you have just made changes to the roles or shares, it may be necessary to restart IIS for the changes to take effect immediately. This can be done, for example, via the command line with iisreset or via the IIS Manager.
Using the Web Viewer
Usage of the Asset Details and User Details pages is explained in detail in the documentation on handing out and returning devices.
In the Web Console, all data views of Queries and Dashboards are available via the default page (see above) and the export of data in various formats is also supported.
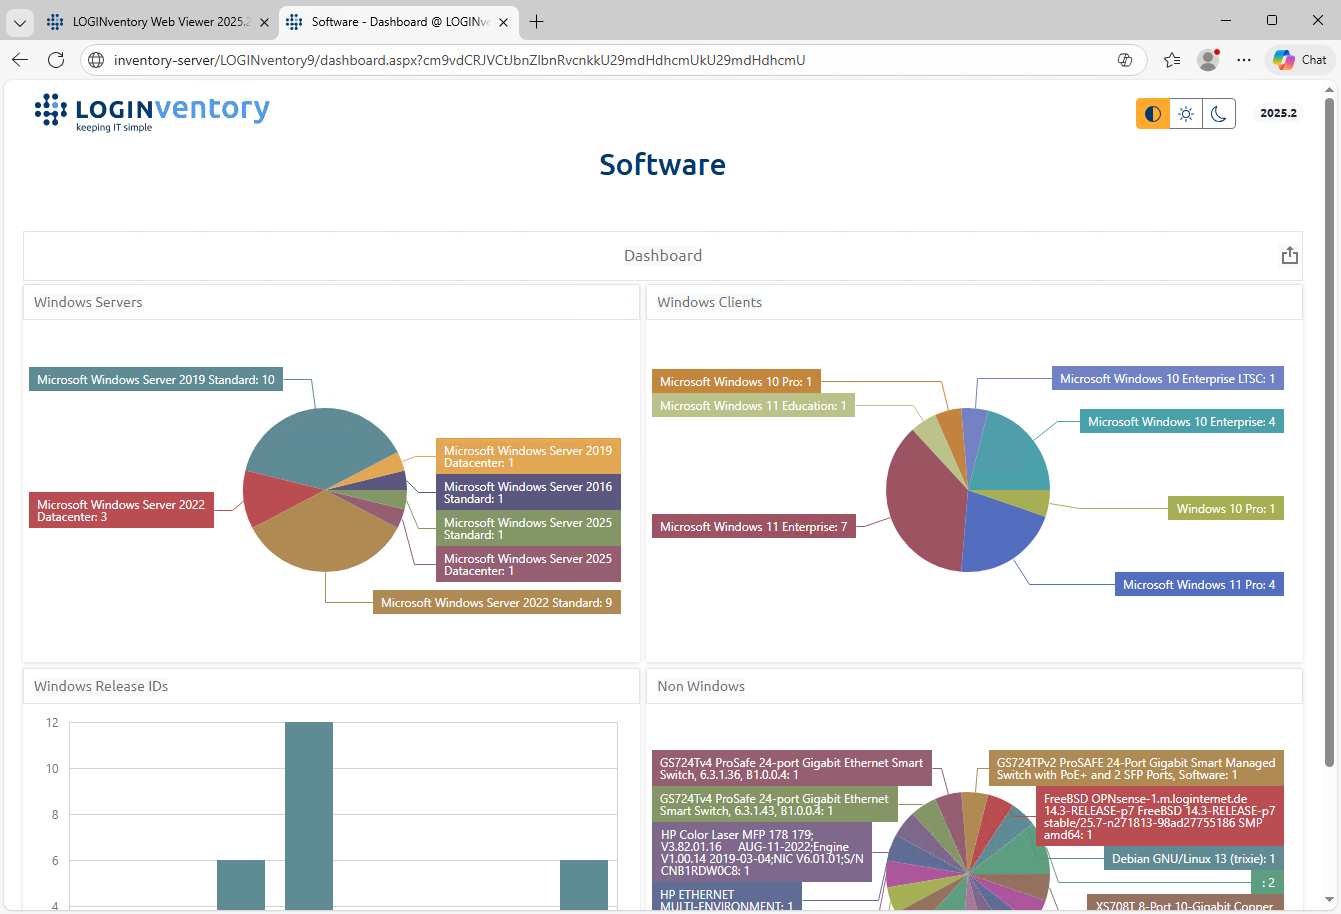
In the Web Console, Dashboards can be displayed and interacted with (e.g. filtering, drill-down, ...). Using the corresponding button, it is also possible to generate a special link that displays only the dashboard, but not the tree structure.
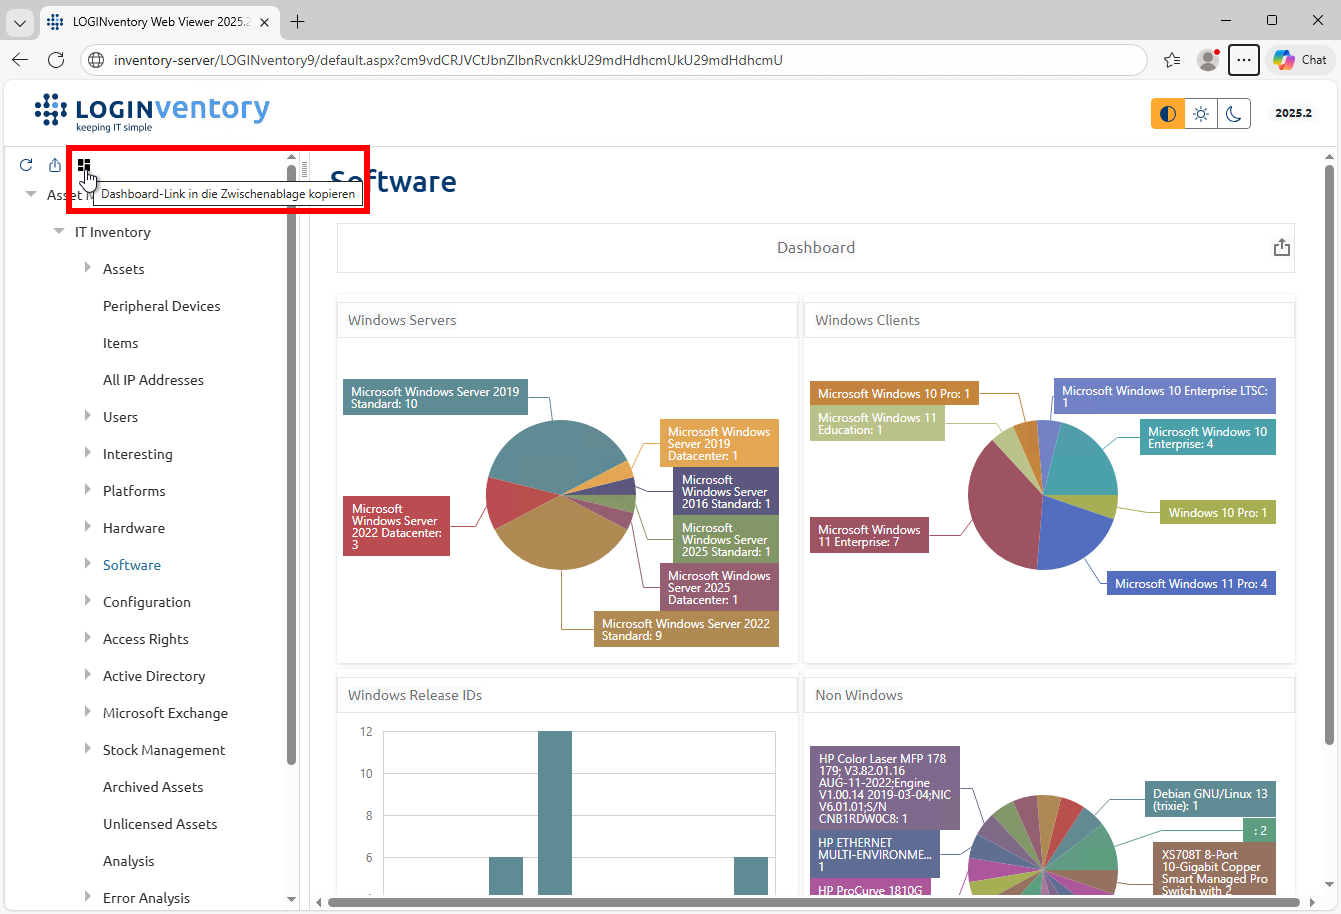
This link is very suitable for sharing with other people, for linking in the intranet, or for permanent display on a dashboard monitor. Nevertheless, the Authorization Concept is observed here, so users who call this link can only access the data if the dashboard has been shared with them.
Tip
It is possible to use the Pin as View option of a dashboard to define it as a view for a folder. This is especially useful in the Web Console. If you pin a dashboard as the view for the Asset Management node, it will be shown directly once you open the Web Console.
Between the different pages, you can switch via the navigation menu in the top right.
Tip
The URL extension ?pcuid=DEVICENAME can be used to jump directly to individual assets. This is useful if you want to call LOGINventory from other programs.
?node=NODEPATH. The following syntax is used for the node path: The $ character is used as a separator for subfolders, a space is replaced by a + and the English node name is always used. For example, the path to the node "Software" -> "Software Packages" is ?node=root$IT+Inventory$Software$Software+Packages. To make it easier to find the right link, you can click on the text "Link to this node" and the full linkable path will be displayed in the browser address bar.