Tasks and Notifications
Tasks and notifications are used to automate processes. You can use it to be notified both in the user interface and by email if a specific condition is met; you can have queries or documents stored in specific locations according to specified schedules; or you can run a Powershell script. All in all, a large number of application scenarios are conceivable.
Examples: You can...
- Receive an email when the antivirus definitions are out of date somewhere.
- Get an overview of the critical events of the last seven days sent to you once a week.
- Get notified if new devices have been added.
- Receive an email in case of license violations.
- Be warned where the warranty expires in the next three months.
- Receive reminders of which contracts automatically renew next month.
- Have an updated emergency manual stored on a network drive once a week.
- Send the latest client documentation monthly.
- Create an incident in an external system using a script.
- And much, much more.
Creating Tasks
You can use the wizard from the ribbon menu to create tasks if you are on the Tasks and Notifications node. Or you can navigate directly to the node in the tree structure on which you want to position a task and select Edit Task from the ribbon menu.

If the task is created with the help of the wizard, you must first determine to which node in the tree structure the task is to refer.
Info
If a dynamic document is to be exported or sent by e-mail, the task can be positioned directly on the document.If a report is to be exported, the task must be positioned on the query to which the report is to be applied.
Then you can define the following in both cases
- What name the task should have,
- Whether a condition must be fulfilled for the task to be executed,
- The schedule according to which the task is started,
- The actions to be carried out.
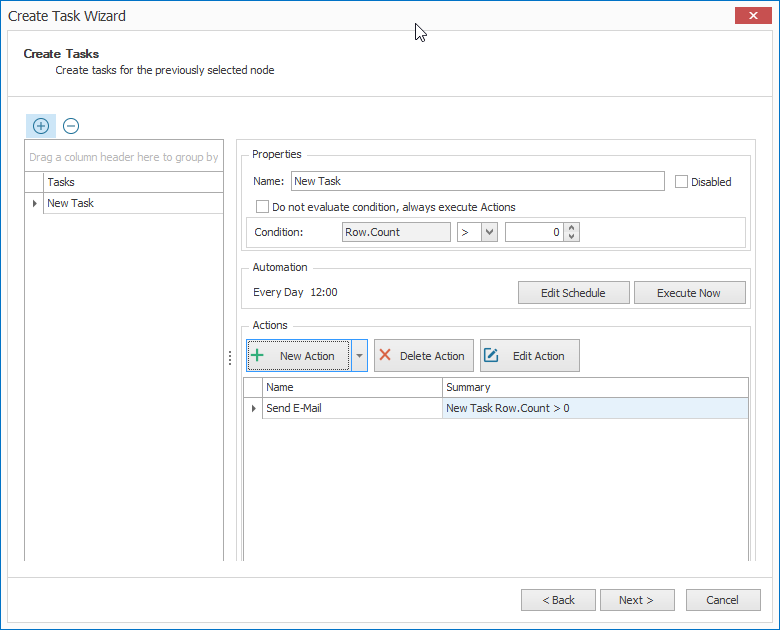
Of course, several tasks can be created per node as well as several actions for each task.
Info
Tasks can be disabled, whereupon the schedule is ignored and the jobs are no longer executed automatically.
The possible settings are described in detail below.
Selection of the Condition
In principle, you can choose whether a condition is to be evaluated or whether the task must always be executed. As a condition, the number of result rows can be compared with a fixed value.
Typically, Row.Count > 0 is
often selected
as the condition here, which means that the action is only performed if the query has result rows.
Example
If an action is to be executed only if critical events have occurred in the last 7 days, the corresponding query must filter on Event.Level is Critical and Count7Days is greater than 0. Then the condition Row.Count > 0 can be selected. If the action should always be executed, no matter if critical events have occurred, the checkbox "Do not evaluate condition, always execute actions" should be set.
Storing the schedule
A separate schedule can be defined for each action, according to which the task is executed. You can also define end dates after which the task is no longer to be executed.
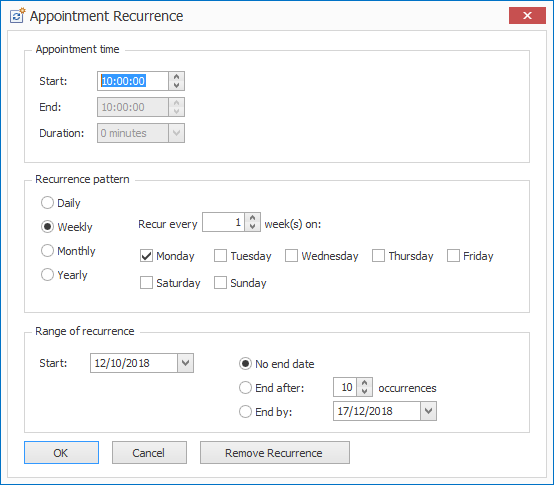
If a condition has been defined, it is then evaluated at the appropriate time.
Info
If an immediate notification of a change of a certain value is desired, it is therefore advisable to have the condition evaluated shortly after completion of the scan process.
Creating the Action
Several actions can be defined for each task. So you can send e-mails and save files at the same time.
Send Email
Here you can define from which address the e-mail is sent to which address with which subject, what the message content is and whether the result data should be attached in PDF or Excel format. In addition, you can define whether a report should be attached to the e-mail.
Info
If no e-mail is entered, the standard e-mail stored in the settings is used.
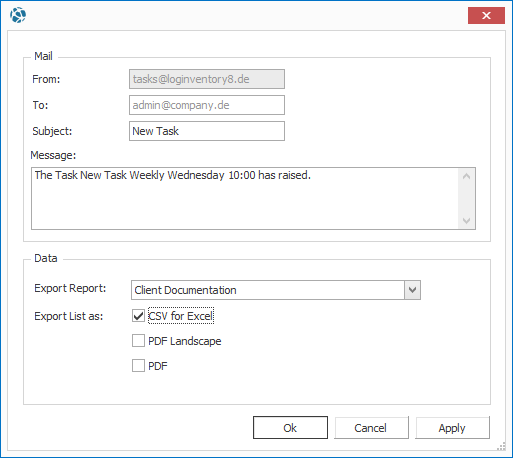
Attention
Make sure that in the Settings the correct mail server is stored and let the e-mail be sent best once as a test by clicking on the button "Test".
Save as File
In this menu you can define in which format (Excel or PDF) the result list should be saved. You can also select whether a report is to be saved additionally. If a location is selected, you can also define whether the timestamp should be appended to the file name, for example to allow older versions to be kept in the same folder.
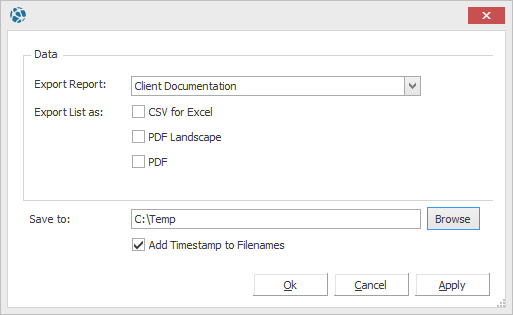
Attention
If the exported documents are to be stored in a UNC path, this may not be possible with the default settings. The Event Viewer may then display an "Access Denied" error message. This indicates that the LOGINventory8 Automation Service service account (default "Local Service") does not have access to the specified path. To change this you can adjust the used account in the Windows services settings (services.msc) (e.g. to your domain user or another user with access).
Run Powershell Script
A task can trigger the execution of a Powershell script. For this purpose any .ps1 files can be stored, and thus further actions can be defined. The script receives a $data parameter as a passing parameter, which contains a .csv export of the selected data view.
Attention
When running the Powershell scripts we are not dealing with the LOGINventory powershell, but with the Windows powershell! This means that general actions can be executed. If you want to automate tasks in the context of LOGINventory-Powershell, this is also possible, but first you have to initialize the LOGINventory-Powershell from the Windows-Powershell!
Example
This allows you, for example, to create an incident in an external system if devices were found in the inventory for which the antivirus definitions are not up-to-date.
The structure of the Powershell script can look like this:
param (
    [string]$data
)
Import-Csv $data -delimiter ";" |
Set content "C:\Temp\ps\x-out.csv"
ForEach Object {
    Write-Host $_.Name
}
When a script is selected, it is stored in the database. This script can then be used again for other tasks.
Overview of Tasks
All created tasks are listed in the Tasks and Notifications node. Here you can also see directly according to which schedule the tasks were evaluated and if and when they were last executed.
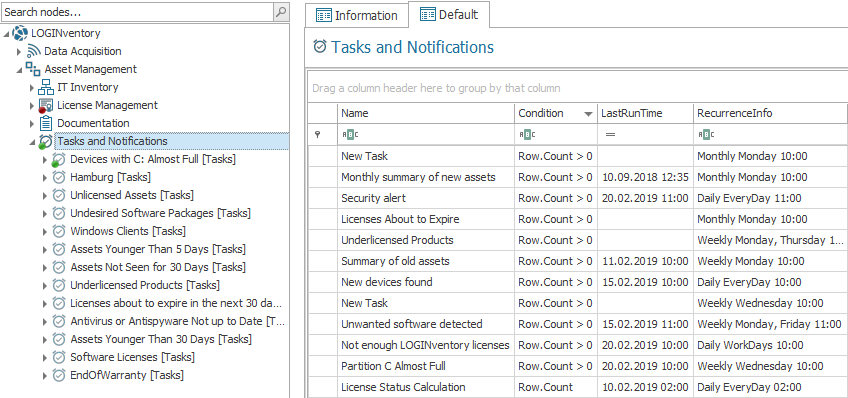
If a task was successfully executed, a green circle is also displayed above the task icon to indicate this. If the task is clicked and the tree is reloaded, the green circle disappears and the user has marked the note as "acknowledged".
The individual tasks are also listed in the nodes below the Tasks and Notifications node, and for each task you can see when it was executed, what results it delivered, and so on.
Info
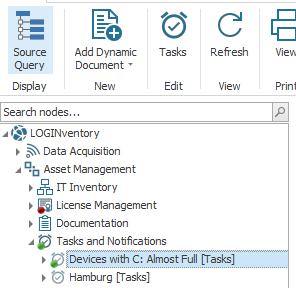 To jump to the query to which the task refers, select Display - Source Query from the ribbon menu.